< Previous | Contents | Next >
Introduction to the Camera Raw Palette
When a timeline uses clips that are linked to camera raw source media recorded from cameras from Blackmagic Design, RED, ARRI, Sony, and Vision Research, all clips in raw media formats are initially debayered using the settings found in the Camera Raw panel of the Project Settings.
However, if there are individual clips that you want to apply different raw settings to, for example altering the ISO to pull more detail out of the highlights or shadows, then you can use the controls found in the Camera Raw palette to individually alter the parameters found within.
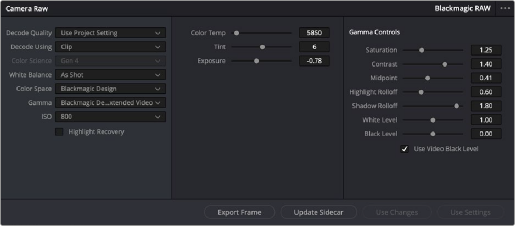
The Camera Raw palette showing the available parameters for Blackmagic RAW media.
The Camera Raw palette is automatically set to the mode (seen within the Mode drop-down menu) that is appropriate to the clip that’s currently selected. If the current clip is not in a raw format, then the parameters within the Camera Raw palette are disabled.
All settings that currently populate the Camera Raw palette are also accessible from the DaVinci control panel.
![]()
1 Press the CAMERA RAW soft key on the Center panel.
2 Use the Center panel knobs to make camera raw parameter adjustments.
3 When you’re finished, press the MAIN soft key to return to the main page of controls.
This section covers general use of the Camera Raw palette. For in-depth documentation about specific camera raw parameters, see Chapter 7, “Camera Raw Settings.”