< Previous | Contents | Next >
Different options are entered automatically by various actions:
— You can double-click any clip to open it into the Viewer as a Source Clip (the left button)
![]()
— You can view an entire bin full of clips in the Source Tape (the middle button)
— You can play your edited program in the Timeline (the right button)
Eight controls sit at the bottom of the Viewer. These let you play through and otherwise navigate clips and the Timeline in different ways.
Clicking the Tools button in the lower left of the Viewer reveals an effects toolbar that you can use to add and edit clip effects, right within the Viewer with no Inspector needed. The Tools button reveals a variety of controls over sizing, cropping, audio, speed effects, stabilization, dynamic zoom, and compositing, covered in more detail later in this chapter.

The Tools bar shown opened
Audio Meter
An audio meter to the right of the Viewer shows you a graphical representation of the audio levels playing in the current clip or in the Timeline as you play through the Viewer, via animated vertical bars that are tinted to indicate how loud the levels are.
The Timeline
The word “timeline” refers both to an edited sequence of clips which constitutes a program that is stored in the Media Pool, and to the area of the Cut page interface where you can open this sequence of clips to see its contents, and for playback and editing.
For the Cut page user, the timeline is divided into an Upper Timeline at the top, and a larger and more detailed Timeline Editor showing a zoomed in portion of the timeline around the playhead at the bottom. Working together, these two views of your edited sequence make it possible to navigate your entire project and cut in great detail.
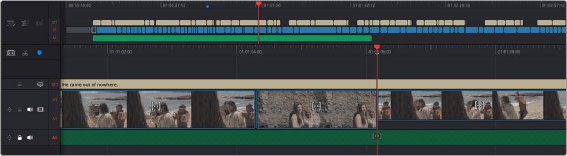
The Timeline of the Cut page, comprising the Upper Timeline and the zoomed in Timeline
Three icons at the upper left-hand corner of the Timeline lets you choose a variety of timeline tasks. They are composed of Timeline Options, Timeline Actions, and Edit Actions.
![]()