< Previous | Contents | Next >
Printer Light Step Project Settings
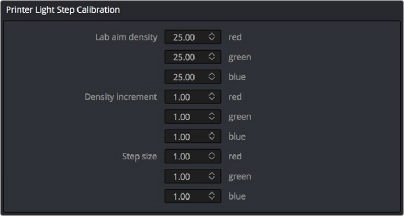
The increments used by the Printer Point buttons are defined by the Printer Light Step Calibration parameters, found in the Color panel of the User Preferences. The default settings are designed to emulate traditional film printer adjustments, but these settings can be customized to align
DaVinci Resolve’s printer points adjustments with those of a particular film lab’s equipment. However, if you’re not working with a lab, you can change the Step and Density settings to alter how much of an adjustment each printer point makes according to your own preferences. For more information,
see Chapter 4, “System and User Preferences.”
TIP: If you’re feeling left out because all the cool kids are using printer points and you’re unfamiliar with them, making the Parade scope visible is a great way to learn how these adjustments work while seeing their specific effects on the red, green, and blue channels of the video signal.
TIP: If you’re feeling left out because all the cool kids are using printer points and you’re unfamiliar with them, making the Parade scope visible is a great way to learn how these adjustments work while seeing their specific effects on the red, green, and blue channels of the video signal.
TIP: If you’re feeling left out because all the cool kids are using printer points and you’re unfamiliar with them, making the Parade scope visible is a great way to learn how these adjustments work while seeing their specific effects on the red, green, and blue channels of the video signal.
![]()
Controls in the Color panel of the User Preferences to adjust Printer Point functionality