

< Previous | Contents | Next >
Meanwhile, Light exposure adjustments affect everything in the image from -1 stops all the way through maximum white.
(Left) The original image, (Right) Lightening all highlights by raising the Light exposure adjustment
This ability to make open-ended adjustments to image contrast in different overlapping ranges of shadow and highlight tonality makes these controls uniquely suitable for HDR grading, while also being completely suitable when grading at SDR levels. Also, keep in mind that all contrast adjustments in the HDR palette keep saturation constant as contrast increases or decreases.
This is particularly useful when making large contrast adjustments to HDR images, for which a 300 nit expansion of highlight contrast using the Lift/Gamma/Gain or Log controls would create a huge saturation increase. Using the HDR palette to expand highlight contrast keeps image saturation
perceptually the same, while offering zone-specific saturation controls that let you choose whether to increase or decrease the saturation falling within that zone.
Exposure adjustments to zones that overlap other zones are smoothly combined to allow targeted contrast adjustments, while making it relatively easy to avoid unwanted artifacts, like contouring or solarizing due to overzealous inversion of the curves caused by these operations.
An Example of Zone-Based Exposure Adjustment
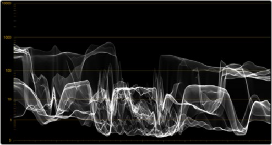
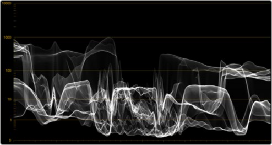
To see this in action, let’s see what happens when we make some overlapping adjustments to the Light, Highlight, and Specular zones in order to grade some HDR highlights, focusing our attention on the Waveform scope, since it’s difficult to see HDR grades in print. Keep in mind that you won’t usually be making Zone-based Exposure adjustments by themselves. This example image has had a Contrast/ Pivot adjustment to push the midtones and shadows down, to give the shadows greater definition.
![]()
Then, Black Offset is raised to lift the darkest shadows up just a little bit, so they can breathe. This leaves us with an image that’s mostly under 200 nits to begin with. A perfect starting point for us to begin sculpting those highlights.
(Left) The original image; (Right) After changing Contrast/Pivot and raising Black Offset
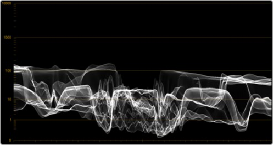
Using the default preset, making an exposure adjustment to the Light zone smoothly raises everything in the source image above -1 stops on the Zone graph. Practically, it’s stretching up all levels above 10 nits on the HDR scope. This smoothly boosts the brighter part of the image, while leaving the shadows down where we put them.

(Left) The previous adjustment; (Right) After raising Light Exposure
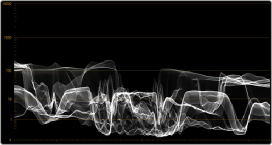
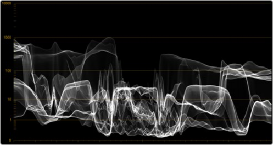
At this point, making an exposure adjustment to the Highlight zone boosts all levels above 1.5 stops on the Zone graph. Again, practically speaking, all levels above 100 nits are being boosted,
brightening the top highlights. In the image, you can see that we’re creating a greater differentiation between dimmer and brighter highlights in the image, creating highlight contrast with greater detail where once there were simply flat pools of light.
(Left) The previous adjustment; (Right) After raising Highlight Exposure
![]()
Now, this might be a fine place to stop, but since we’re interested in turning the HDR in this image up to 11, we can put the highlights over the top by making one more Exposure adjustment, to the Specular zone. The Specular zone starts at 4 stops and is designed to let you boost or attenuate only the very brightest, hardest highlights, likely corresponding to specular details such as chrome
reflections, eye glints, and directly photographed light sources. You won’t always use this control, but it’s useful to know about.
In this example, the default Specular Zone Min Range control is outside of the available image data in the image (seen as the right edge of the histogram in the Zone graph), so making adjustments with this control won’t do anything. However, dragging the Min Range control to intersect the end of the histogram will allow these controls to affect the very brightest pixels in the image.
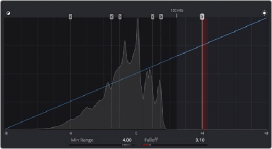
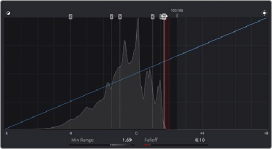
(Left) The original distribution of zones in the Zone Graph; (Right) Dragging the Specular Min Range handle to intersect the brightest highlights in the image histogram, to allow the Specular controls to affect that part of the image
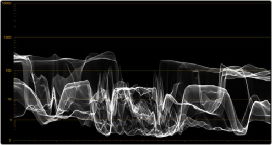
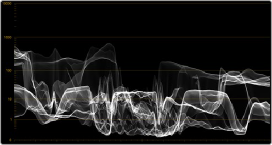
Now, the Specular Exposure control lets us push the very brightest pixels of our image up, further differentiating them from the other highlights, and widening the audience’s sensation of highlight contrast.
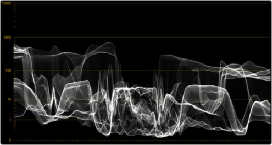
(Left) The previous adjustment; (Right) After raising Specular Exposure to bring the very brightest highlights to 1000 nits
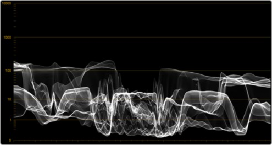
Now, having selectively boosted the Highlight and Specular zones, you might decide that you like the differentiation that’s been created among different brightnesses of highlights, but the overall highlights are too bright. This is easily fixed by lowering the Light zone’s Exposure adjustment. As a
![]()
result of this one adjustment, all of the highlights are scaled down, while the adjustments you’ve made to the Highlight and Specular zones maintain a relative influence on the parts of the image they’re brightening. The Shadow, Dark, and Black controls work similarly, but for the shadows.
(Left) The previous adjustment; (Right) After lowering Light Exposure, all levels smoothly scale down to reduce the brightness of the highlights while keeping the differentiation you’ve created with the Highlight and Specular controls.
Now that you’ve seen how all overlapping Zone adjustments work together to create a seamless adjustment, it’s time to look at the Zone controls in more detail.