
< Previous | Contents | Next >
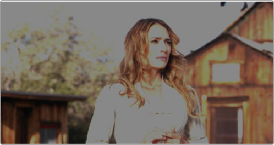
Using High Soft Clip to pull highlight details into the viewable range
Ganging and Unganging Soft Clip Controls
Soft clipping can be simultaneously applied to all three color channels by enabling the Ganging control (on by default), or you can disable Soft Clip ganging to individually adjust each channel. For example, using soft clipping on individual channels can be useful for legalizing RGB out-of-gamut errors for channels that over- or undershoot your QC standards.
— Click the channel control button corresponding to the color channel you want to edit, and then drag the sliders to create the desired adjustment.
TIP: Applying too much soft clipping to individual color channels may add an unwanted color tint to the corresponding highlights or shadows of an image. To avoid this, use the soft clipping parameters with ganging enabled to clip all three color channels equally.
TIP: Applying too much soft clipping to individual color channels may add an unwanted color tint to the corresponding highlights or shadows of an image. To avoid this, use the soft clipping parameters with ganging enabled to clip all three color channels equally.
TIP: Applying too much soft clipping to individual color channels may add an unwanted color tint to the corresponding highlights or shadows of an image. To avoid this, use the soft clipping parameters with ganging enabled to clip all three color channels equally.
— Click the Ganging control to the left of the Soft Clip channel controls.
![]()
Soft Clip Controls
Whether all channels are ganged or not, soft clipping is controlled via two sliders and two additional parameters for each color channel.
High
The High Clipping Point slider lets you adjust the maximum signal level above which the signal is clipped. Any pixels above the clipping level are made equal to the clipping level.
The High Clipping Point defaults to a digital level of 1023 relative to the DaVinci Resolve internal video scopes. Dragging this slider to the left causes the highlights of the image to clip at a lower level, resulting in lower, dimmer maximum levels.
![]()
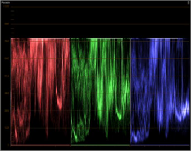
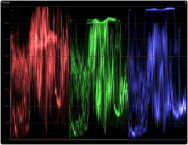
Selecting and adjusting the high clip
RGB Parade displays the clipped image
At the default position, no clipping occurs and image data that you push above 1023 on the internal scopes is preserved and passed through the image processing pipeline to subsequent nodes.
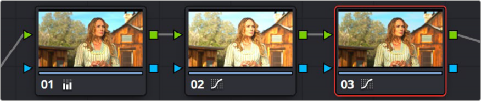
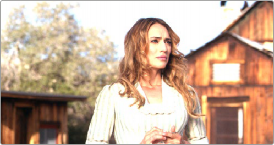
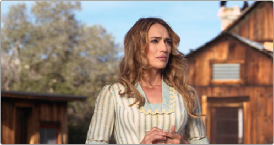
For example, in the following two screenshots, the highlights in the screenshot at top are blown out raising the gain dramatically in Node 1. In the screenshot at bottom, a subsequent adjustment in Node 2 lowers the gain and retrieves all the previously clipped values.

![]()
The image is clipped using the Gain control in Node 2
The image data that was clipped in Node 1 is retrieved in Node 3 by lowering the Gain control. This illustrates the preservation of deliberately clipped data.
However, if at any point in a node tree you drag the High Clip slider to the left, even by a single digit, all image data above the new clipping threshold is discarded from that node forward. In the following example, the High Clip slider in Node 1 is lowered. The result is that all clipped image data
is discarded. As a result, when Node 2 lowers the gain, there is no image detail left to retrieve, and all three channels exhibit flattening.
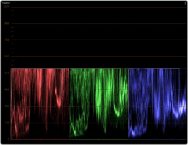
Lowering the High Clip slider in Node 1 forces all image data above the new High Clip threshold to be irretrievably discarded. Clipped data cannot be brought back by subsequent nodes.
High Soft

IMPORTANT: Image data that was clipped “in camera” is not necessarily retrievable using the Soft Clip controls, although there may be some preserved overhead in the super-white highlights of Y’CbCr-encoded video data.
IMPORTANT: Image data that was clipped “in camera” is not necessarily retrievable using the Soft Clip controls, although there may be some preserved overhead in the super-white highlights of Y’CbCr-encoded video data.
IMPORTANT: Image data that was clipped “in camera” is not necessarily retrievable using the Soft Clip controls, although there may be some preserved overhead in the super-white highlights of Y’CbCr-encoded video data.
The High Soft slider sets the threshold, below the clipping point, at which highlights begin to compress before hard clipping. At unity, no soft clipping occurs. As you raise this value, more and more of the clipped highlight values are compressed, rather than clipped, resulting in softer, more pleasant “glowing” highlights.
Low
The Low Soft Clipping Point slider lets you adjust the minimum signal level at which the signal clips. This defaults to a digital level of 0 relative to the DaVinci Resolve internal video scopes. Dragging this slider to the right causes the shadows of the image to clip at a higher level, resulting in lighter minimum levels, and a lower-contrast image with lighter (possibly milky) shadows.
![]()
Low Soft
The Low Soft slider sets the threshold, above the minimum clipping point, at which shadows begin to compress before hard clipping. At unity, no soft clipping occurs. As you drag this slider to the right, more and more of the clipped shadow values are compressed, rather than clipped, resulting in a softer, more pleasant rolloff in the shadows.