< Previous | Contents | Next >
— Six-Vector Color Patches: The Hue curves each have six buttons for automatically adding control points to manipulate the red/yellow/green/cyan/blue/magenta ranges of hue. Clicking any of these buttons adds three control points; two to define the outer range of hue to be adjusted, and a middle control point that you use to make the adjustment.
— Input and Output (Hue Rotate/Saturation/Lum) fields: These two number fields correspond to the horizontal and vertical adjustment values for the currently selected control point. Click any control point on a curve to view or alter these values. The label of the second field depends on the curve that’s selected.
![]()
![]()
![]()
![]()
The following sections describe each available curve in more detail. Each type of curve is accessed by selecting the appropriate icon in the upper right of the Curve Palette.
![]()
Custom | Hue vs. Hue | Hue vs. Sat | Hue vs. Lum | ||
Lum vs. Sat |
| Sat vs. Sat |
| Sat vs. Lum |
![]()
Hue vs. Hue
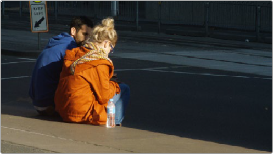
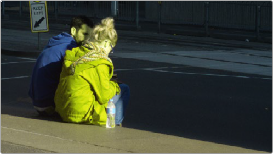
The Hue vs. Hue curve lets you change any hue to any other hue. In the following example, the image on the left is the unadjusted original. The image on the right has had the orange jacket shifted to an olive green via a set of three control points.
![]()
Changing the hue of the woman’s jacket using the Hue vs. Hue curve; Left–original image, Right–altered image
One excellent use of the Hue vs. Hue curve is to quickly and subtly alter elements that require only minor adjustments. For example, a sky that appears a bit too cyan can be made into a richer shade of blue with a small adjustment.
Hue vs. Hue is also useful for making more radical changes to elements that might be too noisy to key successfully using the HSL qualifier controls. For example, red autumnal foliage blowing in the wind might result in a chattery matte, but you can use the Hue vs. Hue curve to change reds to greens, without having to worry about aliased matte edges giving your correction away.