< Previous | Contents | Next >
You can either use the Color Warper as it appears docked into the middle palette area, or you can click the Expand button to open the Color Warper into a floating window that you can make as large as you like, giving you more detailed control of dense grids of control points. For convenience, the examples in this chapter show the Color Warper side-by-side with the Viewer, in a floating window. While the Color Warper is open in its own window, the Color Warper palette button in the toolbar turns into a “re-docking” button, clicking it puts the palette back in the palette area below.
![]()
![]()
(Left) Clicking the Expand button opens the Color Warper into a floating window, (Right) Clicking the Re-docking button in the palette toolbar puts the palette back.
There are two overall regions of the Color Warper palette. At the left, the grid area has the actual warping grid with points you manipulate to make adjustments, while controls underneath let you choose the resolution of the grid and the color space in which it works. At the right, the control area provides all the tools, range controls, and feathering controls that are available for manipulating the warping grid in a variety of highly specific ways.
Using the Grid Controls to Manipulate Color
This palette has two modes; each lets you manipulate the colors of the image in different ways, and each has a different style of grid used for warping the different color channels that are affected. Learning how to manipulate the color warping points of each of these grids is central to understanding how this palette works.
![]()
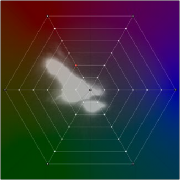
(Left) The radial grid in Hue-Saturation mode, (Right) The two rectangular grids in Chroma-Luma mode
Dragging to Warp Colors
Despite the different shapes, each of these grids are manipulated in similar ways. Dragging a control point alters whatever color corresponds to that point, while the colors that surround this dragged point are also adjusted proportionally according to their location between the point being dragged and surrounding points that either (a) aren’t affected, or (b) are locked into place. Locked points prevent the colors at those points from being changed. By locking some parts of a grid and dragging other parts, you can create sophisticated hue-specific adjustments.
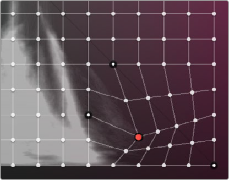
The orange control point has been selected and dragged to make an adjustment.
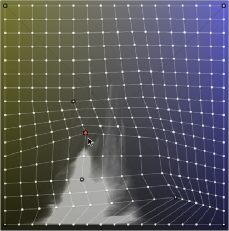
Control points with black outlines are locked in place and help prevent control points on the opposite side from being moved. All other control points between the selected and locked control points are stretched or squished depending on the selected point’s adjustment.
The image above shows the three states of control points in the grid:
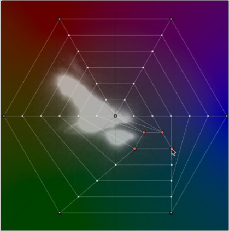
— Orange: Selected points appear orange. You can select multiple points by Command-clicking multiple points, by dragging a bounding box over multiple points, or by using the draw selection tool to click and draw over any points you want to select. Once you’ve selected and moved a control point, it becomes locked to keep that adjustment in place.
Selected points appear orange; in this example four points are selected to move them all together.
![]()
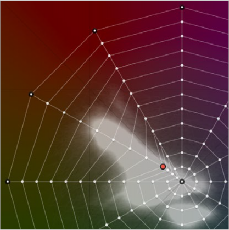
— Outlined: White control points with a black outline are locked. Locked points do not move automatically when nearby points are dragged, so locked points are important for preventing specific colors you don’t want altered from being changed, as well as for saving changes to points that you’ve adjusted. All adjusted points become locked. The outer corners of the Chroma-Luma grid are locked, as is the outer ring and center point of the Hue-Saturation web.
Locked points with black outlines keeping other colors in the image
from being adjusted by the selected point
— White: White control points are neither selected nor locked, and will be stretched or squished when adjacent control points are moved.
Unlocked control points between a selected point and locked points (in this case the corners of the grid) will squish and stretch to warp an entire range
of color as you drag.
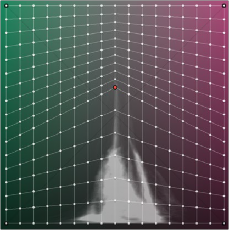
While control points work much the same in either the Hue-Saturation or Choma-Luma modes, there are some important differences. The radial “spokes” of the Hue-Saturation wheel don’t influence neighboring spokes, so any adjustment you make to a control point on one spoke only affects the colors that fall between it and the two neighboring spokes that surround it. This means it’s not necessary to lock control points on neighboring spokes of this wheel-shaped grid to prevent them from changing.
Adjustments made to control points on one “spoke” of
![]()
the Hue-Saturation wheel grid don’t affect those on neighboring spokes, which act as if they’re locked, even though they’re not.

TIP: Dragging the locked center point of the Hue-Saturation grid lets you alter the color of the white point, while proportionally warping all other colors in the image to smoothly accommodate this change. This can be the starting point of a lot of different looks.
TIP: Dragging the locked center point of the Hue-Saturation grid lets you alter the color of the white point, while proportionally warping all other colors in the image to smoothly accommodate this change. This can be the starting point of a lot of different looks.
TIP: Dragging the locked center point of the Hue-Saturation grid lets you alter the color of the white point, while proportionally warping all other colors in the image to smoothly accommodate this change. This can be the starting point of a lot of different looks.
Both the Hue-Saturation and Chroma-Luma warper grids lock the outer boundary of the grid. You can still drag these points to adjust them, but they can’t be unlocked and they won’t move automatically when you adjust other control points. The Hue-Saturation grid has an additional point locked right in the center, which keeps the neutral colors (black through gray and white) neutral.