< Previous | Contents | Next >
Using the High-Visibility Power Window Outline Option
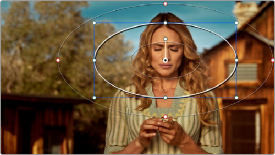
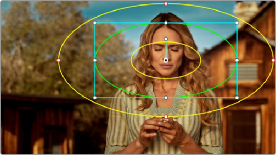
Ordinarily, Power Window outlines are white (for the center shape) and gray (for the softness shapes). However, sometimes this color scheme can be difficult to see, so the Color panel of the User Preferences has an option in the General Settings section called “High visibility Power Window
outlines.” Turning this on sets Power Window outlines to be drawn as green (for the center shape) and yellow (for the softness shapes), to make these windows easier to see in certain circumstances.
(Left) Default window outlines, (Right) High Visibility window outlines enabled in the Color panel of the User Preferences
Window Transform Controls
Windows have transform parameters that are similar to those found in the Sizing palette. These parameters let you alter the window, affecting all of its control points together.
![]()
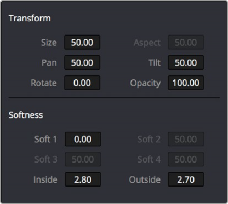
Window transform controls
— Size: Scales the entire window up or down. 50.00 is the default size.
— Aspect: Alters the aspect ratio of the window. 50.00 is the default value, larger values make the window wider, and smaller values make the window taller.
— Pan: Repositions the window along the X axis. 50.00 is the default position, larger values move the window to the right, smaller values move the window to the left.
— Tilt: Repositions the window along the Y axis. 50.00 is the default position, larger values move the window up, smaller values move the window down.
— Rotate: The default value is 0. Increasing this parameter rotates the shape clockwise, decreasing this parameter rotates the shape counterclockwise.
— Opacity: Lets you vary the transparency of an individual window’s contribution to a node’s key.
— Convergence: When “Apply stereoscopic convergence to windows and effects” is enabled in the General Options of the Project Settings, this additional Transform parameter appears that lets you create properly aligned convergence for a window placed onto a stereoscopic 3D clip.
For more information about working with Stereoscopic 3D projects, see Chapter 15, “Stereoscopic Workflows.”
The transform parameters also correspond to onscreen controls found in the Viewer, which can be manipulated directly using the pointer.
Manipulating the window position on the Viewer
While many of the onscreen controls correspond to parameters within the Window palette, some onscreen controls, such as the control points that govern reshaping linear, polygonal, and Curve windows, are only adjustable via the pointer.
— To select any window: Click on one of an arrangement of many windows to select it, making that window’s controls active.
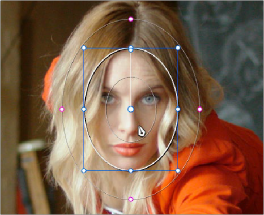
— To reposition any window: Drag anywhere within the window’s onscreen control. Window position corresponds to the Window palette’s Pan and Tilt parameters. For a gradient window, drag the center control point.
![]()
— To resize a circular window while locking its aspect ratio: Drag one of the four blue corner points out to enlarge, or inwards to shrink. This corresponds to the Window palette’s Size parameter.
— To squish or stretch a circular window, altering its aspect ratio: Drag one of the blue top, bottom, left, or right control points. These adjustments correspond to the Window palette’s Aspect parameter.
— To rotate a window: Drag the top inner white rotate handle, in the middle of the window. For a gradient, drag the bottom arrow handle.
— To alter window softness: Drag any one of the magenta softness handles. Different window shapes have different sets of handles, which correspond to the Softness parameters.
— To reshape a linear window: Drag any of the white corner handles to corner pin the window, or drag one of the white top, bottom, or side handles to move an entire side segment of the window around.