< Previous | Contents | Next >
If you find there’s a particular window shape or combination of windows that you use frequently, you can save one or more windows as a preset for easy recall whenever needed. For example, if you’re working on a documentary within which you find you need to do a lot of face brightening, you can create preset face ovals for close-up, medium, and wide shots, to save you from having to customize a stock circular window for every single new shot. You can also save groups of windows together as a single preset, in order to reuse complicated multi-window shapes.
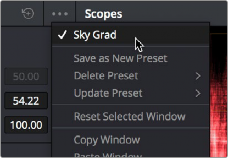
Window presets are available from a group of Presets controls in the option menu in the upper right- hand corner of the Window palette.
Controls for saving, applying, and deleting window presets
— To save a window preset: Once you’ve created one or more windows you want to save, click the Save as New Preset option in the Window palette’s option menu. Type a name into the resulting dialog, and click OK. That preset is now available in the Preset section of the option menu.
— To recall a window preset: Click to open the Window palette’s option menu, and choose a preset from the list. Loaded window presets overwrite whatever other windows were set up in that node.
— To update an already saved preset: Recall a preset, change the resulting window(s), then click to open the Window palette’s option menu. Select Update Preset, then select the preset name. This will overwrite the selected preset with the altered window arrangement.
![]()
— To delete a window preset: Click to open the Window palette’s option menu, and choose Delete Preset, then choose a preset from the list. Make sure you chose the correct preset name; there is no warning before the deletion, and you cannot undo the deletion once it’s done.
Once recalled, windows created by presets can be modified and tracked just like any other window.
Using Windows and Qualifiers Together
Another use of windows is to act as a “garbage matte” when used together with a qualifier. By default, when you use a window and qualifier together, a key is only output where both the window and qualifier intersect. This makes it easy to exclude unwanted parts of a key that are too difficult to eliminate by further refinement of the qualifier controls.
For example, the following qualification is intended to isolate the woman’s face, but some of the similarly colored wood and sky in the background is also included.
Instead of driving yourself crazy trying to eliminate the unwanted parts of the key by modifying the current qualification, which is doing a great job of isolating the skin tones, you could instead use a window to isolate her face, excluding everything outside the window, and simplifying your job considerably.
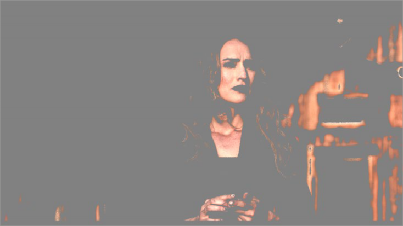
A qualified image with highlight on
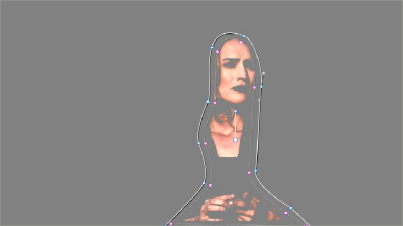
If she moves, then you can simply track the window to follow. Simple tracking is covered in Chapter 136, “Motion Tracking Windows.”
![]()
Now with additional Power Window isolation
Furthermore, you can use the window’s Invert control to do the reverse, excluding all qualified portions of the key inside the window, and including all qualified portions of the key outside the window.
If you need to build more complex qualifier/window combinations than this, you can add more windows, or you can use multiple qualifiers and windows with the Key Mixer node, which is discussed in Chapter 142, “Combining Keys and Using Mattes.”