< Previous | Contents | Next >
Finally, it is the Output Color Space that determines the final color space of your rendered result. While no image data is clipped during the Source to Timeline color space conversion, image data will be clipped during the Timeline to Output color space conversion in order for the final image to
conform to the color space being rendered and output, unless you use the Gamut Mapping options to compress image data during the Timeline to Output Color Space conversion.
The RCM Image Processing Pipeline
![]()
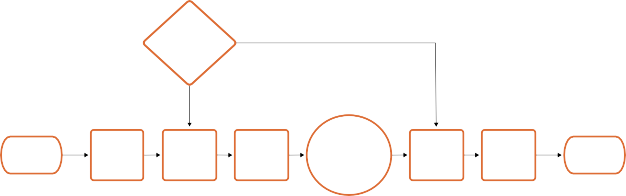
The previous explanation is, of course, simplified. To clarify the inner workings of Resolve Color Management for advanced users, the following flowchart presents a rudimentary overview of how every parameter works together to automatically manage the color of clips in your program.
Timeline Working Luminance
Affects Input DRT
Affects Output DRT
Source Media
Input Color Space
Timeline
Input DRT Color
Space
Your Grade
Output DRT
Ouput Color Space
Final Output
Manual Color Space Tagging
or
Source Media Color Space Metadata
or
Input Color Space Project Setting
Resolve Color Management’s image processing pipeline, illustrated
Identifying the Input Color Space of Different Clips
Central to the process of automated color management is knowing the color space and transfer function used by every clip of source media in your project. There are a variety of ways DaVinci Resolve can figure this out, in a cascading decision-tree that can be manually overridden if necessary. Deriving the Input Color Space involved the following stages of automated decision making:
1 If the source media is a camera raw format like .braw, .R3D, .ari, etc., DaVinci Resolve uses manufacturer-supplied colorimetry to automatically debayer the clip and identify its Input Color Space.
2 Otherwise, if the source media has embedded color space metadata (QuickTime or .MXF make this possible), then use that to identify the Input Color Space.
3 Otherwise, if there is no embedded color space metadata, use the default Input Color Space setting of the Project Settings to assign an Input Color Space to all otherwise unidentified clips.
4 If necessary, you can manually set the Input Color Space of clips in the Media Pool, which overrides both embedded color space metadata (in case it’s wrong), or the default Input Color Space setting (if you’re dealing with multiple color spaces). You cannot override the Input Color Space of camera raw media.
The following sections discuss each of these steps in more detail.
Using Camera Raw Formats
When you use RCM in a project that uses Camera Raw formats, color science data from each camera manufacturer is used to debayer each camera raw file to specific color primaries with linear gamma, so that all image data from the source is preserved and made available to DaVinci Resolve’s color managed image processing pipeline. As a result, the Camera Raw project settings and Camera Raw palette of the Color page are disabled, because RCM now controls the debayering of all camera
raw clips, and all image data from the raw file is available no matter which Timeline Color Space you choose to work within.
![]()
Using Source Media Color Space Metadata
When enabled, RCM automatically identifies the color space information of imported media that’s been either transcoded or recorded directly to supported non-raw media formats, reading the NCLC metadata of QuickTime-wrapped files, the color space metadata of .mxf-wrapped files, and the XML sidecar files that track color management in ACES workflows. This behavior is automatic; there are no visible controls governing this behavior aside from the individual Input Color Space and Input Gamma settings associated with each clip in the Media Pool.
Color Space Metadata in QuickTime
DaVinci Resolve is capable of reading the NCLC metadata found within media files wrapped within a QuickTime container for proper color management. This metadata consists of three values formatted as (for example) 1-1-1. From left to right, these three digits specify the Color Primary (or color space), Transfer Function (or gamma), and Color Matrix used by that media file.
These values are standardized in the SMPTE Registered Disclosure Document RDD 36:2015. For your information, the different codes are listed in the following table. In the previous example, the code of 1-1-1 indicates a standard dynamic range clip that uses the BT.709 primaries, transfer function, and color matrix.
Color Primary | Transfer Function | Color Matrix | |||
0 | Reserved | 0 | Reserved | 0 | GBR |
1 | ITU-R BT.709 | 1 | ITU-R BT.709 | 1 | BT709 |
2 | Unspecified | 2 | Unspecified | 2 | Unspecified |
3 | Reserved | 3 | Reserved | 3 | Reserved |
4 | ITU-R BT.470M | 4 | Gamma 2.2 curve | 4 | FCC |
5 | ITU-R BT.470BG | 5 | Gamma 2.8 curve | 5 | BT470BG |
6 | SMPTE 170M | 6 | SMPTE 170M | 6 | SMPTE 170M |
7 | SMPTE 240M | 7 | SMPTE 240M | 7 | SMPTE 240M |
8 | FILM | 8 | Linear | 8 | YCOCG |
9 | ITU-R BT.2020 | 9 | Log | 9 | BT2020 Non- constant Luminance |
10 | SMPTE ST 428-1 | 10 | Log Sqrt | 10 | BT2020 Constant Luminance |
Transfer Function | Color Matrix | ||||
11 | DCI P3 | 11 | IEC 61966-2-4 | – | – |
12 | P3 D65 | 12 | ITU-R BT.1361 Extended Colour Gamut | – | – |
– | – | 13 | IEC 61966-2-1 | – | – |
– | – | 14 | ITU-R BT.2020 10 bit | – | – |
– | – | 15 | ITU-R BT.2020 12 bit | – | – |
– | – | 16 | SMPTE ST 2084 (PQ) | – | – |
– | – | 17 | SMPTE ST 428-1 | – | – |
– | – | 18 | ARIB STD-B67 (HLG) | – | – |
![]()
The Default Input Color Space
The default Input Color Space can only be set if the “Resolve color management preset” drop-down menu is set to Custom. Otherwise, it defaults to “Rec. 709 Gamma 2.4” for all presets. Or else, this setting is the default color space that all otherwise unidentified clips in the Media Pool will default to.
Manually Tagging Clip Color Space
If necessary, you can manually identify the color space of one or more selected clips in the Media Pool by right-clicking them and choosing the Input Color Space (and optionally the Input Gamma) from the contextual menu.
Simple RCM Setup
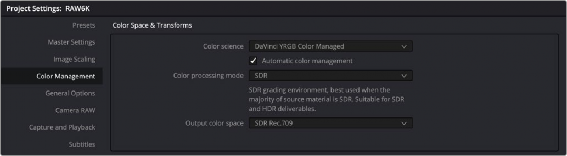
When you first choose DaVinci YRGB Color Managed from the Color science drop-down menu of the Color Management panel in the Project Settings, you’re presented with a simple pair of menus for setting up how you want to work with Resolve Color Management: the “Resolve color management preset,” and the “Output Color Space.”
Automatic Color Management
The first option when using RCM is to decide to use either Automatic Color Management or the Manual Presets. When the Automatic Color Management box is checked, DaVinci Resolve presents you with a simplified set of options for the most common use cases. For the Color Processing Mode, you choose SDR or HDR, and based on the file types and codecs in the Media Pool, DaVinci Resolve will automatically choose the appropriate input color space. Then, select from a list of common Output color spaces for delivery. If you want specific control of these parameters, uncheck Automatic Color Management box and select from the Color Management Presets below.
![]()