< Previous | Contents | Next >
You can also choose options in the Gallery that dictate what happens when you copy a grade that has shared nodes within it.
Converting Shared Nodes Back to Corrector Nodes
Sometimes you need to stop a node from being shared. For example, if you want to copy a grade from another scene to use as the starting point for a new grade, chances are you don’t want any shared nodes to continue being shared as you customize that grade for the new scene. In this instance, you can convert the Shared node back to a regular Corrector node, make any adjustments you need to customize it for the new scene, and then turn that node into a brand new Shared node that’s specific to the new scene.
— Right-click any Shared node, and choose Convert to Corrector from the contextual menu.
Deleting Shared Nodes
If you’ve created a Shared node that’s being used in multiple clips, and you decide you want to eliminate the linked relationship among these nodes so they all work independently, you can “delete” a specific Shared node. This leaves the now unlinked nodes intact within each node tree in which they appear, but clears their effect. Additionally, that Shared node is removed from the Add Node submenu.
— Right-click any Shared node, and choose a node to delete from the Delete Shared Node submenu.
Using Adjustment Clips
You can also apply a single grade to multiple clips in the Timeline using Adjustment clips that have been superimposed over numerous other clips in the Timeline. They can be used to apply a single grade to all clips in a scene, or to add further color adjustments or trims to a section of clips via a second grade that’s applied on top of the individual clip grades that are already applied.
![]()
Adjustment clips are a great way to add adjustments to multiple clips that you may be making frequent changes to. If you make changes to a grade in an Adjustment clip, that change is automatically applied to all clips underneath it in the Timeline. Additionally, grades applied via adjustment layers can be turned off by disabling the adjustment layers, either one at a time, or by disabling an entire track with adjustment layers in it.
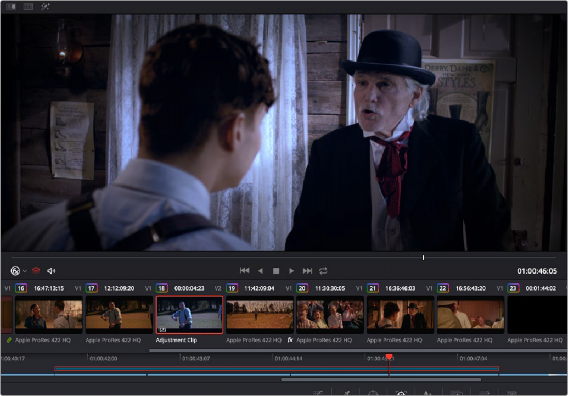
An Adjustment clip (shown selected in the Mini Timeline) used to apply a cooler grade to four other clips in a scene
Adjustment clips can be edited into the Timeline on the Edit page, and are available from the
Effects bin of the toolbox in the Effects Library. When an Adjustment clip is superimposed above one or more clips in the Timeline, all effects that are applied to the Adjustment clip are also applied to all clips underneath it.
Adjustment clips can be used to apply the following types of effects:
— ResolveFX and OpenFX plugins
— Inspector parameters, including Composite, Transform, Cropping, and Dynamic Zoom
— Fusion page effects
— Color page grading and sizing

TIP: Multiple adjustment layers can be grouped together so that you can apply Group and Clip grades to adjustment layers, linking multiple adjustment layers together in situations where you want to apply the exact same trim or stylistic adjustment to multiple scenes in non-contiguous areas of the Timeline.
TIP: Multiple adjustment layers can be grouped together so that you can apply Group and Clip grades to adjustment layers, linking multiple adjustment layers together in situations where you want to apply the exact same trim or stylistic adjustment to multiple scenes in non-contiguous areas of the Timeline.
TIP: Multiple adjustment layers can be grouped together so that you can apply Group and Clip grades to adjustment layers, linking multiple adjustment layers together in situations where you want to apply the exact same trim or stylistic adjustment to multiple scenes in non-contiguous areas of the Timeline.
![]()
Effects clips are a fast and easily revised way to apply one or more grades and effects to a range of clips.