< Previous | Contents | Next >
— Move the playhead to another clip that’s a member of that group.
— Right-click any clip belonging to any group, and choose Group > “Name of group” > Load. The selected group now becomes the current group. Using the Add Into
Current Group command will add a clip to the newly loaded group.
1 Load the group you want to add clips to.
2 Select one or more clip thumbnails in the Timeline. You can select a contiguous range of clips by clicking one and then Shift-clicking another, or you can make a noncontiguous selection by Command-clicking individual clip thumbnails anywhere in the Timeline.
3 Right-click one of the selected clip thumbnails, and choose Group > “Name of group” > Assign to Group.
The selected clips now appear with the “linked” group badge above the thumbnails.
1 Select one or more clip thumbnails in the Timeline that you want to remove from a group. You can select a contiguous range of clips by clicking one and then Shift-clicking another, or you can make a discontiguous selection by Command-clicking individual clip thumbnails anywhere in the Timeline.
2 Right-click one of the selected clip thumbnails, and choose Remove From Group.
1 Right-click any clip belonging to any group, and choose Group > “Name of group” > Rename.
2 Type a new name into the field of the Group Name dialog, and click OK.
The group is renamed. The new name appears as a new submenu of the Timeline contextual menu.
— Right-click a clip belonging the group you want to delete, and choose Group > “Name of group” > Delete.
— This clears the group, while preserving the last applied grade within each clip.
![]()
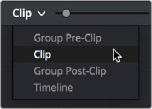
DaVinci Resolve makes a default smart filter for all clips in the current group. It can be found in the Clips drop-down, under Grouped > Current Group.
Using Group Modes to Control
Which Grades Ripple and Which Don’t
When you create a group and then select any clip that is a member of that group, additional Node Editor modes become available that let you apply multiple levels of grades to the clips in that group.
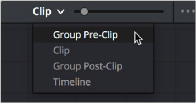
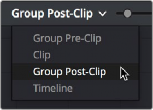
Available options in the Node Editor modes drop-down
For clips that aren’t grouped, two dots at the top of the Node Editor let you switch between Clip and Timeline modes via a single click. If you’re working on a clip that’s part of a group, four dots will be displayed to allow fast access to the Pre-Clip and Post-Clip Group modes as well.
Four dots at the top of the Node Editor let you choose which mode you’re working on
Node trees you create using the Group Pre-Clip and Group Post-Clip modes automatically ripple changes to every member of a group. Node trees created with the Clip mode are specific to each clip. Node trees created with the Timeline grade affect the entire Timeline, all at once. Combining node trees made using these different modes makes it easy combine clip-specific changes with group-wide changes that make grading faster.
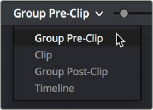
— Group Pre-Clip: Node trees assembled in this mode affect every clip in the group simultaneously. Pre-Clip adjustments are useful for creating an overall grade that you want to use as a starting point for the scene, such as when you need to normalize a group of log-encoded clips in a specific way, or when you want to create a base grade that generally improves every clip in a scene.
— Clip: The Clip grade corresponds to the local or remote version associated with that clip. Node trees assembled in the Clip mode only affect the specific clip that’s selected. All Local and Remote versions you create are in Clip mode. Clip adjustments are useful for matching clips to one another in a scene, doing clip-specific secondary adjustments, or making any other sort of adjustment that you only want applied to the current clip, rather than to the group as a whole. Clip adjustments are applied after Pre-Clip adjustments.
![]()
— Group Post-Clip: Node trees assembled in this mode also affect every clip in the group simultaneously, but these adjustments are applied after the Clip adjustments. Post-Clip adjustments can be useful for applying a creative look to an overall scene, so that later revisions to a scene’s look can be accomplished with a single set of adjustments that automatically affect the entire group.
— Timeline: Node trees assembled in this mode affect every single clip in the entire Timeline. Timeline adjustments are useful when you have a single change that you want to apply to every single clip at once.
The image processing of each Node Editor mode is sequential, making it easy to keep track of the order of operations affecting a particular clip.
An Example of Grading a Group of Clips
This section shows an example of how you might approach grading a group of clips using the different Node Editor modes that are available. Keep in mind that this is only one of many possible approaches you could take to the use of groups, and was chosen because it exercises everything you can do to a single grade.
To get started, select a series of clips that you want to group, and right-click one of them and choose Create New Group to group them together, entering a name and clicking OK when prompted.
One convenient advantage of simply creating groups from a selection is that you’re not limited to selecting a continuous range of clips in the Timeline. Another advantage is that you can use the View
> Timeline Thumbnail Mode > Source (C-mode) command, or Timeline filtering, to isolate the range of clips you want to use for creating a group.
There are different ways you might choose to group clips together:
— All clips within a particular scene
— All clips recorded from a specific camera
— All headshots of a particular person
— All clips from a particular angle of coverage
— All exteriors of a particular location
The list could go on and on, but you get the idea. You can group any selection of clips together that have reason to share a common grade. In this example, a series of shots from an exterior scene are selected and made into a group.

Clips made into a group
![]()
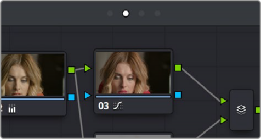
Once you’ve created a group, choose Group Pre-Clip from the Node Editor mode drop-down. This is the first grade that’s applied, as the underlying grade that affects the entire group. Using this node tree, adding a LUT to normalize the clips, a Color Wheel adjustment, and some Curve adjustments to tune the color provide a primary grade that now affects every single clip in the group.

A primary adjustment applied to the Group Pre-Clip mode
With this accomplished, you can see there’s some variation among the clips in the scene that needs to be corrected in order for every clip to match. Choose Clip from the Node Editor mode drop-down.
Grades that you make in Clip mode only affect the clip to which they’re applied, so now you can work clip by clip using the Image Wipe and Split-Screen controls to compare clips and make whatever adjustments are necessary to make each one match the main look for the scene.

Scene balancing adjustments made using the Clip mode
Once all the clips are balanced with one another, you can choose Post-Clip Group from the Node Editor mode drop-down. This lets you add one more grade on top of the Pre-Clip and Clip grades that you’ve already applied, that you can use for any number of things. In this example, a single stylistic adjustment is applied that now affects all of the clips at once. If a client wants to see something different, you can easily make the necessary changes to one clip, and all other clips in that group will immediately be altered as well.

![]()
A stylistic adjustment applied to the Group Post-Clip mode
At this point, the scene is graded via a well organized set of corrections. If the client later wants a change affecting the underlying primary grade that everything is built on, you can adjust the Pre-Clip grade. If you spot an inconsistency with your shot matching at any point, you can make a fast tweak to the relevant Clip grade. And if the client wants a stylistic change, you can make any necessary adjustments to the Post-Clip grade to change the overall look of the whole scene. In each case, groups give you total control over which adjustments will ripple across the whole group, and which adjustments will be clip-specific.