< Previous | Contents | Next >
Resolve Color Management is extremely flexible, so you don’t have to use DaVinci Wide Gamut/ DaVinci Intermediate as your Timeline color space if you don’t want. However, it presents many advantages and is worth trying out to see if it can improve your workflow.
For more information, see the “DaVinci Resolve Wide Gamut Intermediate” document at https://www. blackmagicdesign.com/support/family/davinci-resolve-and-fusion.
Timeline Working Luminance
![]()
This control is only visible while the Resolve Color Management presets menu is set to Custom Settings. The Timeline Working Luminance drop-down menu lets you choose how the Input DRT (described below) maps the maximum level of a source image to the currently selected Timeline Color Space. This setting also defines the maximum highlight level that’s possible to output into the currently selected Output Color Space using the Output DRT.
While it’s typical to set this according to the mastering standard you’re grading to via a collection of SDR and HDR labeled settings, there are additional settings available that make it possible to add more automatic compression of highlights as you grade.
— SDR 100: The conventional setting for grading SDR material with a maximum level of 100 nits.
— HDR 500-4000: Conventional settings for grading HDR material at a variety of maximum mastering levels. So long as output DRT isn’t set to None, there will be some manner of rolloff in the highlights, unless inverse DRT is enabled, in which case there will be no rolloff.
— SDR and HDR ER settings: These “extended range” settings each specify two values and provide more headroom for aggressive grading of highlights by enabling DaVinci Resolve to compress a greater range of out-of-bounds image data without clipping, which can result in a smoother look.
Here’s how it works. Suppose you choose the setting “HDR ER 1000/2000.” In this case, the Input DRT is used to map the maximum brightness of each source image to the range specified by the first value, which is 1000 nits. Then, when you grade, the signal isn’t clipped until it reaches the maximum range specified by the second value, which is 2000 nits. This provides an additional 1000 nits of out-of-bounds headroom before the image data is hard clipped by RCM’s image processing pipeline. The Output DRT is then used to map from the maximum brightness specified by the second number (2000 nits) to the output value defined by the currently selected Output Color Space, in the process compressing this out-of-bounds headroom to preserve as much highlight detail as is possible given the range you’ve selected.
— Custom: Exposes a field where you can enter a specific nit value.
203 Nit Support for SDR to HDR
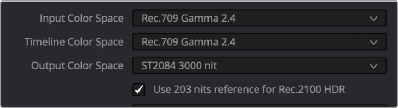
This control is only visible while the Resolve Color Management presets menu is set to Custom Settings. Resolve Color Management has support for remapping SDR content to HDR by mapping 100 nits to 203 nits (defined as the diffuse white level) according to the BT.2100 recommendation. This enables the peak highlights of SDR material to compete more favorably against the significantly brighter highlights of HDR content in programs that combine both (such as documentaries), so that SDR whites continue to appear white, rather than gray, when compared to diffuse white in HDR.
The checkbox that enables this is hidden by default. Whenever you set the Output to an HDR standard while the Timeline is set to an SDR standard, the “Use 203 nits reference for Rec.2100 HDR” checkbox for remapping SDR highlights to HDR appears in both the RCM settings of the Color Management panel of the Project Settings and in the Color Space Transform Resolve FX plugin.