< Previous | Contents | Next >
As you make various adjustments to nodes, small badges appear underneath that indicate what each node is actually doing. Since nodes are capable of holding multiple adjustments, any given node may have multiple badges; how many badges a node can show depends on the zoom level of the Node Editor. Larger nodes will show more badges, whereas smaller nodes will show fewer badges, hiding whichever badges don’t fit.
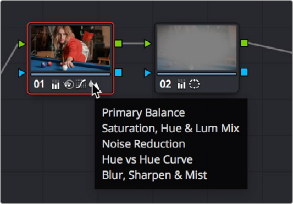
Another nice organizational feature of the Node Editor is an automatic tooltip that appears whenever you hover the pointer over a particular node, that shows you a concise list of all the operations applied to that particular node.
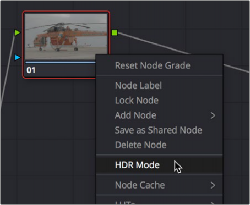
(Left) Badges underneath each node indicate which adjustments it contains. (Right) Using a node’s contextual menu to put that node into HDR mode
Putting Nodes into HDR Mode
When using various grading controls in the Color page to grade wide-latitude images for HDR output, you may find it useful to enable the HDR mode of the node you’re working on by right-clicking that node in the Node Editor and choosing HDR Mode from the contextual menu.
![]()
This setting adapts that node’s controls to work within an expanded HDR range. Practically speaking, this makes it easier to work with wide-latitude signals using controls that operate by letting you make adjustments at different tonal ranges such as Lift/Gamma/Gain, Custom Curves, Soft Clip, and so on.
Clip vs. Timeline Grading
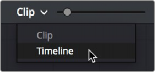
Ordinarily, the Node Editor has two modes. The default Clip mode lets you create individual grades for each clip or group in the Timeline. However, the Timeline grade mode lets you apply a single grade simultaneously to every clip in the Timeline, as seen in the Thumbnail timeline in the following screenshot.

A paragon of sophisticated grading, the author applies a red edge vignette to every clip in the project simultaneously using the Timeline grade
There are a variety of reasons you might want to do this. For example, if you’re working on a commercial spot, you might elect to use Clip grades to do general correcting and scene-to-scene balancing, and then use the Timeline grade to apply a single stylistic grade to the entire spot simultaneously. That way, any changes the client wants made to the style of the grade can be instantly applied to the whole spot.
Another example would be using the Timeline grade to apply corrections meant to address QC issues running throughout a program, desaturating highlights or selectively darkening a specific shade of red wherever it appears.
— Choose the mode from the drop-down menu at the top right of the Node Editor.
Selecting Track mode in the Node Editor
— Click the dot in the Node Editor toolbar that corresponds to the Clip or Timeline mode
![]()

NOTE: When you reset the Timeline grade using the Color > Reset All Grades and Nodes command, the Output Sizing parameters are reset as well.
NOTE: When you reset the Timeline grade using the Color > Reset All Grades and Nodes command, the Output Sizing parameters are reset as well.
NOTE: When you reset the Timeline grade using the Color > Reset All Grades and Nodes command, the Output Sizing parameters are reset as well.
Two dots show whether you’re in Clip or Timeline mode; these can be clicked to switch
![]()
Two dots at the top of the Node Editor let you switch between Clip and Timeline modes via a single click. If you’re working on a clip that’s part of a group, four dots will be displayed to allow fast access to the Pre-Clip and Post-Clip Group modes as well. For more information about group grading, see Chapter 139, “Grade Management.”
Timeline Grades and Saved Stills
When you save a Gallery still, the Clip and Timeline grades are both saved. However, when you apply a grade from that still, you only apply either the Clip grade, or the Timeline grade, depending on which mode the Node Editor is in. For more information on saving and applying grades, see Chapter 139, “Grade Management.”