< Previous | Contents | Next >
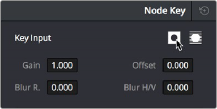
When selecting the new node and opening the Key palette, you can see that the Key Input’s Invert control is on by default, which is what inverts the key from the previous node.
The Key Input Invert control is on by default for each node.
If, instead of using the Outside node to invert the incoming key, you want to copy the existing key in order to perform another operation to the same isolated region, you can disable the key input’s Invert control.
Feeding Keys From One Node to Another
One of the most powerful aspects of the Node Editor is the ability to create keys based on a specific part of the node tree, and feed the result into a completely different correction somewhere else in the node tree. This is one of the reasons for the separate key input and output on every Corrector node.
The key that’s created whenever you use the HSL Qualifier, create one or more windows, or use an external matte can be output from one node’s key output and fed to the key input of any other node in a tree. There are many reasons to do this, but the following example shows a common problem you can solve with this technique.
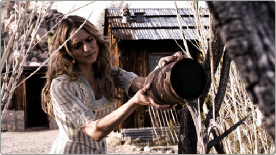
1 Use Node 1 to apply a basic primary correction, increasing contrast and balancing the color to achieve a pleasing ambient color temperature.
![]()
2 Add a Serial node (Node 2), followed by a Layer Mixer node which also adds Node 4 (as seen in the following screenshots). Then, completely desaturate Node 4 and add contrast to make it super- high contrast black and white, desaturate Node 2 just a bit, and right-click the Layer Mixer node to choose the Overlay blend mode with which to combine these two layers.
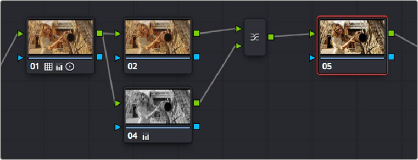
A group of nodes to create a stylized image
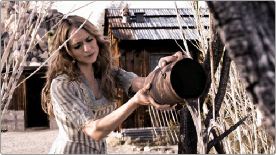
The result is a highly stylized image, but the skin tone on the actor’s face and hands in the resulting image are too monochromatic, and you want to give them some differentiation. Simply adding another node after the Layer Mixer and keying the skin tone may not work well because the low level of saturation will make a key difficult to pull.

The resulting stylized image may be difficult to key accurately.
3 Add another node after the Layer Mixer (Node 5 in the screenshot), and then right-click in the gray background area of the Node Editor, and choose Add Node > Corrector to create an unattached node, (Node 6).
4 Connect the RGB output of Node 1 to the RGB input of Node 6, and then connect the key output of Node 6 to the key input of Node 5. Now you’re ready to pull a high-quality key from the very first correction in Node 1, skipping all the complication coming afterwards.
5 Use the HSL Qualifier in Node 6 to pull a good strong skin tone key based on the primary image. Given the way the node tree is now set up, that key is fed to Node 5, and will limit whatever adjustments you make there.
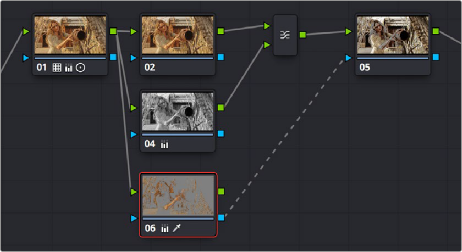
![]()
Using Node 6 to pull a key from the image output by Node 1, and feeding that key to Node 5
6 Now, you can make your adjustment to Node 6’s grade, to lower the contrast, brighten, and increase the saturation of the actor’s skin tone.As a result of this operation, the background remains desaturated and contrasty, while the actor’s skin tone has the brighter quality we need for the shot.