< Previous | Contents | Next >
simultaneously to all three RGB channels. However, you could also render separate pure primary- colored mattes to each color channel (a so-called “disco” matte), so that the Red channel has one matte, the Green channel another, and the Blue channels still another, thereby exporting three separate mattes within a single media file, for convenience. If you add another matte to the Alpha channel, you can even export four mattes within a single file. You can then use each one of these mattes individually by connecting the correct output of the EXT MATTE node. (Note: For backward compatibility, projects from versions of DaVinci Resolve previous to 12.5 continue to output RGBY from the square outputs, not YRGB.)
— RGB Output: A square green RGB output lets you connect the RGB image data of a matte clip to any other clip’s RGB input. This is especially useful when you’re combining a matte clip with the current clip using a Layer Mixer node, to create a textured composite of some kind.
External Mattes to Limit Adjustments
Going back to the External Matte node’s original use, mattes are typically grayscale media files that represent image opacity, and are meant to be used either as alpha channels for creating opacity within a corresponding RGB clip, or as a matte for limiting effects.
An example of a matte channel would be the key created by a green screen keyer. If you output just the key, that would be an external matte. If you receive an external matte along with an effects clip, you can attach the matte to its corresponding RGB clip in the Media page. Then, you can access that matte via an External Matte node in the Node Editor, so you can use the key it outputs to limit different kinds of corrections you want to apply.
In the following example, the keyed matte of a green screen composite clip is used to apply different corrections to the inside and outside of a keyed composite, in order to make the subject match the background more convincingly.
![]()
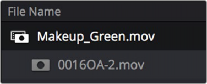
A matte attached to clip Makeup_Green.mov, as seen in the Media Pool
1 Right-click any node, and choose the attached matte you want to use from the Add Matte submenu of the contextual menu.
By default, the EXT MATTE node that appears has its first output connected to the Connect one of the EXT MATTE node’s triangular key outputs to the key input of a node you want it to limit.
2 Select the node to which the EXT MATTE node is attached, and add an Outside node to make it possible to add adjustments on either side of the matte.
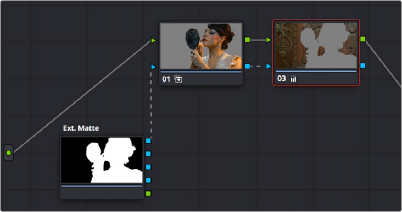
Node Editor displaying the influence of the external matte on multiple nodes when the keys are linked

NOTE: Don’t select the EXT MATTE node, because it exposes different controls in the Key palette for transforming, flipping, looping, and freezing the matte.
NOTE: Don’t select the EXT MATTE node, because it exposes different controls in the Key palette for transforming, flipping, looping, and freezing the matte.
NOTE: Don’t select the EXT MATTE node, because it exposes different controls in the Key palette for transforming, flipping, looping, and freezing the matte.
3 If necessary, select Node 1, and use the Key palette controls to modify the incoming key, inverting or blurring it as necessary to create the isolation you need.
At this point, you can add adjustments to the inside and the outside of this composited shot to improve the composite.


![]()
(Before/After) An external matte is used to apply separate grades to the foreground and background of a previously composited clip
Ideally, external mattes are exported so that they match the size and duration of the RGB clip they’re supposed to accompany. If they don’t match or if you’re using some other grayscale clip as an external matte to create some sort of effect, then there are parameters in the Key palette that you can use to retime or transform a matte so it works better in your grade.
1 Select the Ext Matte node you want to slip.
2 Open the Key palette, and turn off the Lock Matte checkbox.
3 Raise or lower the Offset parameter until the matte is perfectly aligned with the clip it’s supposed to match.