
< Previous | Contents | Next >
Hovering the pointer over a source identifies it in a tooltip
Generally, sources are arranged from top to bottom from the first MediaOut node appearing in a Fusion composition to the last. At this point, you can connect the second Source to the Key input of a second corrector node, using that key to selectively grade just the woman in the foreground (grade exaggerated for effect), without affecting the background. The Viewer is shown with Splitscreen set to Highlight Modes, so you can see the result as well as the key from the Fusion page that’s being used by Node 2.
Connecting the second source to a second Corrector node’s KEY input to use the matte to limit a correction made to the foreground character
Using the Key Mixer
![]()
The Key Mixer node lets you mix keys output from multiple Corrector nodes, combining them in different ways to create a single key output. This makes it possible to build much more intricate keys than you can with a single qualifier or set of four windows. In particular, the Key Mixer node is the only way to combine multiple keys made using qualifiers and windows, adding, subtracting, or intersecting them to create a highly specific result.
Adding Two Keys Together
In the following example, you’ll learn how to set up a Key Mixer to combine the keys output by two Corrector nodes in a node tree. Then you’ll learn how to change the way the input keys are combined using the Key palette.
1 Right-click anywhere on the gray area of the Node Editor, and choose Add Node > Key Mixer.
2 Create two Corrector nodes, then attach their RGB inputs to the RGB output from an appropriate node in the main part of the tree, and attach their key outputs to the key inputs of the Key Mixer.
3 Next, attach the key output of the Key Mixer node to the key input of the node you want to use to make the correction. Remember, the objective is to use the key that’s output by the Key Mixer to limit the adjustment being made using another node, in this case Node 3.
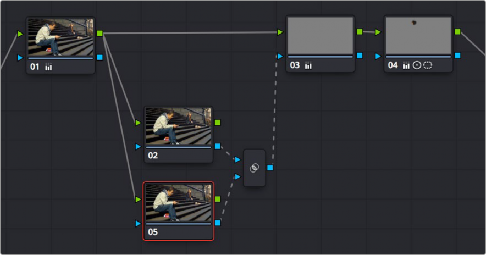
Setting up the node tree you’ll need to combine two keys together
Keep in mind, especially since this is a significant reordering of nodes in the Node Editor, that every node needs to be connected properly for the overall grade to work.
4 Now that the node structure is fully connected, use windows, qualifiers, or both to create keys in each of the nodes that you connected to the Key Mixer. In this example, Node 2 is isolating the main skin tone, and Node 5 is isolating the blue of his jeans and hood.
By default, all keys connected to the Key Mixer are added together, as you can see in the Key Mixer’s thumbnail.
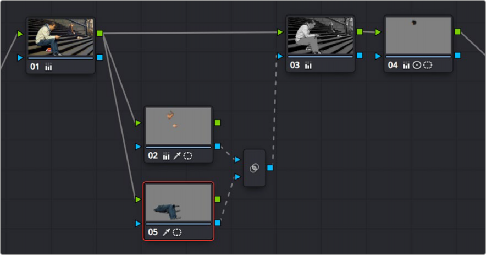
![]()
Combining multiple keys with the Key Mixer
If you wanted, you can use the controls in the Key palette to change this, in order to isolate the intersection of two keys, or to subtract one key from another. This is covered in the next section.
5 Continuing with the previous setup where both keys are added together by default, selecting Node 3 and dropping the saturation to be very faint stylizes the entire background, while leaving the various hues of the man we’ve isolated alone.