< Previous | Contents | Next >
Isolating, Splitting, and Converting Color Channels
DaVinci Resolve provides two different methods of making channel-specific adjustments, depending on whether you need to apply an adjustment to just one channel within a single node, or apply separate adjustments to all three channels across several nodes.
Enabling, Disabling, and Converting Node Channels
Within the contextual menu of each node in the Node Editor is a series of four options:
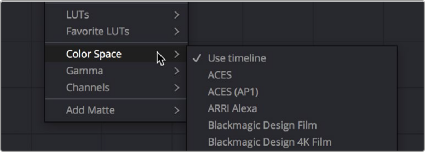
Expanded choices for choosing a color space and gamma for image processing within a node, and for disabling channels
While the ability to change the color space in which a particular node’s operations work from the RGB default has been available for many versions, the list of available color spaces was greatly expanded in DaVinci Resolve 15 (all the previous options such as Lab (CIE), HSL, and YUV are still there). Additionally, you have the option of choosing the gamma that node works with as well, with a similarly long list of options.
![]()
Choosing a node-specific color space and gamma does not directly alter the image, as with the Color Space Transform ResolveFX plugin. Instead, changing a node’s color space and gamma alters what type of image channels the red, green, and blue controls affect, and how the adjustments you make within that node are applied. For example, this lets you make a temperature adjustment with a node’s gamma set to Linear, which in some instances may be mathematically advantageous.
Additionally, three checked Enable Channel 1–3 options let you turn individual channels off or on, limiting which channel that node’s adjustments will actually affect.
In the following example, you’ll see how to use these features to selectively sharpen just the Y’ (luma) of an image without affecting the chroma, which can be a more subtle effect than simply sharpening the entire image.