< Previous | Contents | Next >
Whether it’s referred to as keyframing, dynamics, or marks, DaVinci Resolve provides an interface for automatically interpolating color adjustment parameters in various ways from one setting to another. For example, if you have a clip with varying exposure settings, you can animate a series of contrast adjustments using Dynamic keyframes to make the changes in exposure less distracting.
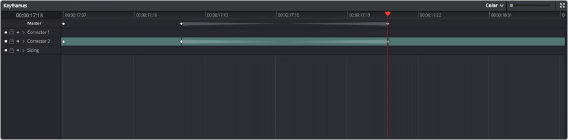
The Keyframe Editor with dynamic keyframes animating the parameters of Node 2
In another example, suppose you’re grading a documentary, and an archival clip that’s edited in the middle of the Timeline actually consists of six different shots from a program in the eighties. If you’re in a hurry, you can insert Static keyframes (marks) at the cut points of each of these shots, creating instant one-frame transitions between different adjustments made to that clip’s grade, which allows you to create unique adjustments for each shot within the clip.
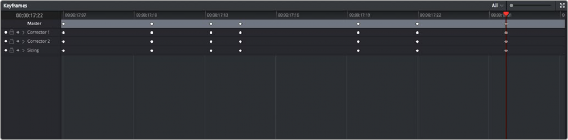
Round static keyframes added to all parameters, enabling individual adjustment of shots merged together within a single clip
![]()
In both cases, you use the Keyframe Editor to create a series of keyframes with which to change parameters from one value to another. In this section, you’ll learn how to work with the Keyframe Editor to set up these kinds of animated changes.
The Keyframe Editor Interface
The Keyframe Editor has all the controls necessary to create and modify keyframes for the currently selected clip. If necessary, you can even make it wider in a single screen layout by clicking its expand button (at the top right of the Keyframe Editor). If you have two computer displays, you can use the Color page’s Dual Screen layout which places the Keyframe Editor on a second screen and uses the entire width of the monitor, for even more room.

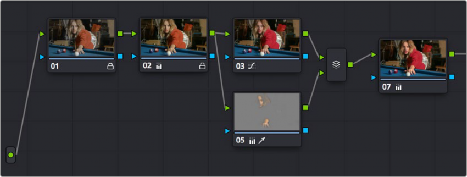
The Node Editor shown in wide mode, pushing all other palettes to the left
The Keyframe Editor consists of the following components:
— Timeline Ruler: Mirrors the record timecode of the currently selected clip; dragging within the Timeline Ruler moves the playhead, and a timecode display to the left shows the current frame.
— Keyframe track header: Each node in the current grade has a corresponding keyframe track, Sizing has its own keyframe track, and the track header contains controls you can use to manage the keyframing.
The Keyframe track header
— Enable/Disable button: A round white button lets you enable or disable that track’s corresponding node.
![]()
— Lock button: Lets you prevent any changes from being made to that track’s corresponding node. Nodes that have been locked show a lock icon. You can also lock or unlock nodes by right-clicking a node in the Node Editor and choosing Lock Node from the contextual menu.
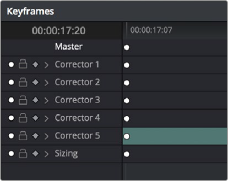
Nodes 1 and 2 have been locked in the Keyframe Editor of the Color page.
— Auto-Keyframe button: Turn this button on to automatically create a Dynamic keyframe every time you adjust any parameter within that node.
— Track disclosure triangle: Exposes individually keyframable groups of parameters underneath the main keyframe track.