< Previous | Contents | Next >
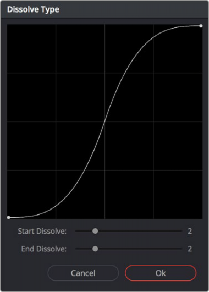
3 When the Dynamic Attributes window appears, do one or both of the following:
— Choose a new outgoing acceleration curve using the Start slider, affecting the interpolation occurring to the right of that keyframe.
— Choose a new incoming acceleration curve using the End slider, affecting the interpolation occurring to the left of that keyframe.
As you choose different acceleration curves, the display to the right shows the resulting curve graph.
Changing the dissolve profile
4 When you’re happy with the curve, click OK.

TIP: The default dynamic profile start and end of each new keyframe can be set via the Dynamics Profile values in the General Options panel of the Project Settings.
TIP: The default dynamic profile start and end of each new keyframe can be set via the Dynamics Profile values in the General Options panel of the Project Settings.
TIP: The default dynamic profile start and end of each new keyframe can be set via the Dynamics Profile values in the General Options panel of the Project Settings.
By using different Start and End values, you can make animated adjustments “ease in” or “ease out” of a particular keyframe, to create a more gradual or abrupt transition.
![]()
Deleting Keyframes
You have the option to delete individual keyframes, or to delete all the keyframes within a particular grade at once.
— Move the playhead on top of the keyframe you want to delete, then choose Mark > Delete Keyframe (Option-]). Every keyframe at the position of the playhead is deleted.
— Using the pointer, click a keyframe in the Keyframe Editor to select it, then right-click that keyframe and choose Delete Selected Keyframe. Only the selected keyframe is deleted.