< Previous | Contents | Next >
Color Management Using ACES
The ACES (Academy Color Encoding Specification) color space has been designed to make scene- referred color management a reality for high-end digital cinema workflows. ACES also makes it easier to extract high-precision, wide-latitude image data from raw camera formats, in order to preserve high-quality image data from acquisition through the color grading process, and to output high- quality data for broadcast viewing, film printing, or digital cinema encoding.
![]()
An oversimplification of the way ACES works is that every camera and acquisition device is characterized to create an IDT (Input Device Transform) that specifies how media from that device is converted into the ACES color space. The ACES gamut has been designed to be large enough to encompass all visible light, with more than 25 stops of exposure latitude. In this way ACES has been designed to be future-proof, taking into consideration advances in image capture and distribution.
Meanwhile, an RRT (Reference Rendering Transform) is used to transform the data provided by each image format’s IDT into standardized, high-precision, wide-latitude image data that in turn is
processed via an ODT (Output Device Transform). Different ODT settings correspond to each standard of monitoring and output, and describe how to accurately convert the data within the ACES color space into the gamut of that display in order to most accurately represent the image in every situation. The RRT and ODT always work together.
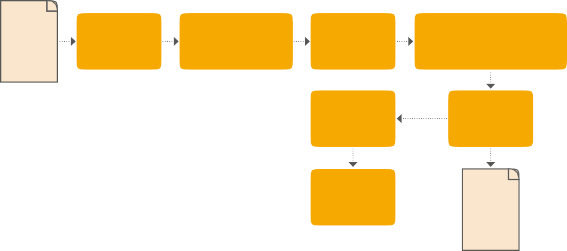
Image Data
Image Data
Image Data
Disable ODT for Deliver Page Output
Disable ODT for Deliver Page Output
Disable ODT for Deliver Page Output
ACES signal and processing flow
By using the ACES color space and specifying an IDT and an ODT, you can ingest media from any capture device, grade it using a calibrated display, output it to any destination, and preserve the color fidelity of the graded image.
Setting Up ACES in the Project Settings Window
There are four parameters available in the Color Science drop-down of the Color Management panel of the Project Settings that let you set up DaVinci Resolve to use the ACES workflow:
— Color science is: Using this drop-down menu, you can choose either DaVinci ACES, or DaVinci ACEScc color science, which enables ACES processing throughout DaVinci Resolve.
— ACEScc: Choose DaVinci ACEScc color science to apply a standard Cineon-style log encoding to the ACES data before it is processed by DaVinci Resolve. This well defined common
encoding makes it possible for ASC CDL values to be used across systems using the same ACEScc encoding. After processing, a reverse encoding is applied in order to output
ACES linear data.
— ACEScct: A variation of ACEScc that adds a roll-off at the toe of the image that’s different from the encoding of ACEScc, in order to make color correction lift operations “feel” more like they do with film scans and LogC encoded images, which makes it easier to raise the darkest values of the image and get milky shadows, something that can be difficult with ACEScc. After processing, a reverse encoding is applied in order to output ACES linear data.
![]()
— ACES Version: When you’ve chosen one of the ACES color science options, this drop-down becomes available to let you choose which version of ACES you want to use. You can choose from ACES 1.0.3, ACES 1.1, ACES 1.2, or ACES 1.3 (the latest version).
— ACES Input Device Transform: This drop-down menu lets you choose which IDT (Input Device Transform) to use for the dominant media format in use. DaVinci Resolve currently supports the following IDTs:
— ACEScc/ACEScct/ACEScg: Standardized transforms for each of these ACES standards.
— ADX (10 or 16): 10-bit or 16-bit integer film-density encoding transforms meant for use if you’re working with film scans that were initially encoded in an ACES workflow. This transform is designed to maintain the variation in look between different film stocks.
— ALEXA: Color management settings for all ARRI ALEXA cameras.
— BMD Film/4K/4.6K: Color management settings for Blackmagic Design cameras.
— Canon 1D/5D/7D/C200/C300/C300MkII/C500/C700: Color management settings for Canon cameras.
— DCDM: This IDT transforms X’Y’Z’-encoded media with a gamma of 2.6.
— DCDM (P3D65 Limited): This IDT transforms X’Y’Z’-encoded media with a gamma of 2.6, specifically hard clipped to a P3 gamut with a D65 white point.
— DRAGONcolor/2 and REDgamma3/4/REDlogFilm combinations: Different combinations of the DRAGONcolor, REDgamma, and REDlogFilm settings are provided for legacy RED workflows.
— P3-D60: Transforms RGB-encoded image data with a D60 white point, intended for monitoring with a P3-compatible display using a D60 white point.
— P3-D65: Transforms RGB-encoded image data with a D65 white point; intended for monitoring with a P3-compatible display using a D65 white point.
— P3-D65 (D60 sim.): Transforms RGB-encoded image data with a D65 white point; intended to simulate monitoring with a P3-compatible display using a D60 white point on a display with D65.
— P3-D65 ST2084 (108/1000/2000/4000 nits): Transforms an image that’s compatible with the P3 color gamut, using the SMPTE standard PQ (ST.2084) tone curve for High Dynamic Range (HDR) post-production. Three settings for four different peak luminance ranges are
provided; which one is appropriate to use depends on the maximum white level of the display used to create the media. Preliminary standards exist for HDR displays with peak luminance at 1000 nits, 2000 nits, and 4000 nits. A setting of 108 nits is provided for Kodak laser projection.
— P3-D65: Transforms RGB-encoded image data with a D65 white point, intended for monitoring with a P3-compatible display using a D65 white point.
— P3-D65 ST2084 (1000/2000/4000 nits): Transforms an image that’s compatible with the P3 color gamut, using the SMPTE standard PQ (ST.2084) tone curve for High Dynamic Range (HDR) post-production. Three settings for three different peak luminance ranges are
provided; which one is appropriate to use depends on the maximum white level of the display used to create the media. Preliminary standards exist for HDR displays with peak luminance at 1000 nits, 2000 nits, and 4000 nits.
— P3-DCI (D60 sim.): Produces output that’s specifically for output on a DCI projector with
![]()
a D60 white point. This output may look magenta on other display devices that aren’t set up for DCI display.
— P3-DCI (D65 sim.): Produces output that’s specifically for output on a DCI projector with
a D65 white point. This output may look magenta on other display devices that aren’t set up for DCI display.
— Panasonic V35: Color management settings for each listed camera.
— Rec.2020: This IDT transforms media created with the wide-gamut standard for consumer and broadcast television.
— Rec.2020 ST2084 (1000/2000/4000 nits): This IDT transforms media created within the wide-gamut standard for consumer and broadcast television, using the SMPTE standard PQ
(ST.2084) tone curve for High Dynamic Range (HDR) post-production. Three settings provided for HDR televisions with different peak luminance capabilities.
— Rec.2020 HLG (1000 nits): This IDT transforms media within the wide-gamut standard for consumer and broadcast television and uses the Hybrid Log-Gamma (HLG) standard tone curve for High Dynamic Range (HDR) post-production. A single setting is provided for HDR televisions with peak luminance at 1000 nits.
— Rec.709 (Camera): A deprecated legacy IDT for Rec. 709 that’s included for backward compatibility. Converts the source data to linear based on Rec. 709 and transforms the result to ACES, but while this transformation is technically correct, it’s not necessarily pleasing after conversion through the matching ODT. For this reason, the academy updated to the following Rec. 709 IDT, which is the inverse of the Rec. 709 ODT.
— Rec.709: A standard transform designed to move media in the Rec. 709 color space into the ACES color space. This option is used for any other file type that might be imported, such as ProRes from Final Cut Pro, DNxHD from Media Composer, and any media file captured from tape.
— Rec.709 (D60 sim.): A standard transform designed to move media in the Rec. 709 color space with a white point of D60 into the ACES color space.
— REDColor2/3/4/REDGamma3/4/REDLogFilm combinations: Different combinations of the REDcolor, REDgamma, and REDlogFilm settings are provided for legacy RED workflows.
— RWGLog3G10: The standardized RED IPP2 color pipeline transform for all RED camera media.
If you’re working on a project that mixes media formats that require different IDTs, then you can assign different IDTs to clips using the Media Pool’s contextual menu, or using the Clip Attributes window, which is also accessible via the Media Pool’s contextual menu.
— ACES Output Device Transform: This drop-down menu lets you choose an ODT (Output Device Transform) with which to transform the image data for monitoring on your calibrated display, and when exporting a timeline in the Deliver page. You can choose from the following options:
— ADX (10 and 16): A standardized ODT designed for media destined for film output. Two settings accommodate 10-bit and 16-bit output. This ODT is not meant to be used for monitoring.
— DCDM: This ODT exports X’Y’Z’-encoded media with a gamma of 2.6 intended for handoff to applications that will be re-encoding this data to create a DCP (Digital Cinema Package) for digital cinema distribution. This can be displayed via an XYZ-capable projector.
— DCDM (P3D60 Limited): Outputs a P3 hard-limited signal with a D60 white point.
— DCDM (P3D65 Limited): Outputs a P3 hard-limited signal with a D65 white point.
![]()
— P3 D60: Outputs RGB-encoded image data with a D60 white point; intended for monitoring with a P3-compatible display using a D60 white point.
— P3 D65: Outputs RGB-encoded image data with a D66 white point; intended for monitoring with a P3-compatible display using a D66 white point.
— P3 D65 (D60 sim.): Outputs RGB-encoded image data to simulate monitoring with a P3- compatible display using a D60 white point on a display with a D65 white point.
— P3 D65 (Rec.709 Limited): Outputs RGB-encoded image data with a D65 white point within a P3 gamut that’s hard-limited to the color range of Rec. 709.
— P3 D65 ST2084 (108/1000/2000/4000 nits): Outputs an image that’s compatible with the P3 color gamut, using the SMPTE standard PQ tone curve for High Dynamic Range (HDR) post-production. Three settings for three different peak luminance ranges are provided; which one is appropriate to use depends on the maximum white level of your display. Preliminary standards exist for HDR displays with peak luminance at 1000 nits, 2000 nits, and
4000 nits. A setting of 108 nits is provided to simulate an HDR signal clipped to an SDR range.
— P3 DCI (D60 sim.): Outputs RGB-encoded P3 image data that appears as if with a D60 white point on a DCI projector with a DCI white point.
— P3 DCI (D65 sim.): Transforms RGB-encoded image data with a D61 white point (the DCI mastering standard) that appears as if with a D65 white point.
— P3-D65 ST2084 (1000/2000/4000 nits): Transforms an image that’s compatible with the P3 color gamut, using the SMPTE standard PQ (ST.2084) tone curve for High Dynamic Range (HDR) post-production. Three settings for three different peak luminance ranges are
provided; which one is appropriate to use depends on the maximum white level of the display used to create the media. Preliminary standards exist for HDR displays with peak luminance at 1000 nits, 2000 nits, and 4000 nits.
— Rec.2020: This ODT is for compatibility with the full range of this wide-gamut standard for consumer and broadcast television.
— Rec.2020 (P3D65 Limited): Outputs a P3D65 hard-limited signal within this wide-gamut standard for consumer and broadcast television.
— Rec.2020 (Rec.709 Limited): Outputs a Rec. 709 hard-limited signal within this wide-gamut standard for consumer and broadcast television.
— Rec.2020 HLG: Outputs the full Rec. 2020 gamut to the Hybrid Log-Gamma standard for HDR.
— Rec.2020 HLG (1000 nits, P3D65 Limited): Outputs a 1000 nit, P3D65 hard-limited signal within the Rec. 2020 gamut and the Hybrid Log-Gamma standard for HDR.
— Rec.2020 ST2084 (1000/2000/4000 nits): This ODT transforms media created within the wide-gamut standard for consumer and broadcast television, using the SMPTE standard PQ (ST.2084) tone curve for High Dynamic Range (HDR) postproduction. Three settings are provided for HDR televisions with different peak luminance capabilities.
![]()
— Rec.2020 ST2084 (1000/2000/4000 nits, P3D65 Limited): This ODT transforms media within the wide-gamut standard for consumer and broadcast television but with hard clipping at the boundary of the P3 gamut for televisions that are limited to the smaller P3 gamut for digital cinema; also uses the SMPTE standard PQ (ST.2084) tone curve for High Dynamic Range (HDR) post-production. Three settings are provided for HDR televisions with different peak luminance capabilities.
— Rec.709: This ODT is used for standard monitoring and deliverables for TV.
— Rec.709 (D60 Sim): A standard transform designed to move media in the Rec. 709 color space with a white point of D60 into the ACES color space.
— sRGB: A standardized transform designed for media created for computer display in a consumer environment.
— sRGB (D60 Sim.): A standardized ODT designed for media destined for computer display in a consumer environment. Suitable for monitoring when grading programs destined for the web.
— ACEScc/ACEScct/ACEScg: Standardized transforms for each of these ACES standards.
You must manually select an ODT that matches your workflow and room setup when working in ACES.
— Process Node LUTs in: This drop-down menu lets you choose how you want to process CLF LUTs that are added to nodes in your grades while working in ACES, such as Look LUTs in on-set or VFX workflows. There are two choices: ACEScc AP1 Timeline Space (the default), and ACES AP0 Linear.
— ACEScc AP1: For LUTs that have been designed to take the specific range of ACEScc data using the AP1 primary coordinates.

NOTE: ACES grades require CLF LUTs that have been specifically created for ACES workflows. If you want to apply a regular LUT within a grade, you must do a color space transform to convert the image from ACES to whatever space the LUT was designed to work within, and then another color space transform to convert the image back to ACES; however, this workflow does not alway provide ideal results.
NOTE: ACES grades require CLF LUTs that have been specifically created for ACES workflows. If you want to apply a regular LUT within a grade, you must do a color space transform to convert the image from ACES to whatever space the LUT was designed to work within, and then another color space transform to convert the image back to ACES; however, this workflow does not alway provide ideal results.
NOTE: ACES grades require CLF LUTs that have been specifically created for ACES workflows. If you want to apply a regular LUT within a grade, you must do a color space transform to convert the image from ACES to whatever space the LUT was designed to work within, and then another color space transform to convert the image back to ACES; however, this workflow does not alway provide ideal results.
— ACES AP0: For LUTs that have been designed for normal ACES data from 65504 to -65504 floating point values.
The Initial State of Clips When Working in ACES
Don’t worry if the initial state of each image file appears differently than what was monitored originally on set. What’s important is that if the camera original media was well exposed, the IDT used in ACES mode will retain the maximum amount of image data, and provide the maximum available latitude for grading, regardless of how the image initially appears on the Timeline.