< Previous | Contents | Next >
The Five Color Page Sizing Modes
The Sizing Palette on the Color page can be put into one of five modes, each of which accomplishes a different task.
— Edit Sizing: These controls mirror those found in the Inspector of the Edit page.
— Input Sizing: These controls let you make sizing adjustments to individual clips that affect their overall geometry (pan, tilt, zoom, and rotation). These controls are useful for doing clip-by-clip pan and scan adjustments.
— Output Sizing: These controls are nearly identical, except that they affect every clip in the entire timeline, all at once. Output sizing is useful for making a formatting adjustment to an entire timeline, such as changing an HD timeline to an SD timeline with simple adjustments to crop and pan the resulting framing.
— Node Sizing: Lets you add targeted sizing adjustments at any point within the node tree. Like Input Sizing, Node Sizing is specific to a particular clip. Unlike Input Sizing, Node Sizing is affected by operations that split color channels (such as the splitter/combiner nodes) and limit the image (such as qualifiers and windows). You can also add as many node sizing adjustments to a clip’s grade as you need.
— Reference Sizing: A set of sizing controls that lets you reposition the still when a wipe comparison is being made. Using these controls, you can move the still image to better compare it to the clip you’re wiping it against. The Reference Sizing controls only work when you have a wipe enabled.
Sizing Order of Processing on the Color Page
Input Sizing adjustments are applied before all image processing that takes place in the node graph, including Node Sizing, while Output Sizing adjustments are applied after image processing in the node graph.
Sizing Controls
![]()
Input, Node, and Output Sizing share many of the same controls. When the Sizing palette is set to Input Sizing mode, the controls transform each clip individually. If you’re simply pushing in on one or two clips, or making individual pan and scan adjustments to account for a change in format, these are the controls you want to use.
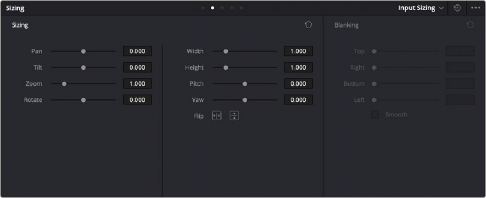
The Sizing palette
— Pan: Moves the clip along the horizontal, X axis. Positive values move the clip right, negative values move the clip left.
— Tilt: Moves the clip along the vertical, Y axis. Positive values move the clip up, negative values move the clip down.
— Zoom: Adjusts the overall dimensions of the clip. The range is from 0.250 (1/4x size) to
4.000 (4x size). Normal size is 1.000.
— Rotate: Positive values rotate the clip clockwise. Negative values rotate the clip counter-clockwise.
— Width: Stretches the image wider or narrower. The range is from 0.250 (1/4x width) to
4.000 (4x width). Normal width is 1.000.
— Height: Stretches the image taller or shorter. The range is from 0.250 (1/4x height) to
4.000 (4x height). Normal height is 1.000.
— Pitch: Rotates the image toward or away from the camera along an axis running through the center of the image, from left to right. Positive values push the top of the image away and bring the bottom of the image forward. Negative values bring the top of the image forward and push the bottom of the image away. Higher values stretch the image more extremely.
— Yaw: Rotates the image toward or away from the camera along an axis running through the center of the image from top to bottom. Positive values bring the left of the image forward and push the right of the image away. Negative values push the left of the image away and push the right of the image forward. Higher values stretch the image more extremely.
— Key Lock: (Node Sizing only) Lets you choose how regions of the image that are isolated by one or more windows will be transformed. There are two options:
— Off: While off, the transform controls will move the windowed region to another area of the frame, effectively duplicating the windowed area.
— On: While on, the transform controls will move other areas of the frame into the windowed regions, effectively covering up the windowed area with another portion of the picture.
— Flip Image: Two buttons let you flip the image in different dimensions.
— Flip Horizontal control: Reverses the image along the X axis, left to right.
— Flip Vertical control: Reverses the clip along the Y axis, turning it upside down.
— Lens Correction: (Edit Sizing only) Two controls let you correct for lens distortion in the image, or add lens distortion of your own (only available in the Studio version).
![]()
— Analyze: Automatically analyzes the frame in the Timeline at the position of the playhead for edges that are being distorted by wide angle lens. Clicking the Analyze button modifies the effect of the Distortion slider so that it gives a more accurate result, but it doesn’t perform a correction.
— Distortion: Dragging this slider to the right applies a warp to the image that lets you straighten the bent areas of the picture that can be caused by wide angle lenses. It’s not necessary to click the Analyze button prior to using this slider, but using the Analyze button can improve the accuracy of the result.