< Previous | Contents | Next >
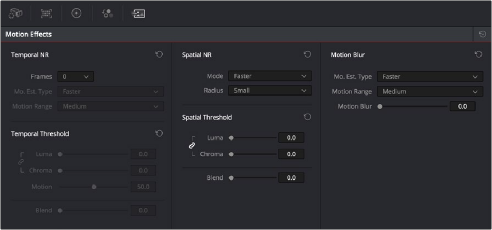
The Motion Effects palette (only available in the Studio version) contains two sets of controls for applying optical-flow-calculated effects to clips in your program. These include enhanced Spatial and Temporal noise reduction, and motion-estimated artificial motion blur.
Noise Reduction Controls
Two sets of parameters let you apply GPU-accelerated Temporal and/or Spatial noise reduction that’s designed to let you subdue noise in problematic clips, in close to real time on workstations with appropriate processing power. Both methods of noise reduction can be used separately or together, in varying amounts depending on the needs of the particular material you’re working on. Furthermore, each set of controls is highly customizable, allowing for varying amounts of noise reduction to the chroma and luma of an image, as well as numerous options for how to apply this noise reduction.
Noise Reduction and Motion Blur controls
Temporal NR Controls
![]()
The Temporal NR controls analyze images across multiple frames in order to isolate noise from detail. Motion estimation settings let you exclude moving subjects from this operation in order to prevent unwanted motion artifacts.
— Number of Frames: The number of frames you want DaVinci Resolve to average in order to separate detail from the noise. You can choose between 0 and 5 frames. 0 applies no frame averaging, higher values apply more frame averaging, at the expense of being significantly more computationally intensive the higher a value you use. Also, a higher frame setting will yield a better analysis, but may yield unwanted artifacts if there are fast-moving images in the frame. A value of 1 may yield better results for fast-moving images. If you need to use higher frame values but you see artifacts, you can also try adjusting the Motion Threshold to fix the issue.
— Motion Est. Type: Picks the method DaVinci Resolve uses to detect motion in the image. The default, Faster, is less processor intensive, but less accurate. Choosing Better can effectively exclude motion more accurately, but is more processor intensive. None lets you disable motion estimation altogether, with the result being the application of Temporal NR to the entire image.
— Motion Range: Three settings, Small, Medium, and Large, let you set the speed of motion that Motion Estimation should expect to exclude. A Small setting assumes slow-moving subjects with little or no motion blur, allowing Temporal NR to affect more of the image at a given Motion Threshold setting. A Large setting assumes fast motion with blur occupying a larger area of
the image, which excludes more of the image from Temporal NR at the same Motion Threshold setting. Choose the setting that gives you the best compromise between a reduction in noise and the introduction of motion artifacts when adjusting the Motion Threshold parameter.
— Luma Threshold: Lets you determine how much or how little Temporal NR to apply to the luma component of the image. The range is 0–100, where 0 applies no noise reduction at all, and 100 is the maximum amount. Too high a setting may eliminate fine detail from the image.
— Chroma Threshold: Lets you determine how much or how little Temporal NR to apply to the chroma component of the image. The range is 0–100, where 0 applies no noise reduction at all, and 100 is the maximum amount. Too high a setting may eliminate fine color detail from the image, although you may find you can raise the Chroma Threshold higher than the Luma Threshold with less noticeable artifacting.
— Luma/Chroma Threshold ganging: Ordinarily, the Luma and Chroma Threshold parameters are ganged together so that adjusting one adjusts both. However, you can ungang these parameters in order to adjust different amounts of noise reduction to each component of the image, depending on where the noise happens to be worst.
— Motion Threshold: Defines the threshold separating which moving pixels are in motion (above this threshold) versus which moving pixels are static (below this threshold). Using Motion Estimation, Temporal Noise Reduction is not applied to regions of the image that fall above this threshold, in order to prevent motion artifacts by not applying frame-averaging to parts of the image that are in motion. Lower values omit more of the image from Temporal NR by considering more subtle movements. Higher values apply Temporal NR to more of the image by requiring faster motion for exclusion. You can choose between 0 and 100, where 0 applies Temporal NR
to no pixels, and 100 applies Temporal NR to all pixels. The default value is 50, which is a suitable compromise for many clips. Be aware that if you set too high a Motion Threshold, you may see artifacts in moving parts of the image.
— NR Blend: Lets you dissolve between the image as it’s being affected by the
Temporal NR parameters (at 0.0) and the image with no noise reduction at all (100.0). This parameter lets you easily split the difference when using aggressive temporal noise reduction.
![]()
Spatial NR Controls
The Spatial NR controls let you smooth out regions of high-frequency noise throughout the image, while attempting to avoid softening by preserving detail. It’s effective for reducing noise that Temporal NR can’t.
— Mode: The Mode drop-down lets you switch Spatial NR between three different algorithms. All three modes of operation use exactly the same controls, so you can switch between modes using the same settings to compare your results.
— Faster: Uses a computationally lightweight method of noise reduction that’s good at lower settings, but may produce artifacts when applied at higher values.
— Better: Switches the Spatial NR controls to use a higher quality algorithm that produces greatly superior results to Faster, at the expense of being more processor intensive to render, as well as not allowing you to decouple the Luma and Chroma Threshold sliders for individual adjustments to each color component.
— Enhanced: Does a significantly better job of preserving image sharpness and detail when raising the Spatial Threshold sliders to eliminate noise. This improvement is particularly apparent when the Spatial Threshold sliders are raised to high values (what constitutes “high” varies with the image you’re working on). At lower values, the improvement may be more subtle when compared to the “Better” mode, which is less processor intensive than the
computationally expensive “Enhanced” setting. Additionally, “Enhanced” lets you decouple the Luma and Chroma threshold sliders so you can add different amounts of noise reduction to each color component, as the image requires.
— Radius: Options include Large, Medium, and Small. A smaller radius offers greater real time performance, and can provide good quality when using low Luma and Chroma Threshold values. However, you may see more aliasing in regions of detail when using low NR Threshold values.
Setting Radius to be progressively larger results in higher quality within areas of greater visual detail at high Luma and Chroma Threshold values, at the expense of slower performance. An NR Radius of Medium should provide suitable quality for most images when using medium NR Threshold settings. As with many operations, there’s an adjustable tradeoff between quality and speed.
— Luma Threshold: Lets you determine how much or how little noise reduction to apply to the luma component of the image. The range is 0–100, where 0 applies no noise reduction at all, and 100 is the maximum amount. Too high a setting may eliminate fine detail from the image.
— Chroma Threshold: Lets you determine how much or how little noise reduction to apply to the chroma component of the image by smoothing out regions of high-frequency noise while attempting to preserve the sharpness of significant edge details. The range is 0–100, where 0 applies no noise reduction at all, and 100 is the maximum amount. Too high a setting may eliminate fine color detail from the image, although you may find you can raise the Chroma Threshold higher than the Luma Threshold with less noticeable artifacting.
— Luma/Chroma Threshold ganging: Ordinarily, the Luma and Chroma Threshold parameters are ganged together so that adjusting one adjusts both. However, you can ungang these parameters in order to adjust different amounts of noise reduction to each component of the image. For example, if an image softens too much at a certain level of noise reduction, but you find there’s more color speckling than there is luma noise, you can lower the Luma Threshold to preserve detail while raising the Chroma Threshold to eliminate color noise.
— NR Blend: Lets you dissolve between the image as it’s being affected by the Spatial
![]()
NR parameters (at 0.0) and the image with no noise reduction at all (100.0). This parameter lets you easily split the difference when using aggressive spatial noise reduction.
Using Noise Reduction
The following procedure suggests a method of using the Noise Reduction (NR) parameters to achieve a controlled result.
1 Enable Temporal NR by choosing 1 to 5 frames from the Number of Frames drop-down menu. Keep in mind that more frames dramatically increase the render time of this effect, while it may or may not significantly improve the result, depending on your material.
2 Choose options from the Motion Est. Type and Motion Range drop-down menus corresponding to how much motion is in the image. If there’s a lot of motion, you may need to choose Better and Large. If there’s not very much motion, lesser settings may suffice.
3 With Luma and Chroma Threshold linked, slowly raise either parameter until you just start to see a reduction in noise within the nonmoving areas of the image, then make smaller adjustments to determine the maximum amount of Temporal NR you can add without creating motion artifacts, or overly softening image detail you want to preserve.
4 If there’s obviously more chroma than luma noise in the image, you can disable Luma/Chroma linking at a satisfactory level of luma noise reduction, and then raise the Chroma Threshold to apply more aggressive Temporal NR to address color speckling in the picture.
5 If you’re not satisfied with the tradeoff between the maximum possible threshold of noise reduction and the prevention of motion artifacts, you may want to adjust the Motion Threshold setting, lowering it to omit more of the motion from the noise reduction operation, or raising it to include more motion. If you’re still not satisfied, you can also try better Motion Est. Type and Motion Range settings.

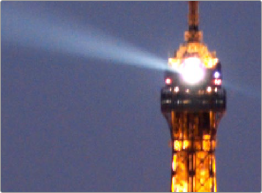
(Left) Before and (Right) after Temporal NR to reduce noise in unmoving areas of the image
Keep in mind that the strength of Temporal NR is to reduce noise in unmoving parts of the image. When you’ve achieve the best tradeoff between noise reduction in the still areas and avoidance of motion artifacts in the moving areas of the image, then it’s time to turn to Spatial NR to further eliminate noise throughout the rest of the picture.
![]()
6 Enable Spatial NR by raising either the Luma or Chroma Threshold parameters, which are linked by default, until you strike a suitable balance between the reduction of noise, and an unwanted increase in image softness.
7 It’s recommended to choose the Enhanced option from the Spatial NR mode drop-down, as it will yield the best possible results. However, this can be processor-intensive, so if you need better real-time performance, you can switch the mode to Faster and compare results.
8 If there’s obviously more chroma than luma noise in the image, you can disable Luma/Chroma linking at a satisfactory level of luma noise reduction, and then raise the Chroma Threshold to apply more aggressive Spatial NR to address color speckling in the picture.
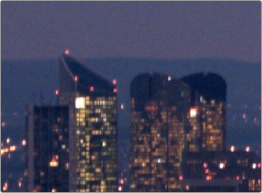
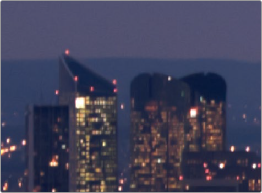
(Left) Before and (Right) after noise reduction improves the “look”
9 If you’ve had to use a high Spatial NR Luma or Chroma Threshold setting to reduce noise visibly, and areas of detail look a bit chunky or aliased, you can choose a larger setting from the Radius drop-down menu to enable a more detailed analysis of the scene.
This will result in higher visual quality, but larger NR Radius settings are more processor intensive, and may reduce real time performance if you don’t have adequate GPU resources available to your system.
10 If you’ve found suitable noise reduction settings, but the result is too aggressive and makes the image appear too processed, you can try raising the Spatial NR and/or Temporal NR Blend
parameters to fade between the noise reduction added by each set of controls, and the image as it was before you added noise reduction.
Try Applying Temporal NR First, then Applying Spatial NR
Because Temporal NR analyzes multiple frames for its noise isolation, it tends to be better at preserving detail accurately in regions of the image where there’s little motion. If you try applying Temporal NR first and get a successful result, even if only in part of the image, you may reduce how much Spatial NR you have to apply, thus improving the overall quality of your final result.
Keep in mind that while Temporal NR does a great job in unmoving parts of an image but is less effective when dealing with subjects in motion, Spatial NR is able to reduce noise everywhere in the frame falling below its threshold, even when there’s motion. Ultimately, a combination of the two is almost always going to be a winning combination.
![]()
Spatial NR Radius, How Large Should You Go?
Larger NR Radius settings can dramatically improve the quality of high-detail regions in shots where you’re using aggressive Spatial noise reduction, but it’s not necessary to always jump to the large Radius setting, which provides the highest precision. In many cases, when evaluating an image that you’re applying noise reduction to, you may not actually be able to perceive the additional quality, and you’ll waste processing time on an unnecessary level of correction.
It’s a good idea to make sure that you’re evaluating the full-frame image on a large enough display to see the noise you’re working on within the viewing context of the intended audience. Zooming really far into a clip while applying noise reduction may encourage you to use higher quality settings than are necessary, because an excessively enlarged detail of an image lets you see subtle changes that you wouldn’t notice at actual size.