< Previous | Contents | Next >
Each of these HDR standards define how an HDR signal is encoded for export and later mapped to the visible output of an HDR or SDR display. Grading to each of these standards requires some degree of color management, and DaVinci Resolve gives you three main ways to handle this:
— The easiest way is to enable Resolve Color Management (RCM) or ACES in the Color Management panel of the Project Settings, and use the Color Space conversion options that are available. There are options there for each supported type of HDR.
— The transforms that are available in RCM are also available as Resolve FX operations, if you want to organize your grading pipeline more manually using the Color Transform Resolve FX adjustment.
![]()
— LUTs are also available to accomplish each of these color space conversions if you want to develop your own specific image processing pipeline based on custom-made LUT or DCTL transforms.
Overall, Resolve Color Management and ACES are reliable and recommended approaches to handling HDR grading in DaVinci Resolve in most instances. For more information about Resolve Color Management, see Chapter 9, “Data Levels, Color Management, and ACES.”
What Do I Do With HDR?
While these standards make HDR mastering and distribution possible, they have nothing to say about how these HDR-strength levels should be used creatively. That’s up to you, because the question of how to utilize the expansive headroom for brightness and saturation that HDR enables is fully within the domain of the colorist, as a series of creative decisions that must be made regarding how to assign the range of highlights that are available in your source media to the above-100 nit HDR levels you’re mastering to as you grade, given the peak luminance level that you’re assigned to master with. Which HDR peak luminance level you use (1000 nit, 3000 nit, 4000 nit) probably depends on which display you have access to and who’s distributing the resulting program.
Analyzing HDR Signals Using Video Scopes
When you’re using waveform scopes of any kind, including parade and overlay scopes, the signal will fit within the 10-bit scale used to analyze the signal much differently owing to the way HDR is encoded. The following chart of values will make it easier to understand how each level in “nits” (i.e., cd/m2) corresponds to a code value within the 10-bit image scale:
10-Bit Code | Nearest Value in cd/m2 | HDR Display Peak Luminance Capability |
1019† | 10,000 | No commercially available display |
948 | 5000 | Outdoor LED Displays |
920 | 4000 | Professional HDR Displays from Sony, Dolby, Flanders Scientific, EIZO, etc. |
889 | 3000 | Professional HDR Displays from Sony, Dolby, Flanders Scientific, EIZO, etc. |
844 | 2000 | Professional HDR Displays from Sony, Dolby, Flanders Scientific, EIZO, etc. |
824 | 1600 | Virtual Production Wall Panels |
767 | 1000 | Professional HDR Displays from Sony, Dolby, Flanders Scientific, EIZO, etc. |
728 | 700 | OLED mobile phone brightness |
10-Bit Code | Nearest Value in cd/m2 | HDR Display Peak Luminance Capability |
691 | 500 | Minimum standard for an “UltraHD” OLED display |
635 | 300 | Professional SDR displays in “HDR preview mode” |
593 | 203 | BT.2408 recommendation for diffuse white of SDR content being intercut with 1000 nit max HDR content |
528 | 108 | Dolby Cinema projector |
520 | 100 | Standard peak luminance for SDR displays |
447 | 48 | Standard peak luminance for SDR DCI projection, Dolby Cinema 3D peak luminance |
4† | 0 | Absolute black |
![]()
† 0–3 and 1020–1023 are reserved values
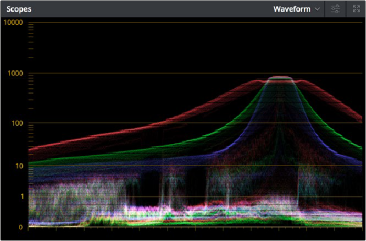
While this table of values is useful for understanding where HDR nit levels fall on legacy external scopes, if you’re monitoring with the built-in video scopes in DaVinci Resolve, you can turn on
“HDR (ST.2084/HLG)” in the Waveform Scale Style settings in the Scopes option menu, which replaces the 10-bit scale of the video scopes with a scale based on nit values (or cd/m2) instead.

TIP: If you’re unsatisfied with the amount of detail you’re seeing in the 0–519 range
(0–100 nits) of the video scope graphs, then you can use the 3D Scopes Lookup Table setting in the Color Management panel of the Project Settings to assign the appropriate “HDR X nits to Gamma 2.4 LUT,” with X being the peak nit level of the HDR display you’re using. This converts the way the scopes are drawn so that the 0–100 nit range of the signal takes up the entire range of the scopes, from 0 through 1023. This will push the HDR-strength highlights up past the top of the visible area of the scopes, making them invisible, but it will make it easier to see detail in the midtones of the image.
The video scopes with HDR (ST.2084/HLG) on in the Waveform Scale Style settings in the Scopes option menu