< Previous | Contents | Next >
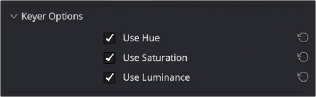
One of the HSL Keyer’s strengths is that you can enable or disable each of the three HSL components using the Hue, Sat, and Lum checkboxes. This lets you ignore specific color components while focusing on others that may be more important. For example, if you’re trying to key the saturated parts of an image, regardless of the hue or brightness, you can turn off Hue and Lum so that only Sat is used to sample it.
HSL Keyer options
Matte Finesse
You may find that sampling the screen color is not enough to overcome some problems. Issues such as chattery edges, holes, or noise can sometimes be fixed using the Matte Finesse controls. These controls filter the output of the Keyer and are adjustments that are made to the matte itself, modifying the key using the frame’s content.
— Pre Filter: This slider attempts to clean up the image before colors are sampled. This adjustment can be useful when you have footage containing MPEG blocking artifacts.
— Clean Black: Clean Black is a specialized operation that eliminates noise seen as white speckling in the black area of a key. Raising Clean Black lets you “fill holes” in the background portion of a key and erode translucent edges.
— Clean White: Clean White is another specialized operation that eliminates noise (seen as black speckling when viewing a high-contrast highlight) in the white portion of a key that includes areas of the image you’re isolating and expands the key by making light parts of a key lighter the higher you raise this parameter, pushing light gray areas of the key toward white. The practical result is that raising Clean White lets you “fill holes” in the foreground portion of a key and grow translucent edges.
![]()
— Black Clip: Raising Black Clip applies a “lift” adjustment such that translucent areas of the matte (gray areas when viewing a high-contrast highlight) are pushed toward black. The range is
0 to 100, with 0 being the default setting.
— White Clip: Lowering White Clip applies a “gain” adjustment such that translucent areas of the matte (gray areas when viewing a high-contrast highlight) are pushed toward white. The range is 0 to 100, with 100 being the default setting.
— Blur Radius: In small amounts, blurring a key does well to take the edge off problem edges. However, blurring a key can also feather the edges of a key past the border of the subject you’re keying, with the result being a visible “halo” around your subject, depending on the adjustment you’re making. The range is 0 to 2000, with 0 being the default. With such a large maximum blur radius, combined with the capabilities that the In/Out Ratio provides in customizing the direction of spread, you can turn some pretty precarious mattes into surprisingly smooth and useful results.