< Previous | Contents | Next >
1 Apply the HSL Keyer to a clip on video track 2 or higher.
2 From the Viewer Overlay menu in the lower-left corner of the Timeline Viewer choose Open FX Overlays.
3 Click and drag across the screen color you want to remove.
4 The transparency immediately takes effect, showing the keyed subject against whatever clip appears on the video track underneath it in the Timeline as a composite. To see the matte you created for further adjustment, choose Alpha Highlight or Alpha Highlight B/W from the Output drop-down menu.
5 To add or subtract from the matte, click the plus or minus Color Range control, and click or drag across the portion of the keyed image.
6 To add softness to the outer range of the key you’re creating, click the plus Softness control and then click or drag across the portion of the image you’d like to include as a soft edge.
Luma Keyer
Based on the Luma Qualifier in the Color page, the Luma Keyer pulls a key from the luma channel. It’s identical to the HSL Keyer with H and S turned off. Although not often used by itself, the Luma Keyer can produce useful effects when used in conjunction with Composite modes.
Selection Range Controls
The Selection Range buttons in the Inspector let you define a key by sampling pixels in the Viewer with the mouse pointer.
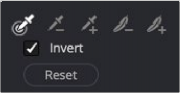
Luma Keyer Selection Range controls
![]()
— Sample Eyedropper: The first control you use whenever sampling the image. It defines the initial range of the keyer; you must use this tool before any of the others. In the Edit page, the Timeline Viewer Overlay must be set to Open FX. Clicking once with this tool selects a single pixel value, while clicking and dragging selects a range of image values that add together.
— Add/Subtract Luma Range: These two controls let you add areas of the image to, or subtract them from, the currently selected luma range that defines the core of the key. As with the eyedropper, you can click on single pixels, or drag over a range of color.
— Add/Subtract Softness: These two controls let you redefine the softness that transitions from the inner range of the key, falling off towards the outer edge of the key. Like the other keying controls, you can click on single pixels, or drag over a range of color.
— Invert: Inverts the sampled luma range to become opaque, and areas not sampled become transparent.
— Reset: Resets the sampled luma range while retaining the Output control settings.