< Previous | Contents | Next >
— Depth Map Preview: By default this box is checked, and shows you the current Depth Map for making adjustments. When this check box is disabled, the resulting alpha can then be used for grading on other nodes. If you applied the effect to a corrector node, make sure to right click on the Depth Map’s node and select “Use OFX Alpha” to have the node correctly pass the effect’s Alpha channel.
— Invert: Checking this box reverses the Depth Map, switching its transparent and opaque regions.
Resulting Map Adjustment
These controls let you determine how the Depth Map’s contrast is adjusted.
— Adjust Map Levels: When deselected (default), you can use DaVinci Resolve’s grading tools (lift, gamma, gain, etc.) to adjust the full range of the Depth Map. When enabled, this option clips the Depth Map’s levels to 0 and 1. This functions as a preview of what will happen to the Depth Map when used as an Alpha channel where the values are always clipped to 0 and 1 by DaVinci Resolve.
— Far Limit: This control adjusts the black levels of the Depth Map.
— Near Limit: This control adjusts the white levels of the Depth Map.
— Gamma: This control adjusts the intermediate depth values to be brighter or dimmer compared to the fixed black and white levels.
Isolate Specific Depth
These controls allow you to sweep backwards and forwards in the scene by depth, allowing you to isolate a specific depth range to adjust.
— Isolation: This checkbox turns the depth isolation tools on or off.
— Target Depth: This controls the specific depth you want to isolate. 1 is fully in the foreground, while 0 is fully in the background.
— Tolerance: Sets the range to either side of the Target Depth to include in the Depth Map.
— Softness: This sets a subtle ramp-in and ramp-out of the selected range, giving it a more organic selection.
Map Finesse
![]()
These controls modify the resulting Depth Map’s Alpha channel for use in grading.
— Post Processing: This control turns the Map Finesse tools on or off.
— Contract/Expand: This control dilates or erodes the overall shape at the edges, useful for fine tuning the boundary between the affected and unaffected regions of the map.
— Blur: This control softens the boundary of the map, allowing it to blend more smoothly into the resulting image.
Advanced Options
These controls tell the Depth Map how to handle various blanking issues.
— Blanking Regions: These controls tell the Depth Map how to handle letter and pillar boxing regions in the effect.
— Process Entire Frame: Tells the AI to ignore any information about the timeline shape and just process all the visible pixels.
— Handle Automatically (default): The AI will process only the area that DaVinci Resolve knows your media is in.
— Auto + Extra Crop: This is recommended for cropping away black bars; it uses
— DaVinci Resolve’s knowledge of which pixels were occupied by your media but lets you crop out the framing or letterboxing relative to its shape. This is recommended because it will stay consistent as you adjust Timeline settings.
— Manual Cropping: Simply lets you override whatever the framing of the content is, ignoring any of DaVinci Resolve’s knowledge of the shape of your media.
For example, say you have footage shot of a person on a rainy day, but the background is too distracting and contrasty. By creating a depth map that isolates only the foreground person, we can then apply a Fast Noise smoke effect to only the background, making it look like a foggy mist, and less distracting.

![]()
The original footage with a distracting background

The same footage with a Fast Noise Smoke effect node to simulate a
fine mist, however it covers the entire frame, including the main subject. The mist belongs in the background only to be more realistic.
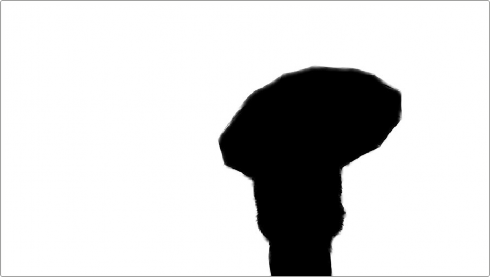
By placing a node with Depth Map applied between the original nodes, you can use the effect to pull a key based solely on “distance” from the
camera. In this case, we have selected the background (white) and excluded the woman with the umbrella (black). Note the fine detail in the furry
coat, which would be difficult to get with an HSL or window qualifier.


TIP: To create more believable Depth of Field adjustments, use the Depth Map effect in conjunction with the Tilt-Shift Blur effect. You can feed the results of the Depth Map directly into the Tilt-Shift Blur effect as a blur map by connecting the key output of the Depth Map node to the key input of the Tilt-Shift Blur node and selecting “From Alpha In” in the Map Source drop-down in the Depth of Field section of the effect. From there adjust the Focus Sweep to dial in the area you want to isolate. If you’re not getting the expected results, try inverting the Depth Map.
TIP: To create more believable Depth of Field adjustments, use the Depth Map effect in conjunction with the Tilt-Shift Blur effect. You can feed the results of the Depth Map directly into the Tilt-Shift Blur effect as a blur map by connecting the key output of the Depth Map node to the key input of the Tilt-Shift Blur node and selecting “From Alpha In” in the Map Source drop-down in the Depth of Field section of the effect. From there adjust the Focus Sweep to dial in the area you want to isolate. If you’re not getting the expected results, try inverting the Depth Map.
TIP: To create more believable Depth of Field adjustments, use the Depth Map effect in conjunction with the Tilt-Shift Blur effect. You can feed the results of the Depth Map directly into the Tilt-Shift Blur effect as a blur map by connecting the key output of the Depth Map node to the key input of the Tilt-Shift Blur node and selecting “From Alpha In” in the Map Source drop-down in the Depth of Field section of the effect. From there adjust the Focus Sweep to dial in the area you want to isolate. If you’re not getting the expected results, try inverting the Depth Map.
![]()
The final result of the process shows the main subject in the foreground with the Fast Noise smoke effect limited only to the background.