
< Previous | Contents | Next >
As the name implies, adjusts color and texture on the forehead.
— Hue and Saturation: These sliders let you adjust forehead color.
— Smooth: This slider lets you apply a specific smoothing operation to the forehead to ameliorate wrinkles and worry-lines.
Cheek Retouching
Simple color adjustment controls affecting the entire cheek area, and not just the blush area.
— Hue and Saturation: These sliders let you adjust the color of the cheek, eye, and nose area.
Chin Retouching
Simple color adjustment controls over the chin of the face.
— Hue and Saturation: These sliders let you adjust the color of the chin, running up alongside the sides of the face (the beard area).
Relight (Studio Version Only)
Relight allows you to add light sources to your scene, realistically illuminating the objects within it. Unlike a Power Window whose shape is fixed on screen, Relight analyzes the shapes of people and objects to create a Surface Map and uses that map to reflect light appropriately. When dialed-in properly, this effect can provide the illusion of light following the curves of an object, reflecting off highlights, and disappearing into shadows.
NOTE: The Relight effect creates the illusion of depth with its analysis of the surfaces in a scene, but it does not calculate 3D relationships between objects in the scene. Shapes cannot be made to cast shadows, and depth information cannot be produced.
NOTE: The Relight effect creates the illusion of depth with its analysis of the surfaces in a scene, but it does not calculate 3D relationships between objects in the scene. Shapes cannot be made to cast shadows, and depth information cannot be produced.
NOTE: The Relight effect creates the illusion of depth with its analysis of the surfaces in a scene, but it does not calculate 3D relationships between objects in the scene. Shapes cannot be made to cast shadows, and depth information cannot be produced.
Relight is useful in situations when you wished you had another light in the scene, want to accentuate an existing light to match another shot, or increase the realism of day-for-night grading.
![]()
Setting up Relight
Analyzing the image to create a Surface Map is very computationally intensive. Calculating the effects of light sources to an existing analysis is comparatively very fast. By default, adding Relight to a node will create the map and add a light in one step. This is convenient, but adjusting the light position
re-runs the effect, and hence re-runs the analysis. So it can be slow to work with unless you have an extremely powerful computer. Fortunately it is possible to split the work across two nodes, caching the analysis in the first node and adjusting the light positions in the second node. This is described in detail below.
Note that you can add multiple light sources reusing the same analysis. If you have, say, three separate lights in the same scene, reusing one analysis, then this will run three times faster than repeating the analysis for each light.
And as an advanced option, the split approach allows you to use a Surface Map which has been saved out to file, or a Surface Map from other software. Computer graphics software can often render “surface normals” of 3D models along with the images they create and these can be made
compatible with Relight. In this context a “normal” is a geometric term describing which way a surface is oriented. There is no universal format for surface normals; see the External Map settings for some options which can help with using these as Surface Maps in the plugin.
Here is a sample node graph splitting the Relight in two:
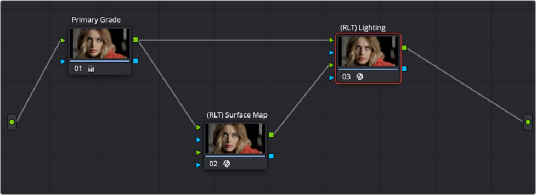
How to set up a dual Relight Node Tree with two separate Relight nodes, configured as above. These have been labeled Surface Map and Lighting for clarity.
In the above example, you have the source video and two Relight nodes. This is how they’re set up:
— The source video is connected to the first RGB input (top green triangle) of both nodes.
— The first Relight Node ((RLT) Surface Map) creates the Surface Map for the image by selecting “Output Surface Map” checkbox in the Relight effect’s settings. When checked, the plugin goes into analysis-only mode and other options disappear. You can enable Node Caching to
automatically generate the Surface Map in the background when you aren’t using DaVinci Resolve. The RGB output of this node is connected to the second RGB input (bottom green triangle) of the second Relight Node.
— In the second Relight Node ((RLT) Lighting), set the first option “Surface Map” from its default (“Use Internal”) to “Use Input 2.” The other settings all remain visible; this node is where you will adjust the light properties.
![]()
You can add Power Windows, Qualifiers, or masks to either node, or to separate nodes and connect them via the first Alpha channel (top blue triangle) of either node. For example, you could select a person using the magic mask and use it to limit the lighting to just that person and not the background.
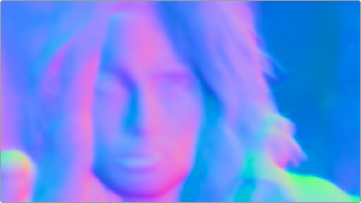
The output of the Relight Surface Map. This goes into the
input of the Relight Lighting node.