< Previous | Contents | Next >
When first placing Relight on a node and turning off the lighting preview, there is no visible change to the image. This is because the map of what the light is illuminating is in the Alpha channel, ready for all of DaVinci Resolve’s color grading tools to go to work. The simplest place to start is to increase Gain (dial it up directly or add color); often changes to gamma and saturation may be appropriate.
For a day-for-night effect you can invert the Alpha to darken all of a scene except the light areas, to achieve a day-for-night effect but with a “light source” that is the original scene lighting.
The Relight Settings
These controls allow you to adjust the intensity, type, and direction of the light that reflects off the surface map. Most are keyframable, and positions can be attached to the FX Tracker, allowing things like moving a light source as if it were attached to an object, or moving a spotlight to follow a person as they move through the scene. Controls and their groups are:
— Surface Map: This chooses which mode you will use to create the Surface Map.
— Use Internal: Generates the Surface Map and immediately uses it in this node.
— Use Input 2: Receives the Surface Map from another Relight Node. Use this on the second node of a dual Relight Node setup.
— Output Surface Map: Checking this box causes this copy of the effect to output a multi-colored map of the input frame. This Surface Map can then be fed into a second Relight effect (set to “Use Input 2” as above) where the light sources are placed and adjusted.
— Directional / Point Source / Spotlight:
— Directional: Creates a light source that emits from a specific direction at an infinite distance.
— Point Source: Creates a light source that emits from a central point.
— Spotlight: Is also a point source but it is directed into a cone shape.
— Relighting Map Preview: Checking this box reveals the Alpha channel of the effect of this light. Unchecking this box shows the current image but with the light mask in the Alpha channel.
— Diffuse Reflection Properties: These controls determine the quality of the emitted light.
![]()
— Brightness: This controls the strength of any grading that is applied to the scene. It does not add brightness changes on its own but amplifies the changes you make in the grading tools.
— Softness: This controls the size of the light emitter, effectively determining how harsh or gentle the gradient is between light and dark.
— Distance Falloff: This controls how much reflections will dim with distance to the light source.
— Light Properties:
— Brightness: This controls the strength of any grading that is applied to the scene. It does not add brightness changes on its own but amplifies the changes you make in the grading tools.
— Reach: This controls how much reflections will dim with distance from the light source.
— Contrast: This determines how harsh or gentle the gradient is between light and dark.
— Surface Properties:
— Glossiness: Gives the illusion of a metallic sheen to reflective surfaces.
— Specularity: When there is any glossiness added, this controls how metallic/shiny that glossiness is.
— Shadow Softness: Controls how much the light penetrates into shadows due to ambient reflections, beyond where it would reach otherwise.
— Spotlight :(shown only with Spotlight option enabled)
— Beam Angle: Sets how broad the cone of light is. This control is also available graphically in the Viewer.
— Edge Softness: Controls the softness of the edges of the light cone/beam.
— Light Position: These controls are for the the position of the light emitter for all light types.
They can be adjusted directly, but more easily, they can be adjusted graphically in the Main Viewer. Ensure that the Main Viewer’s mode is set to Open FX Overlay with the icon at the bottom left.
In Directional mode:
— Azimuth / Elevation XY : Controls the direction the light is coming from.
In Point and Spotlight modes:
— Source Follows FX Tracker: Check this box to have the light source follow the FX tracker.
— Light Source XYZ: These controls determine the light emitter’s position in 3D space.
In Spotlight mode:
— Spot Follows FX Tracker: Check this box to have the light source follow the FX tracker.
— Spot Target XY: These controls determine the position of the base of the spotlight cone.
When you are in Use Input 2 mode, there are options for using an externally-generated Surface Map.
![]()
— Rescale Oversaturated: Different applications use different scalings of the Surface Map. A common format looks like the Relight plugin’s internal ones but with the colors intensely saturated and can be dark or black in some areas. If your imported surface map has this appearance, check this box to re-interpret it.
— Reinterpret Left/Right: Check this box to swap the direction of your external surface map if your map surfaces are appearing concave instead of convex.
— Reinterpret Up/Down: Check this box to swap the direction of your external surface map if your map surfaces are appearing lit from below when the light is above them.
When you are generating an analysis internally with Use Internal, or you are using Output Surface Map, you will also see an Advanced Options group with an option related to Blanking Regions. These will not apply in the majority of cases; they are only for fixing some specific situations. They are for forcing different behavior at the edges of the frame in these special cases:
— The source video has letterboxing or some framing border “baked in,” meaning that the incoming frames have black pixels at the edges that were not added by DaVinci Resolve. Letterboxing added by DaVinci Resolve (e.g., a 21:9 frame fit to a 16:9 timeline) does not need any special treatment.
You will recognize that there is a problem because the Surface Map AI will treat the scene as if the black areas are actually objects or attached to objects in frame. Objects in contact with the black bars may appear to blend into those areas.
— The source video has pillarboxing, same as with letterboxing above. For example, if a 4:3 source video was captured to a 16:9 clip with black borders before it was used in DaVinci Resolve.
— A case where a wide clip was inserted into a narrower timeline correctly, but after resizing or effects were applied you wish for the plugin to process the original blanking areas because there is now content there. This case will appear obvious, in that the analysis will stop at the original blanking boundary, cropping-away areas you want to analyze.
If you encounter any of these special cases your options are:
— Blanking Regions:
— Process Entire Frame: Tell the AI to ignore any information about the timeline shape and just process all the visible pixels.
— Handle Automatically (default): The AI will process only the area that DaVinci Resolve knows your media is in
— Auto + Extra Crop: This is recommended for cropping away black bars, it uses
DaVinci Resolve’s knowledge of which pixels were occupied by your media but lets you crop out the framing or letterboxing relative to its shape. This is recommended because it will stay consistent as you adjust timeline settings.
— Manual Cropping: Simply lets you override whatever the framing of the content is, ignoring any of DaVinci Resolve’s knowledge of the shape of your media.
The Relight On-Screen Controls
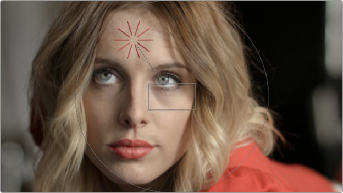
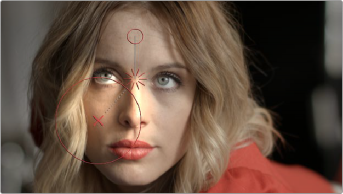
Several of the controls for positioning the light source are available graphically in the Viewer; make sure that Open FX Overlay is selected in the lower left of the Viewer to see them.
![]()
In the Directional mode, you can drag the emitter (red rays) around the frame to set the Azimuth/Elevation controls.
In the Point Source and Spotlight modes, you can move the emitter (red rays) to change XY coordinates, and the circle to adjust the emitter’s Z coordinates. If in Spotlight mode you can drag the X to change
the XY coordinates of the Spot Target, and scale the large circle to adjust the Cone Angle.
Example
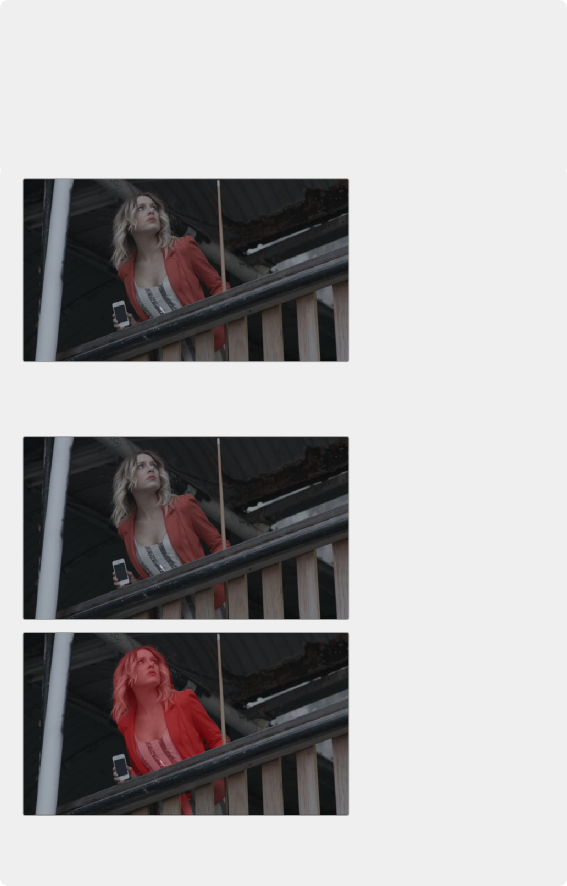
In this example, we will be relighting the scene below. Shot during a cloudy overcast day, the director likes the flat look on the building. Unfortunately, the muted drab lighting also affected the model, which he wants to pop more out of the scene. We are going to use the Relight tool to add a phantom sunbeam directly to the model and not to any of the surrounding fence or walls.
The model’s lighting is flat and drab. We want to change it by adding an artificial sunbeam falling on her that wasn’t there in the shot. We also want to keep the fence and background as they are.
The first tool we will use is the Magic Mask to isolate the model from her environment.
The model’s lighting is flat and drab. We want to change it by adding an artificial sunbeam falling on her that wasn’t there in the shot. We also want to keep the fence and background as they are.
![]()
Isolating the model with a Magic Mask to isolate the effect
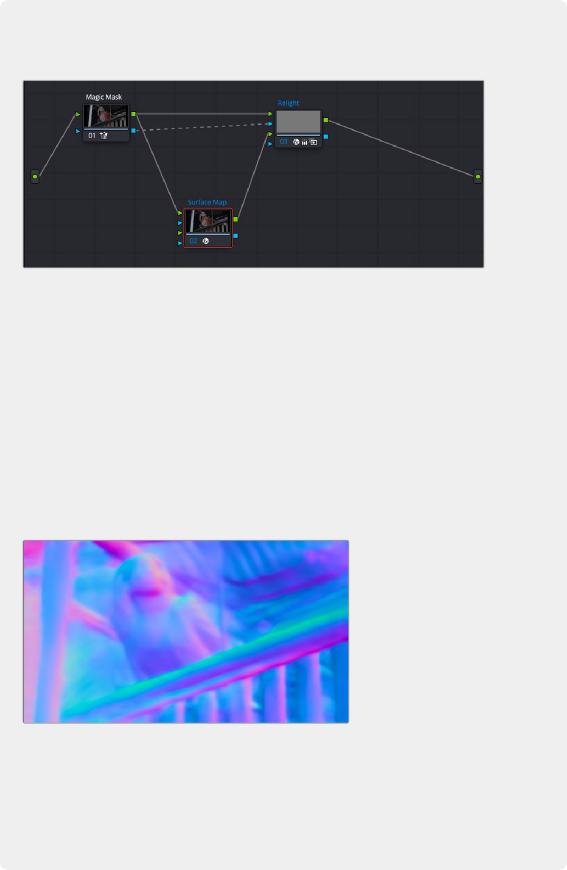
Next we will add two different relight nodes, one to create the surface map, the other to receive it and actually relight the shot. The node tree is explained below.
The Relight node tree; there are two Relight nodes, one called Surface Map and one called Relight.
We feed the RGB output of the Magic Mask to the top RGB inputs of both nodes. We also feed the Alpha output of the Magic Mask into the Relight node. This way the Relight effect will only apply to the model we selected using the Magic Mask and leave the background alone.
In the first node (Surface Map), we select Use Internal from the Surface Map option. We also check the Output Surface Map checkbox to pass that generated map to the second (Relight) node. We then complete the connection by dragging the RGB output of the Surface node to the bottom RGB input of the Relight node. In the Relight node, we then select Use Input 2
in the Surface Map option in the Inspector.
![]()
The surface map generated by the Surface Map node
Now that we have the node tree setup correctly, the Surface Map is generated in its node; make sure it’s node cache is set to On. Then we can work directly in the Relight node and select a Directional light. Using the Relighting Map Preview checkbox and the on screen controls, we can then see exactly where the lighting effect will take place, and how it will follow the curves of the subject.
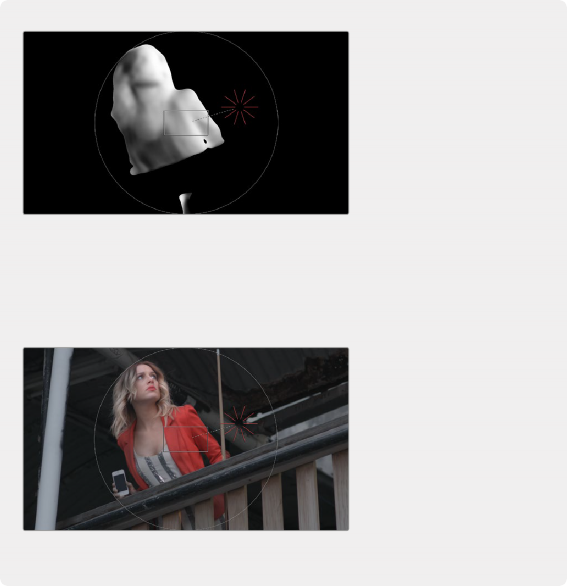
With the Relighting Map Preview box checked, you can see exactly where and how the Relight will affect the subject. Unchecking
the box lets you see the final color output.
With the Relighting Map Preview box checked, you can see exactly where and how the Relight will affect the subject. Unchecking
the box lets you see the final color output.
With the Relighting Map Preview box checked, you can see exactly where and how the Relight will affect the subject. Unchecking
the box lets you see the final color output.
The last thing we need to do is actually create our new light properties, so by using the Primaries Wheels controls in the Relight effect, we can increase the gain and color it slightly yellow/orange and increase the saturation to mimic a golden hour sunbeam on our subject,
where there was only a flat cloudy day before.
Adjusting the Primaries gain and saturation wheels in the Relight node to add the character of the light, selling the illusion that the model
is leaning over the fence into a sunbeam.
Adjusting the Primaries gain and saturation wheels in the Relight node to add the character of the light, selling the illusion that the model
is leaning over the fence into a sunbeam.
Adjusting the Primaries gain and saturation wheels in the Relight node to add the character of the light, selling the illusion that the model
is leaning over the fence into a sunbeam.
![]()