< Previous | Contents | Next >
Licensing DaVinci Resolve to Expose Dolby Vision Trim Controls
To expose the Dolby Vision controls in DaVinci Resolve Studio that let you make manual trims on top of the automatic analysis that any copy of DaVinci Resolve Studio can do, you must email dolbyvisionmastering@dolby.com to receive more information about obtaining a license.
![]()
Once you’ve obtained a license file from Dolby, you can import it by choosing File > Dolby Vision > Load License, and its successful installation will enable the Dolby Vision controls to be enabled in the Color page. You should also receive a display configuration file, which can be loaded via the File
> Dolby Vision > Load Configuration command and lets you populate the Dolby Vision drop-down menus with the most up to date options.
Dolby Vision® Trim Controls in DaVinci Resolve
Once you’ve analyzed a clip, you’re in a position to trim the result. The latest version of the Dolby Vision palette exposes four sets of controls. The first are the main controls:
— Target Display Output: This drop-down specifies what Dolby refers to as the Target Display, used to display the tone mapped image. This menu lets you choose specific display properties to obtain a preview of what the trimmed image will look like on different displays with different gamuts and peak luminance capabilities.
— Trim Controls for: Which Target Display you’re currently trimming for. The default setting
(100-nit, BT.709, BT.1886, Full) lets you monitor an SDR version of the HDR image, so you can see how the trim metadata tone maps the image on non-HDR televisions.
— Analyze controls: The commands governing Dolby Vision auto-analysis are available as buttons, which perform the same functions as their similarly named counterparts in the Color
> Dolby Vision submenu. Please note that most trim controls are disabled until you perform an analysis, which is a necessary first step.
— All: Automatically analyzes each clip in the current Timeline and stores the results individually.
— Selected: Only analyzes selected shots in the Timeline.
— Blend: Analyzes multiple selected shots as if they were a single sequence. The result is the same analysis being saved to each clip. You need to use the blend option when analyzing two clips that meet at a through edit separating otherwise contiguous frames. It’s also typical
to use the Blend option when analyzing a scene of clips that take place at the same location at the same time, to ensure that natural variations in lighting don’t add unwanted variations between the analyses of clips that are supposed to already be balanced with one another. Blend also saves time when analyzing multiple clips that have identical content.
— Frame: Useful in situations where part of a clip has an extreme level of color or lightness that’s not typical of the rest of the clip, that incorrectly biases the analysis and produces a poor result. Placing the playhead on a frame that’s representative of how the clip is supposed to look and using the Frame option bases the analysis on only that frame. This is also a fast way to analyze clips where a single frame is representative of the entire shot.
— Enable Tone Mapping Preview: Lets you see the target display output in the Color page Viewer and video output, so you can evaluate how the tone mapped version looks on your HDR display. This control is disabled when you enable “Use dual-outputs on SDI” in the Master Settings of the Project Settings, since the second output SDI now automatically displays the target display output.
— Mid Tone Offset (CM v4.0 only): This control is used to match the overall exposure between the tone mapped SDR signal to the HDR master. This offset is applied to the L1 Mid values, allowing the adjustment of mid tones without affecting the blacks and highlights. It can be used to shift overall L1 analysis to ensure the best preservation of artistic intent. This setting is shared among all trim passes you do at all nit levels, so if you’ve done two trim passes, one at 100 nits and another at 1000 nits, adjusting this setting always adjusts both trim passes at once. Changes made to this control are recorded to the L3 metadata for each clip.
![]()
The second are the Min, Mid, and Max metadata fields that are populated by the analyzed values of the current clip. These fields cannot be edited, although analysis metadata can be copied and pasted among clips. These values represent the L1 analysis and are used to calculate how the HDR image should be trimmed to fit into the video standard specified by the Target Display.
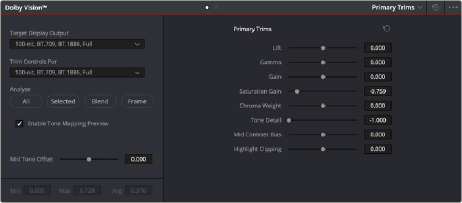
The third are the Primary Trims, which are only editable if you’ve performed an analysis and if you have a license from Dolby. Which controls are exposed depends on the version of Dolby Vision you’ve selected in the Color Management panel of the Project Settings.
Dolby Vision CM v2.9 Controls
If you choose Dolby Vision 2.9 in the Color Management panel of the Project Settings, it activates the
2.9 version of Dolby’s content mapping algorithm and exposes the original Dolby Vision trim controls. It is no longer suggested to use these, since you can do a Dolby Vision 4.0 analysis and trim, and still export converted 2.9 metadata for legacy workflows.
— Lift/Gamma/Gain: These controls function similarly to the Y-only Lift, Gamma, and Gain master wheels of the Color Wheels palette, to let you trim the overall contrast levels of the image. The Dolby Best Practices Guide recommends to limit positive Lift to no more than 0.025, and mostly restrict yourself to using Gamma and Gain if necessary to lighten the image.
— Saturation Gain: Lets you trim the saturation of the most highly saturated areas within a scene. Lesser saturated values will be less affected.
— Chroma Weight: Darkens saturated parts of the image to preserve colorfulness in areas of the image that are clipped by smaller gamuts that don’t have enough headroom for saturation in the highlights.
— Tone Detail: Lets you preserve contrast detail in the highlights that might otherwise be lost when the highlights are mapped to lower dynamic ranges, usually due to clipping. Increasing Tone Detail Weight increases the amount of highlight detail that’s preserved. When used, can have the effect of sharpening highlight detail.
Dolby Vision CM v4.0 Controls
If you choose Dolby Vision 4.0 in the Color Management panel of the Project Settings, it activates the
4.0 version of Dolby’s content mapping algorithm, and exposes the following controls.
— Lift/Gamma/Gain: These controls function similarly to the Y-only Lift, Gamma, and Gain master wheels of the Color Wheels palette, to let you trim the overall contrast levels of the image. The Dolby Best Practices Guide recommends to limit positive Lift to no more than 0.025, and mostly restrict yourself to using Gamma and Gain if necessary to lighten the image.
— Saturation Gain: Lets you trim the saturation of the most highly saturated areas within a scene. Lesser saturated values will be less affected.
— Chroma Weight: Darkens saturated parts of the image to preserve colorfulness in areas of the image that are clipped by smaller gamuts that don’t have enough headroom for saturation in the highlights.
— Tone Detail: Lets you preserve contrast detail in the highlights that might otherwise be lost when the highlights are mapped to lower dynamic ranges, usually due to clipping. Increasing Tone Detail Weight increases the amount of highlight detail that’s preserved. When used, can have the effect of sharpening highlight detail.
![]()
— Mid Contrast Bias: Affects image contrast in the region around the computed average picture level. This lets you increase or decrease contrast in the midtones of the image.
— Highlight Clipping: Reduces details and affects the roll-off the brighter part of the image by clipping the highlights as required. This is useful when the tone mapped image is displaying unwanted details.
The Primary Trims controls that are found in the Dolby Vision palette are only enabled once you’ve authorized your system with a special license, available from Dolby.
The fourth set of controls is available via a second palette mode, the Secondary Trims. These are only editable if you’ve performed an analysis and if you have a license from Dolby.
— Secondary Saturations: A set of slider-based vector-style controls (similar to the Hue vs. Sat curve) lets you adjust the Saturation of Red, Yellow, Green, Cyan, Blue, and Magenta to help you selectively fine tune the results.
— Secondary Hues: Another set of slider-based vector-style controls (similar to the Hue vs. Huecontrols) lets you adjust the Hue of Red, Yellow, Green, Cyan, Blue, and Magenta to help you fine tune the results.
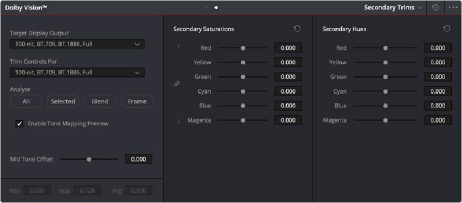
The Secondary Trims controls, as seen on a licensed Dolby Vision system