< Previous | Contents | Next >
For example, if the Search Range is 20, it searches +/-20 frames from the current location, or 40 frames total. The allowance of 10 frames means we look at every fourth frame. You will generally get the best results for the smallest range that gives an acceptable result.
— Blend Mode: If the patch is successfully filled, but the result isn’t blending well with the background, you can try changing the Blend mode. The default is Linear, which is a simple cloning operation, but you can also choose Adaptive Blend, which can provide better results except in certain situations where the edges of the replacement patch have a different color or brightness than the background.
Clean Plate
If you’re noticing that the object removal mask is filled entirely with gray on some frames, this means that background fill couldn’t be easily generated for those frames. In this case, you can try clicking the “Build Clean Plate” button.
— Clean Plate Source: Lets you set the source of the clean plate. Options are Gray Image, which is effectively no source; Internal, which takes a “best guess” approach to generating a background with which to fill the frame and integrates this with frames that could be successfully filled in; and External ,which lets you connect your own plate from another node.
— Build Clean Plate: Executes the building of a new clean plate background based on the Clean Plate Source parameter set.
— Show Clean Plate: Checking this box lets you see behind the mask to the clean plate behind it.
![]()
1 In this example, a drone is flying through a long shot that’s being simultaneously recorded. We’ll remove the drone using a window to identify the feature to be removed using the Object Removal plugin.
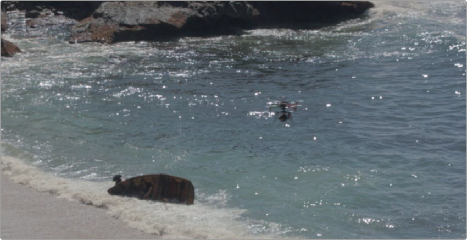
The original shot with a drone that needs to be removed
In simple cases, it’s often easiest to apply the Object Removal effect to a Corrector node, so you can use a window or qualifier within that node to isolate the feature you want to remove. That’s what we’ll do in this example.
2 Use the Window palette to draw a window around the object that needs to be removed. You’ll get the best results using windows or masks that hug the feature being removed fairly closely.
3 Track or keyframe the window to move with the feature you’re removing. Again, you’ll get better results the closer your window hugs the object being removed, and it’s good to have some softness at the edge of this window.
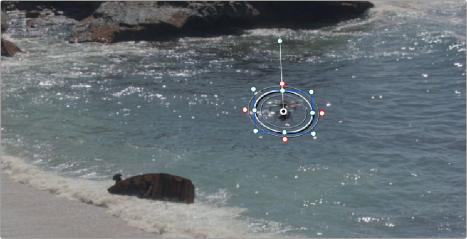
The object that needs to be removed is isolated with a window
4 Drag and drop the Object Removal plugin onto the node in which you’ve just isolated the feature to be removed.
5 Click the Scene Analysis button, and wait for the analysis to finish. If the object you’re removing is moving but the camera is locked, you can turn on the “Assume No Motion” checkbox to improve your results in this case.
![]()
If your footage is ideal for object removal, the object will disappear once analysis is complete, replaced by a seamless background derived from detail found on neighboring frames.
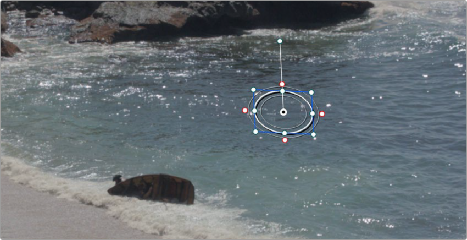
The result after object removal analysis is complete