< Previous | Contents | Next >
5 If you’re not happy with the automatic conversion, use the trim controls in the Dolby Vision palette to manually trim the result to the best possible BT.709 approximation of the HDR grade you created in step 1.
![]()
6 If you obtain a good result, then move on to the next shot and continue work. If you cannot obtain a good result, and worry that you may have gone too far with your HDR grade to derive an acceptable SDR tone mapping, you can always trim the HDR grade a bit, and then retrim the SDR grade to try and achieve a better tone mapping. Dolby recommends that if you make significant changes to the HDR master, particularly if you modify the blacks or the peak highlights, you should reanalyze the scene. However, if you only make small changes, then reanalyzing is not strictly required.
As you can see, the general idea promoted by Dolby is that a colorist will focus on grading the HDR picture relative to the 1000, 2000, 4000, or higher nit display that is being used, and will then rely on the colorist to use the Dolby Vision controls to “trim” this into a 100 nit SDR version. This metadata is saved as part of the mastered media, and it’s used to more intelligently tone map the
entire image to fit within any given display’s parameters. The colorist’s artistic intent is used to guide all dynamic adjustments to the content.
Delivering Dolby Vision
Once you’re finished grading the HDR and trimming the SDR tone mapping, you need to output your program correctly in the Deliver page.
Rendering a Dolby Vision Master
To deliver a Dolby Vision master after you’ve finished grading, you want make sure that the Output Color Space of the Color Management panel of the Project Settings is set to the appropriate HDR ST.2084 setting based on the peak output you want to deliver (any values above will be clipped). Then, you want to set your render up to use one of the following Format/Codec combinations:
— TIFF, RGB 16-bit
— EXR, RBG-half (no compression)
When you render for tapeless delivery, all Dolby Vision metadata is recorded into a Dolby Vision XML and delivered along side either the Tiffs or EXR renders. To export a Dolby Vision XML file, select your timeline in the media pool and choose File > Export >Timeline. Navigate to where you want to save the file and select Dolby Vision v2.9 (or v4.0) MXF files from the file type selector and click save. These two sets of files are then delivered to a facility that’s capable of creating the Dolby Vision deliverable file.
Rendering a Dolby Vision IMF
You can deliver directly to an IMF that includes an MXF with embedded Dolby Vision metadata in the package. To export a Dolby Vision IMF use the following Video settings in the Deliver page:
— Format: IMF
— Codec: Kakadu JPEG 2000
— Type: Dolby Vision (HD, 2K, UHD, or 4K) depending on your deliverable resolution.
— Configure the rest of the IMF settings as necessary for your project.
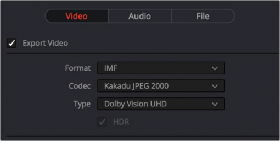
![]()
The Video settings to use for creating a Dolby Vision IMF in the Deliver page
Rendering a Dolby Vision H.265 file
You can deliver directly to a Dolby Vision compatible H.265 file, which allows you to playback video that triggers playback in the Dolby Vision mode on your television or computer screen. To export a Dolby Vision H.265 file, use the following Video settings in the Deliver page:
— Format: MP4 or QuickTime
— Codec: H.265
— Dolby Vision Profile: Set the Dolby Vision profile you wish to use, or None to select the Tone Mapping manually.
— Tone Mapping: Choose None for no tone mapping, or Dolby Vision to expose a list of common deliverables to tone map to.
— Configure the rest of the H.265 settings as necessary for your project.

The Dolby Vision Profile and Tone Mapping settings in the H.265 Video section of the Deliver page
Rendering an Ordinary SDR Media File or Other Specific HDR Trim Pass
If you want to export the SDR trim pass, then you can choose Dolby Vision from the Tone Mapping drop-down menu in the Advanced Settings of the Render Settings list on the Deliver page, and choose the 100-nit, BT.709, BT.1886, Full setting below. With this enabled, you can output the SDR version of your program to any format you like.
You can also export the trims for other HDR nit levels for specific displays, at 600, 1000 or 2000 nits and in the either the BT.2020 or P3 gamuts.

The Tone Mapping setting in the Advanced Settings of the Render Settings list