< Previous | Contents | Next >
These options let you make final adjustments to the source mask from whatever qualifier you’ve used.
— Preview Mask: Check this box to see the mask as a black and white matte; white is where the new sky will come through.
— Shift Edge: Shifts the mask boundary into, or away from, the horizon.
— Refine: Adjusts the mask boundary to the image edges.
— Black Level: Adjusts the transparency level of the mask.
— White Level: Adjusts the opacity level of the mask.
Source Sky Appearance
These tools let you customize the look of the new incoming sky. They have no effect on the artificial sky, but only on a video clip used as a sky background plate.
— Color Space: Lets you adjust the incoming sky’s color space. Defaults to timeline settings.
— Gamma: Lets you adjust the incoming sky’s gamma. Defaults to timeline settings.
— Detail: Lets you adjust the incoming sky’s midtone detail.
— Brightness: Lets you adjust the incoming sky’s brightness.
— Saturation: Lets you adjust the incoming sky’s saturation.
— Temperature: Lets you adjust the incoming sky’s color temperature.
— Tint: Lets you adjust the incoming sky’s tint.
— Opacity: Lets you adjust the incoming sky’s opacity, if you want to blend it in with the sky from the original footage.
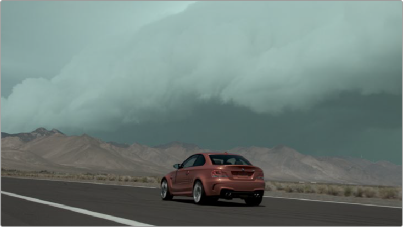
![]()
The same car shot with a more dramatic storm footage used as the replacement sky, adjusted with the Source Sky Appearance tools.
Artificial Sky
These options let you generate realistic looking artificial sky elements. They are broken into three categories: Sky, Cloud, and Hotspot (stand in for the sun or moon). By default, the opacities for these elements are all set to zero (off). In order to see them, you must increase the opacity for each category to a positive number.