< Previous | Contents | Next >
This section of the effect tracks the motion of the mesh points over time. Use the Tracking Direction controls to complete the tracking procedure across the clip. After the tracking is complete, the effect does no more analysis, and any additional contrast assistance from previous nodes can be discarded after this step. For simple cases, the tracking may run completely without user intervention, but for more complex cases, a number of additional controls are used to refine the track.
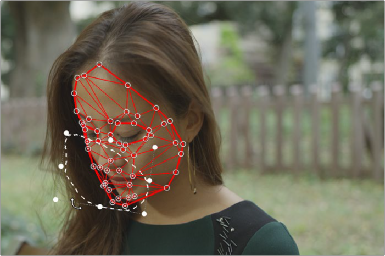
Fixing a broken track will require some manual adjustments to both the mesh and the tracking data. At any time while tracking, mesh points can be adjusted either one by one, or with the lasso selection tool (Command - Drag) around the entire mesh or just parts of it. The lasso selection tool also has the ability to stretch, scale, and rotate the mesh points, making it easier to manually deform and place the mesh exactly where you want it to be, if for some reason the automatic tracking fails. However, additional mesh points cannot be added or deleted at this stage, without first resetting the tracking.
Command-Drag will allow you to lasso multiple mesh points, and scale, rotate, and stretch them, as needed.
Manually editing the mesh points at a frame only affects that frame directly; it does not affect neighboring tracking data. However, it does affect neighboring interpolated positions, which makes it good for tracking from that point onwards. For example:
![]()
— Tracking is good until frame 150 when a few points separate from the rest, disturbed by a lighting change. At frame 150 they can be manually moved back into place, then if tracking is resumed they will continue with their corrected positions.
— Tracking exists until frame 150, after which there is no data for a few frames until it resumes at 160. Editing the points at either frames 150 or 160 will cause the intermediate frames to be interpolated with these changes applied.
— Tracking exists up to frame 150 and at frame 160 onwards, frames 151-159 are interpolated. At frame 155 some points are adjusted. This creates tracking data at this frame, and now frames 151- 154 interpolate from the last tracked frame to this current one, and then frames 156-159 from the current to the next tracked frame.
If an object in the frame occludes the tracked surface, for example tracking a mesh on a shirt, and the person’s arm moves down through the mesh, breaking the track. You may be able to fix this issue by using an Alpha channel, as described in the Tracking Using a Mask section below.
Tracking data is also visible as keyframes in the Keyframe Editor in the FX node’s Surface Tracker keyframing data, and it is also accessible as the last control at the bottom of the Track section where the data at a frame can be created or deleted directly.
— Go to Start: This button will snap the playhead to the first frame that has been tracked, or the frame where the boundary was created.
— Go To End: This button will snap the playhead to the last frame that has been tracked.
— Tracking Direction Controls: These controls perform the tracking analysis in the direction indicated. They are from left to right: Track Backwards, Track Backward One Frame, Pause Tracking, Track Forwards Then Reverse, Track Forwards One Frame, Track Forwards. Using these controls, you can set the track across the whole clip or limit the tracking to just a section of it.
— Tracking Data Controls: These controls allow you to manipulate the track data after it’s been run.
— Remove Tracking Data Before This Frame: Clears all the tracking data before the current frame.
— Track From Last Known Match: This button will match the tracking data to the current frame and connect it to the last frame where tracking data exists. If there has been too much motion between those times, you can move the points approximately into place and try matching again. For example, the tracking occurs without issue until frame 150, but something moving across the scene causes an error in the track for six frames (151-157). The tracking data can
be paused before it hits these frames, or these frame’s tracking data can be deleted after the fact. Then at frame 158 you can press this button to continue the track from the last known good track at frame 150.
— Remove Tracking Data At This Frame: Clears the tracking data at the current frame.
— Remove Tracking Data After This Frame: Clears all the tracking data after the current frame.
— Interaction Overlays: These buttons control the visibility of the mesh overlays on the Viewer.
— Show: Shows the mesh at all times.
— Hide on Drag: Shows the mesh until a point is dragged, then it is hidden, allowing you to see the surface underneath for fine adjustments.
— Hide: Hides the mesh at all times.
— Tracking Behavior: These options allow you adjust the way the tracking operates.
— Motion Range: Controls how far to search for matches. Increase this slider if the surface is moving too quickly and the tracking fails to find it.
![]()
— Mesh Rigidity: Controls how flexible the mesh is. Reduce this slider to make the mesh points more flexible. This gives you best results if the clip is noise-free and warping smoothly. Increase this slider to get a “stiffer” tracked surface with less internal warping.
— Quality: The tracker can be very computationally intensive; it is recommended to use the Faster setting while making adjustments to the mesh, then use Better for the final track once all the parameters have been set correctly.

NOTE: The Surface Tracker creates data at each frame of the source clip. If the source clip is not at the same frame rate as the timeline, tracking may seem to stutter or skip frames. You can “bake” retiming into a clip by right-clicking on it on the Edit page and choosing “Render In Place” to create a result with exactly one frame for every timeline frame.
NOTE: The Surface Tracker creates data at each frame of the source clip. If the source clip is not at the same frame rate as the timeline, tracking may seem to stutter or skip frames. You can “bake” retiming into a clip by right-clicking on it on the Edit page and choosing “Render In Place” to create a result with exactly one frame for every timeline frame.
NOTE: The Surface Tracker creates data at each frame of the source clip. If the source clip is not at the same frame rate as the timeline, tracking may seem to stutter or skip frames. You can “bake” retiming into a clip by right-clicking on it on the Edit page and choosing “Render In Place” to create a result with exactly one frame for every timeline frame.
— Tracking Keyframes: Controls the Surface Tracker in the standard Keyframe Editor. You can insert, delete, and navigate different keyframes from this option.