< Previous | Contents | Next >
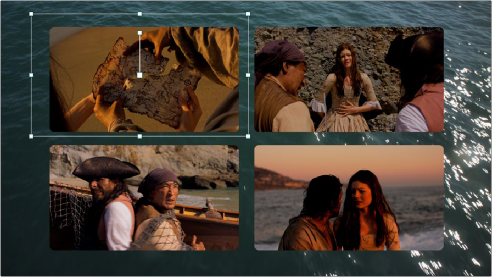
Create Background mode makes it easy to create a split-screen layout of different clips without having to resize them with precision to align the edges and sizes of each clip. The width of the frame that’s created gives some wiggle-room to reposition and animate each individual clip within the hole it shows through. You can see the resulting effect created in the previous example below.
The resulting split-screen effect, with four clips arranged to show through the holes created in the top “background” clip that’s creating the frame; you can see the onscreen controls corresponding to the clip on track 4 that have been used to position and resize it to fit.
Create Tile
![]()
This mode of operation is a bit more work to set up, as it requires you to create a layout in one instance of this effect, but it gives you more options, automatically transforming each layer of video in your stack of clips in the Timeline to fit a layout you design. The best way to work in Create Tile mode is to edit a stack of superimposed clips in the Timeline, but this time if there’s a clip you want to use as the background, it should go at the bottom of the stack.
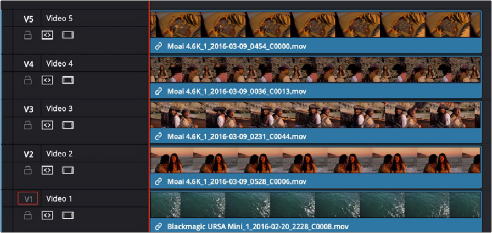
A stack of clips to create a split-screen effect in Tile mode; the bottom clip is going to be used as the background.
Then, apply the Video Collage clip to the topmost clip, and set the Workflow drop-down menu to Create Tile. Immediately, you’ll see that the current layer has been fit inside the first rounded tile
of the default layout of four tiles. For clarity, video tracks 4, 3, and 2 have been muted so you can see the current clip turned into a tile against the bottom clip that serves as the background for this arrangement.
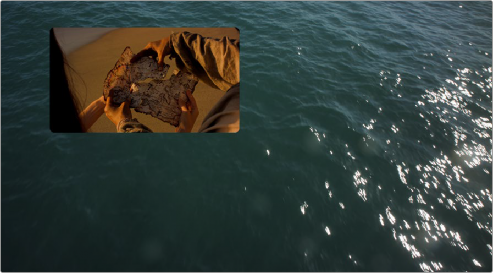
The topmost clip set to create the first tile in a layout; video tracks 4, 3, and 2 are disabled to show the top clip against the bottom clip that’s being used as the background.
Ultimately, you’ll use Paste Attributes to apply a copy of this effect to each clip on the Timeline that’s supposed to fit inside a tile, and once you choose which clip goes inside each tile, that’s what will create the arrangement. Before you do that, however, you need to customize the layout.
![]()
To get a preview of the entire layout for further customization, turn on the Preview Layout checkbox in the Inspector. This draws a preview of how all the tiles will be placed using the current layout. Using this preview, you can make whatever changes you want to set things up, before you copy this plugin to all the other clips in the stack.
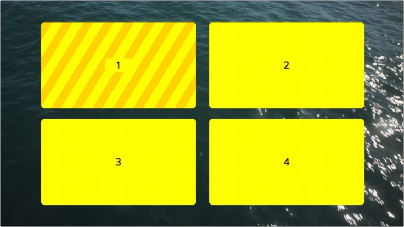
Turning on Preview Layout to customize the layout
With Preview Layout enabled, you can use the Layout controls below to choose how many columns and rows of tiles there are, to stagger the tiles horizontally or vertically, to round or square off each tile by a variable amount, and to alter the margins and spacing. In this way, you can create a wide variety of different symmetrical layouts really easily. In this example, we’ll create a layout with one row, three columns, that’s staggered vertically.
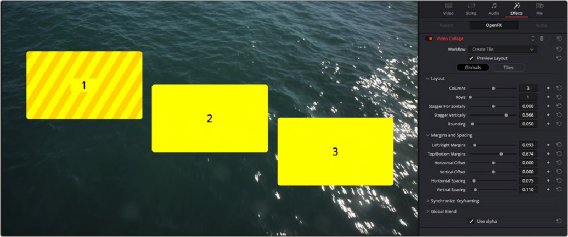
Our new customized layout, shown next to the Inspector controls for this effect
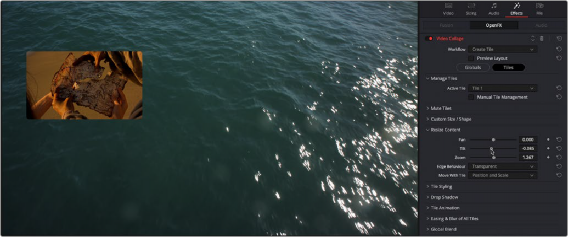
Now that this is done, we’ll turn off Preview Layout to focus on the current clip’s integration into our layout, and we can see that it doesn’t quite fit into the box. Click the Tiles button in the Inspector.
This reveals the Tile-specific controls, which include the Resize Content controls. Click the disclosure control to open these up, and use the Pan, Tilt, and Zoom controls to make this image fit into the tile full screen.
![]()
Tiles controls in the Inspector with Preview Layout disabled, so we can focus on customizing the current tile
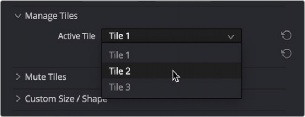
You should also note the Active Tile drop-down menu. This menu serves two purposes. First, it defines which tile the current clip is displayed within. This becomes important later on when you apply this effect to multiple superimposed clips. However, it also determines which tile you further customize using the Tile-based controls of the Inspector. If needed, tiles can be individually styled.
The Manual Tile Management checkbox is off by default, which enables DaVinci Resolve to automatically update the number of tile entries in the Active Tile drop-down menu with items equal to the number of grid positions (or grid nodes) defined by the rows and columns you’ve set, without you needing to do anything. For simple symmetrical layouts, this is easiest. However, if you turn Manual Tile Management on, you gain the ability to add and delete tile positions manually, which enables other options. For now, we’ll leave this turned off.
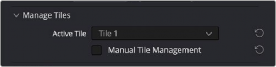

(Left) The Active Tile drop-down with Manual Tile Management turned off, (Right) The Active Tile controls with Manual Tile Management turned on, and additional controls for manual tile management displayed
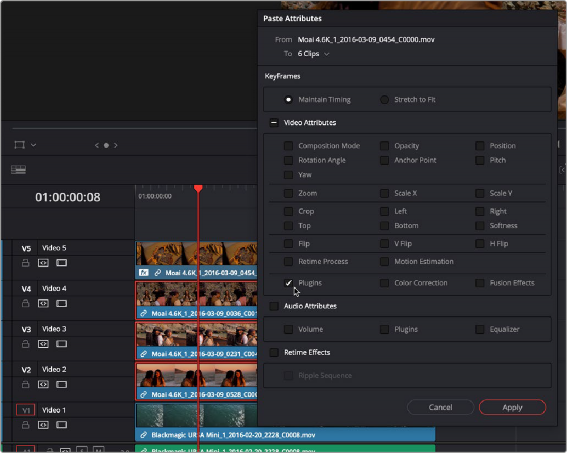
So, now we’ve created a custom overall layout, and we’ve tailored the top clip in the stack to fit the first tile in the layout. Now it’s time to apply this effect to the next two clips in the stack (remember the bottom clip will be used as a background, so it doesn’t need this plugin applied to it). Select the top clip with the effect applied to it in the Timeline, and press Command-C to copy it. Then, select the next two clips, right-click one of them, and choose Paste Attributes (Option-V). When the Paste Attributes window appears, turn on the Plugins checkbox, in Video Attributes and click Apply. Those two clips disappear as they receive the Video Montage effect and fit themselves into Tile 1, just like the top clip.
![]()
Using Paste Attributes to apply the copied effect from the top clip to the other clips in this arrangement
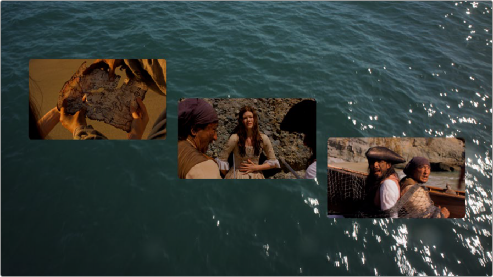
To assign each clip to the correct tile in the layout, select each clip in the arrangement, one at a time, open the Effects panel of the Inspector, click the Tiles button in the Inspector (if necessary), and set each clip to be the next available tile in the Active Tile drop-down menu. In this example, the top clip was in Tile 1, the second clip down will be in Tile 2, and the third clip down will be in Tile 3.
Assigning the Active Tile for each layer in the Timeline

TIP: If you enable the Open FX Overlay of the Timeline Viewer, each tile has an overlay that lets you click a tile in the Viewer to make that the Active Tile.
TIP: If you enable the Open FX Overlay of the Timeline Viewer, each tile has an overlay that lets you click a tile in the Viewer to make that the Active Tile.
TIP: If you enable the Open FX Overlay of the Timeline Viewer, each tile has an overlay that lets you click a tile in the Viewer to make that the Active Tile.
If you like, you can rearrange which clips go into which tiles using this control, but for now we’ll keep things simple. As you do this, each tile becomes populated, and the final layout is revealed, with the background clip showing behind everything. If necessary, you can use the Resize Content controls (in Tiles mode) to resize each tile’s contents to fit the tile better.

NOTE: If you’ve customized a layout, copied and pasted attributes to the other clips you want to use in that layout, and have assigned each clip to its position in the layout, and you then decide you need to make a change to the Globals layout controls, you’ll need to go through the process of copying the updated effect, pasting attributes to the other clips, and reassigning each clip to the appropriate position in the layout to make that update to the other clips as well.
NOTE: If you’ve customized a layout, copied and pasted attributes to the other clips you want to use in that layout, and have assigned each clip to its position in the layout, and you then decide you need to make a change to the Globals layout controls, you’ll need to go through the process of copying the updated effect, pasting attributes to the other clips, and reassigning each clip to the appropriate position in the layout to make that update to the other clips as well.
NOTE: If you’ve customized a layout, copied and pasted attributes to the other clips you want to use in that layout, and have assigned each clip to its position in the layout, and you then decide you need to make a change to the Globals layout controls, you’ll need to go through the process of copying the updated effect, pasting attributes to the other clips, and reassigning each clip to the appropriate position in the layout to make that update to the other clips as well.
![]()
The current layout, with each clip in the stack assigned to a different tile
So, these are the overall workflows of the Video Collage effect. There is, of course, much more you can do, but this is the basis of how you create your initial layout.