< Previous | Contents | Next >
The clips edited into the Timeline appear within each track, with any multichannel elements within each clip occupying as many lanes as that track type has available (for example, 2 channel stereo, or 6 channels for 5.1). At the left of each track is a header area that contains a number of controls.
These multi-lane audio tracks appear differently from the Edit page, which is optimized for straightforward audio-for-video editing, and shows any multichannel files on single lane tracks with composite waveforms.
The Audio page Timeline cannot be closed.
Controls in the Audio Timeline
The Audio Timeline has the following controls.
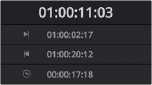
— Timecode fields and Range buttons: Four timecode fields show the current timecode value corresponding to the position of the playhead (at the very top), the Range In point, the Range
Out point, and the Range duration. Clicking the Range In and Range Out buttons (to the left of the timecode fields) set these points and their corresponding timecode value.
Timecode fields and Range buttons in the Fairlight page
— Transport controls: The bar defining the top of the Timeline contains the Fairlight page’s audio- specific transport controls, which differ from those found on the Media, Edit, Color, and Deliver pages due to its inclusion of recording capabilities. These include Fast Reverse, Fast Forward, Play Forward, Stop, Record, Loop, and the Automation toolbar display icon.
![]()
Fairlight page transport controls
— Automation toolbar: Clicking this button opens a secondary toolbar with all the controls you need to configure the recording of mixer automation. For more details on Automation,
see Chapter 174, “Mix Automation.”
![]()
Fairlight page automation toolbar
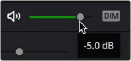
— Monitoring controls: At the far right of the transport controls, a set of three monitoring controls let you quickly control the output volume of your mix. The speaker icon is an Enable/Disable button allowing for muting audio playback. The icon turns red when audio is muted. The slider lets you change the monitor volume and has a decibel indicator of the amount of level that has increased or decreased. The DIM button lets you temporarily reduce the monitored volume being output in order to have a quick chat with your client about sports or the state of the world while keeping half an ear on the mix. The slider turns yellow when audio monitoring is dimmed. Dim and Mute commands are also available from the Fairlight menu.
The monitoring controls
— Timeline Ruler: The Timeline Ruler shows the program’s timecode. The playhead indicates the current frame (and can display the sample) where you’re working in the Timeline, and the
playhead has a handle that appears within the Timeline Ruler. Dragging within the Timeline Ruler moves the playhead. When you add markers to the Timeline, these markers appear within the Timeline Ruler as well.
— Playhead: Shows the current frame and sample of playback, and provides a visual representation of where you are while playing, shuttling, and jogging through the Timeline. Also used as a reference point for editing operations. The large timecode display at the upper left-hand corner of the Timeline shows the position of the playhead.
— Audio tracks: The Fairlight page of DaVinci Resolve supports multiple audio tracks, and each audio track may contain multiple lanes with which to accommodate the audio channels that are contained within multi-channel audio clips using track mappings such as stereo, 5.1, 7.1, Atmos, or Adaptive (1–24 channels). Audio clips that have been edited into the Timeline appear within the
tracks, with the recorded channels occupying as many lanes as that clip has available. At the left of each track is a header area that contains a number of controls.
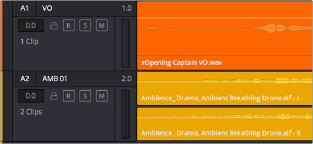
The Fairlight timeline is divided into tracks and lanes;
track A1 is a mono track and has a single lane for mono audio. Track A2 is stereo and has two lanes for stereo audio.
Track header
The track header contains different controls for selecting, locking/unlocking, and soloing/muting tracks, and also informational fields showing, for the track number, how many clips appear on that track and the track type.
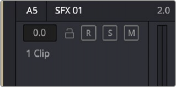
![]()
The track header controls of the Fairlight page timeline
— Track color: Each track can be color-coded with one of 16 different colors. These color codes correspond to the Edit page Mixer, and to the Fairlight page Mixer, Tracks Index, and Audio Meters. You can choose a new color for any track by right-clicking the track header and
choosing from the Change Track Color submenu. You can set multiple tracks to the same color by dragging over contiguous track headers, or by Command-clicking on discontiguous track headers of multiple tracks to select them, and then right-clicking and choosing a color from the Change Track Color submenu.
— Track number: Indicates the number of each track.
— Track name: Each track has a name that defaults to the track number, such as Track 1, Track 2. However, you can click any track’s name and edit it to be whatever you like. For example, you can rename each track with the type of audio you’re editing onto it, such as
Production, Ambience, SFX, or Music. These track names are also used to identify each track’s channel in the Mixer, in the middle of each channel strip (each channel strip’s track number is simultaneously displayed at the top).
— Audio channel type indicator: Audio tracks also show which channel configuration that track uses, listing the number of channels for mono, stereo, 5.1, 7.1, Atmos, adaptive, and others.
— Fader value: A field displays the current fader setting at the position of the playhead, in dB. This value corresponds to the track’s fader level on the Mixer panel. You can drag this value up or down and the fader will follow.
— Lock Track button: When a track is locked, clips can’t be replaced, moved, or otherwise edited, although clips on locked tracks can be graded when in the Color page. The lock shows closed when track contents are locked and open when unlocked.
— Arm button: This button arms recording onto that track.
— Solo button: Disables all other tracks but the current one, enabling you to quickly hear a single track in isolation. This affects rendering, so if one or more tracks are soloed, the muted tracks won’t be output or rendered.
— Mute button: Temporarily disables audio on that track so it’s not monitored or output. This affects rendering, so if one or more tracks are muted, they won’t appear in the rendered output.
— Audio meters: Each track has audio meters in the track header that let you see levels during playback.
— Toolbar editing tools: The toolbar contains both modal and command buttons to let you work on your projects. More detail on these appears in the following section.
— Vertical and horizontal scroll bars: If your project is longer than the current width of the Timeline, or the number of audio tracks is taller than the current height of the Timeline, these scroll bars let you drag to navigate around your program. When the view is scrolled horizontally, the playhead moves along with the track waveforms, so it may temporarily move out of view. If you start playback, the playhead jumps back into view. You can also scroll vertically using the scroll wheel (or other scroll control) of your mouse or other pointing device and can scroll horizontally by holding the Command key down while using your scroll control.
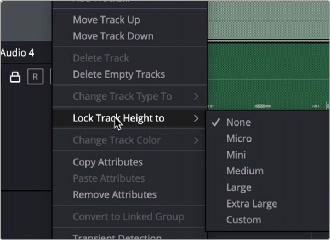
— Individual Timeline track resizing: Any track in the Timeline can be individually resized by right-clicking anywhere within that track’s header control area and choosing a track height from the Lock Track Height To submenu of the contextual menu. You can choose a fixed size including Micro, Mini, Medium, Large, Extra Large, and Custom. When you choose a fixed track height, vertical zooming no longer affects that track until you change that track’s “Lock Track Height to” option back to None. You can also highlight several or all tracks and set the track height to one
size. All highlighted tracks will change to that particular size unless changed again, either globally or individually.