< Previous | Contents | Next >
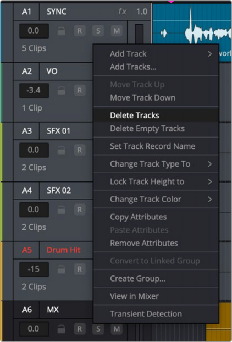
Right-click within a track’s Timeline header and choose Delete Track. If there are clips on a track you remove, they are also deleted from the Timeline, but preserved in the Media Pool.
Right-clicking on a track or the track field reveals the Delete Tracks and Delete Empty Tracks functions
You can remove all empty audio tracks in the Fairlight timeline by right-clicking any track header and selecting Delete Empty Tracks from the contextual menu.
You can delete a multiple selection of tracks in the Fairlight timeline by right-clicking any selected track header and selecting Delete Tracks from the contextual menu.
Link Grouping
The Link Group function allows you to link mono tracks of material that are related and manipulate them as a one entity controlled by a single fader on a single channel strip. Only mono tracks
can be used to create a link group; other track types such as stereo, 5.1, 7.1, Atmos, or Adaptive cannot be used.
Unlike a multi-channel track with lanes, a link group of mono tracks functions as independent, editable tracks in the Timeline. However, each track is mapped when choosing a track type, using one of the standard multi-channel mappings (stereo, 5.1, 7.1, Adaptive).
Link groups are extremely useful. For example, if you’ve been given independent “.L/.R” sides of a stereo mix, or a set of six independent related audio files that need to be assembled as a single 5.1 surround mix, or when you have surround channels that need to be specifically re-edited on a channel by channel basis.
1 Create two or more Mono audio tracks that you want to group together. If you need to create a link group with a specific channel mapping, such as 5.1, make sure you create enough tracks (in this case, 6).
2 Choose Fairlight > Link Group.
3 When the Link Group dialog appears, mono audio tracks are represented by active buttons (all other track types are disabled, since they can’t be linked). Click to enable the button of every track you want to include in the link group you’re about to create. Which track type mappings are available to use for creating your group depends on how many tracks you’ve selected.

Selecting six tracks to use for creating a link group
4 After you’ve selected all the tracks you need to, click one of the available “Link as” buttons below. In this example, six tracks have been selected, so you could click 5.1 Film or 5.1.
![]()
When you select enough tracks, you can create groups linked as specific surround mappings.
Afterwards, the tracks you selected should turn into a single block, showing they’ve been linked.

The Link Group window shows the link indicator line next to the track names.
Depending on the number of mono channels selected, Fairlight will offer possible linking options. For instance, when ten channels have been selected, both Atmos 7.1.2 and 5.1.4 are option choices.

The Link As option is dependent on the number of channels being linked.
![]()
5 Close the Link Group window when you’re finished.
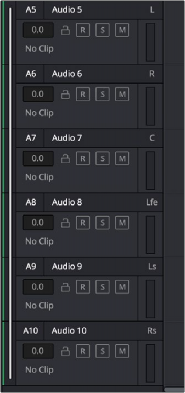
Once you’ve created a link group, the mono tracks in the timeline that you linked appear with a bar to the left in the track header that spans every track that’s linked. If the tracks are tall enough, they’ll also be labeled to identify which track corresponds to which. For example, with a 5.1 surround mapping,
L, R, C, LFE, Ls, Rs, and so on. You also have the freedom to edit additional or different contributing elements of a surround mix into the appropriate track that represents that channel.