< Previous | Contents | Next >
The variations of routing of the multichannel files are due to the path order of SMPTE or Film standards. They are:
— 5.1 film order: L, C, R, Ls, Rs, LFE
— 5.1 SMPTE order: L, R, C, LFE, Ls, Rs
— 7.1 film order: L, C, R, Lss, Rss, Lsr, Rsr, LFE
— 7.1 SMPTE order: L, R, C, LFE, Lss, Rss, Lsr, Rsr
Creating Busses
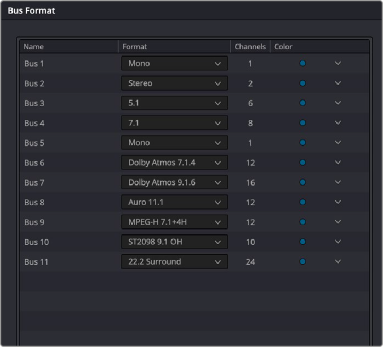
Choosing Fairlight > Bus Format opens the Bus Format window, which lets you create the busses you need (up to the limitations of your system) to organize the tracks and channels of your program.
The depth of options in the FlexBus system
The Bus list lets you rename the bus, choose the format of each bus (a drop-down menu appears in the Format column of each entry of the list), shows the number of channels associated with that bus, and lets you color-code each bus (a Color drop-down lets you choose that bus’s color). Simply click any item on the Bus list to select it, and choose different options from the Format and Color drop-down menus, or click on the User Name of any bus to select it, and type a custom name.
At the bottom of the list are three buttons that let you Add Bus, Duplicate, or Remove selected busses. When you’re done modifying the available busses, you can click OK to accept the changes and close the Bus Format window, or Cancel to close the window without any changes (although all pre-existing busses remain in place). The bottom button row also has a Used tally of what has been used and what is available for your workstation.
Immersive Formats (Studio Version Only)
To turn on the immersive formats, go to Preferences > Video and Audio I/O > System > Immersive Audio, and choose from among the appropriate options. Once enabled, the various immersive bus formats are available in the Bus Format panel’s Bus list.
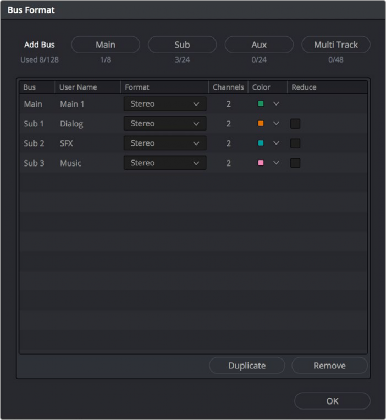
The legacy Bus Format window lets you add busses to the mixer.
Legacy Fixed Bussing
Working with the FlexBus topology is highly recommended for its flexibility. In addition, some newer features are only available using FlexBus. At some point, however, you may need to work with legacy Fixed Bussing in a new project. To use Fixed Bussing in a newly-created project, prior to adding any timeline, open Project Settings > Fairlight, and under the Bussing heading, check “Use fixed bus mapping.” Now all bussing is handled with the legacy Fixed Bus topology.
![]()
The legacy Bus Format window has four buttons that let you create the various Fixed Bus types. Creating a new bus, whether it’s a Main, Sub, Aux, or Multi Track, adds the new bus to the list that appears beneath.
The legacy Bus list works the same as the FlexBus list with choices for rename, format, color code, and so on, and buttons that let you Duplicate or Remove selected busses.
When you’re done modifying the available busses, you can click OK to accept the changes and close the Bus Format window, or Cancel to close the window (although any busses you’ve made remain
in place). The bottom button row also has a Used tally of what has been used and what is available for your workstation.