
< Previous | Contents | Next >
Once you’ve created one or more busses, you can assign different tracks to specific busses or perhaps also busses to busses, busses to tracks, and the final Main bus destinations.
Bus Assignment Using the Mixer
You can easily assign your track(s) to any available busses simply by using the plus (“+”) icon on a Mixer channel strip:
— Select a mixer channel, and click on the plus (“+”) icon in the Bus Output or Bus Sends section.
— In the drop-down menu, choose the desired destination.
— A rectangle appears with the name of the bus, and the bus is now assigned.
Bus routing drop-down menu on a channel strip

TIP: You can quickly assign a bus to any selected group of tracks, or to all tracks, by holding down the Option key (Mac) or the Alt key (Windows) for all selected tracks or Command-Option (Mac) or Control-Alt (Windows) for all mixer channel strips prior to performing the operation. These shortcuts can save a lot of time in your workflow.
TIP: You can quickly assign a bus to any selected group of tracks, or to all tracks, by holding down the Option key (Mac) or the Alt key (Windows) for all selected tracks or Command-Option (Mac) or Control-Alt (Windows) for all mixer channel strips prior to performing the operation. These shortcuts can save a lot of time in your workflow.
TIP: You can quickly assign a bus to any selected group of tracks, or to all tracks, by holding down the Option key (Mac) or the Alt key (Windows) for all selected tracks or Command-Option (Mac) or Control-Alt (Windows) for all mixer channel strips prior to performing the operation. These shortcuts can save a lot of time in your workflow.
The Bus Assign Window
When you have a lot of busses or tracks to handle, the Bus Assign window lets you to easily manage connecting to all of them at once. Choose Fairlight > Bus Assign to open the window. Multiple bus assignments can be created within the dialog; these new assignments will be reflected in the Bus Outputs section on the channel strips in the Mixer.
The top shows the Send and the Out of all of the available busses, while the bottom shows a list of all available tracks and busses to connect to. The Bus Assign window defaults to List view, in which each bus and track is shown as a list, but by using the icon in the upper right of the window, it can be switched to Icon view, in which Available Tracks are shown as buttons.
Making Bus Assignments
Click a button in the Busses section to select the Send or Out of that bus, and then click on any destination in the tracks/busses list below, or drag over a group of tracks or busses to assign to all of them. When assigned, the bus number will appear in the Bus Sends or Bus Outputs column.
— To assign every track, Sub, and Aux to a bus: Click a button in the Busses section to select that bus, and then click Assign All.
— To clear all track assignments from a particular bus: Click a button in the Busses section to select that bus, and then click Unassign All.

NOTE: While the dialog is open, you can undo any assignments you’ve made, one a time, or redo them, using Command-Z and Command Shift-Z respectively.
NOTE: While the dialog is open, you can undo any assignments you’ve made, one a time, or redo them, using Command-Z and Command Shift-Z respectively.
NOTE: While the dialog is open, you can undo any assignments you’ve made, one a time, or redo them, using Command-Z and Command Shift-Z respectively.
When you’re done making bus assignments, click the Close button to close the dialog.
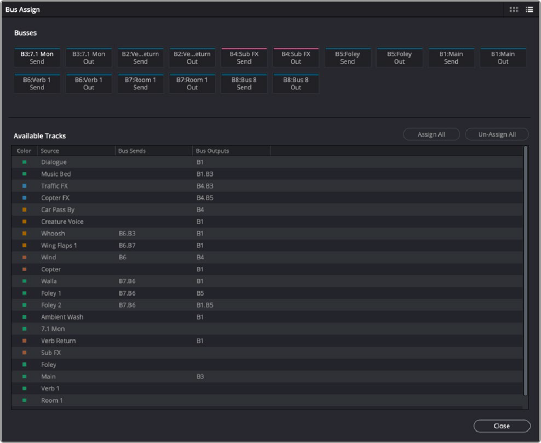
Bus Assign window