< Previous | Contents | Next >
4 Click the Patch button at the bottom of the window, and your recording setup will be patched.
5 Continue steps 2 and 3 until you’ve patched all the inputs you want to record from to all of the tracks that you want to record onto. You can patch as many inputs to as many tracks as your system is set up to accommodate. In this example, there are twelve available audio sources, and the first four have been patched.
6 When you’re finished, close the window.
Arming Tracks
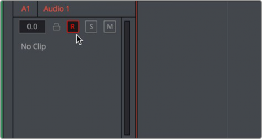
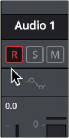
To record on a track, it must be armed. You should note that it’s impossible to arm a track that hasn’t been patched first, so make sure you’ve patched the audio source you want to record from to the track you want to record to first. Then arming that track is as simple as clicking the R button in the track header controls, or in the channel strip for that track in the Mixer.
(Left) The arm button turned on in the track header, (Right) the arm button turned on in the channel strip
Once a track has been armed, you’re ready to record.
Record Name Prefix
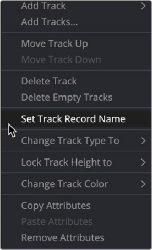
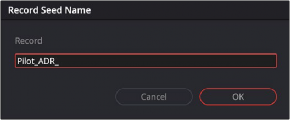
A right-click on the designated record track header has the option to set a recording name prefix to the recordings for that track. This is a useful way to keep tabs of the various recordings required by your project. For instance, if recording ADR you can add a prefix for each character’s recordings as in the example below for a character named Pilot.
![]()
Right-clicking a track header reveals the Set Track Record Name option
Example of a recording name prefix for a character called Pilot