< Previous | Contents | Next >
4 In the Cue Editing section, choose the character who’s speaking that cue from the Character drop- down (only names that have been entered in the Setup tab appear in this list).
5 If necessary, select the text field below, and type the dialog that needs to be re-recorded.
6 Repeat steps 2 through 5 until you’re finished creating all the cues you intend to re-record. If you need to edit any cue, simply click to select that cue, and edit it in the Cue Editing section above.
Importing Cues
If you or an assistant has already created a Cue list using a spreadsheet with separate columns for character names, dialog, and In/Out timecode values, then you can also create a Cue list by importing this data from an exported .csv file.
To import a .csv file to the Cue list:
1 Choose Import Cue List from the ADR option menu, then use the dialog to choose the .csv file containing the Cue list you were given, and click Open.
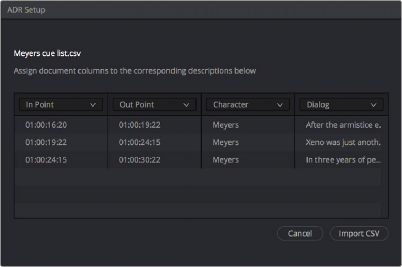
2 An ADR Setup dialog appears, showing the data from the .csv file previewed as a series of columns. This lets you see if each column of incoming data is being assigned correctly. If it’s not, you can reassign each column of the incoming data to the correct column of the ADR panel.
Correct formatting for Cue lists you want to import is to have no header text, and to enter information using one row per cue, with four individual columns for In timecode, Out timecode, Character Name, and Dialog. If any of these columns are transposed, you can correct this by choosing the correct data type for each column from the drop-down menus at top.
Dialog for rearranging columns of cue data, if necessary
3 Click Import CSV. The cues should appear in the Cue list.
— Choose Export Cue List from the ADR option menu, choose a location to save the file, and click Save.