< Previous | Contents | Next >
Once the bounced audio is opened in the external application, you can process it however you need to and bake in any changes made by saving/rendering/outputting and overwriting the original copied audio media file. DaVinci Resolve detects when changes have been made, and the altered result is automatically reimported as an additional audio layer on top of the original clip in the Timeline.
The way an audio application is configured in the DaVinci System Preferences dictates how the bounced audio file is passed to the external program. There are three choices:
— Command Line: As a command line parameter, if your audio application is able to be run from the Terminal.
— Clipboard: By placing the path to the bounced file in the clipboard, so you can paste it into the application which has been automatically launched, or import it via a File > Open dialog.
— Reveal: By revealing the bounced copy in the file manager of your workstation, so you can drag and drop it onto the application which has been automatically launched.
Exporting Audio Clips to External Files
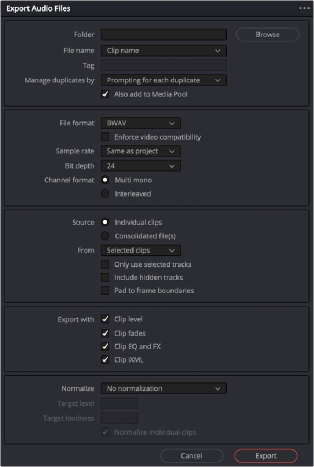
For any workflow where you need to write clips from the Timeline to external files with extensive file altering capabilities, you can use the Export Audio Files command.
1 Select one or more clips in the Timeline.
2 Right-click the desired selected files and choose Export Audio Files from the contextual menu.
3 When the Export Audio Files dialog appears, choose the following:
a) Click Browse to choose a location to save the exported audio files.
b) (Optional) Enter a tag and one of the various Name options.
c) Choose a File Format, Sample Rate, and Bit Depth for the exported files.
d) Choose a Channel Format of Multi-Mono or Interleaved for the exported files.
e) Choose a Source of Individual Clips or Consolidated Clips; a drop-down menu further defines the ranges of the complete timeline, a selected range, or just the selected clips.
f) Checkboxes can further define using only the selected tracks, including hidden tracks and padding to frame boundaries.
g) When exporting you can choose to include the Clip Level, the Clip Fades, the Clip EQ and FX, and the Clip iXML.
h) The exported files can be normalized to predetermined target levels and target loudness values with all of the standards offered throughout the Fairlight page.