
< Previous | Contents | Next >
— To see the editable audio samples: Zoom all the way into an audio clip until you see the sample control points, using either Command-Plus or Command-Minus, the scroll wheel of your pointing device, or by holding down the ZOOM button of your Fairlight editing panel and turning the JOG/EDITING wheel.
— To edit a single audio sample: Click and drag that audio sample up or down to change its height.
— To edit a section of samples: Click and drag horizontally left or right across the samples you want to edit to “redraw” the waveform any way you’d like.
— To reset all edited samples to their original state: Right-click an audio clip with edited samples, and choose Reset Edited Samples from the contextual menu.
Black points show the previous levels when samples have been edited in a clip
Sample editing can be undone, just like any other editing procedure, as the edited sample points are stored non-destructively within the DaVinci Resolve project.
Waveform Zero Crossing Indicator
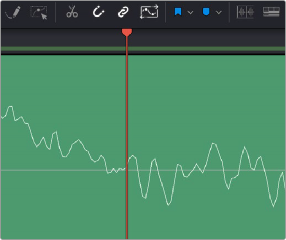
Waveforms have a zero crossing indicator line. Since a waveform is an image representation of sound continually moving positive to negative, the zero crossing point is the level at which that fluctuation occurs. When zooming into a waveform at the sample level, the waveform will display the zero crossing line to enable precise editing.
The zero crossing is a useful feature when editing audio, since clean edits are made at the zero crossing to avoid inducing clicks or pops. A crossfade between two audio clips automatically brings both sides of the fade to the zero crossing.
![]()
The center line in the waveform indicator is the zero crossing.