
< Previous | Contents | Next >
— Frames Per Second: A flywheel control that syncs with the Speed % control showing the FPS relative to the speed change.
— Duration: Indicates the new timing of the clip.
— Ripple Sequence: When checked this moves all the media after the action to ripple edit to the new duration.
NOTE: When in the Speed Change controls, do not use the freeze frame option. This will negatively affect the selected audio file.
NOTE: When in the Speed Change controls, do not use the freeze frame option. This will negatively affect the selected audio file.
NOTE: When in the Speed Change controls, do not use the freeze frame option. This will negatively affect the selected audio file.
— Pitch Correction: When checked this maintains the original pitch of the clips when speed changed. When unchecked the audio will speed up or slow down with the speed adjustment. The slower the speed change, the lower the pitch; the higher the speed change, the higher the pitch.
Equalizer Controls
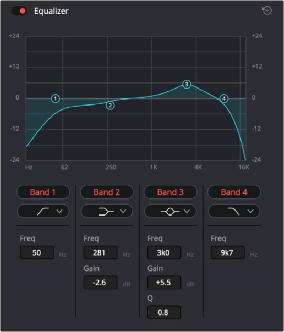
Each audio clip in the timeline has a four-band equalizer that has both graphical and numeric controls for boosting or attenuating different ranges of frequencies within that clip, before it even gets to
the EQ built into the mixer. Each band has controls for the filter type (Bell, Lo-Shelf, Hi-Shelf, Notch), Frequency, Gain, and Q-factor (sharpness of the band), with the available controls for each band of EQ changing depending on the filter type.
When a channel strip’s EQ is enabled, the equalization curve that’s being applied is displayed in the Mixer. A channel strip’s EQ settings affect all the clips on that track, so you must open the EQ window to make those modifications.
The channel strip’s EQ indicator