< Previous | Contents | Next >
By default, the Audio Mixer is divided into two sections, one for tracks (at left) and one for busses (at right).
If you have more tracks and busses than can be displayed all at once given the width of your computer display, then each half of the Mixer has independent scroll bars so you can choose which tracks and which busses you want to see next to one another. You can also remove the split between sections and have a single, continuously scrollable view with all tracks, or change the order or split point for
the channels.
FlexBus Routing and Mixing
The Fairlight audio engine bussing system is called FlexBus. As its name suggests, FlexBus offers a hight level of flexibility for bus types and signal routing. DaVinci Resolve Fairlight’s older Fixed Bus configuration (prior to DaVinci Resolve v17) offered a more limited fixed bus topology, and can still be used, but FlexBus makes it possible to patch outputs and/or sends in any way required, as dictated by your project.
With FlexBus, each track can output to up to ten busses and sends with additional level and pan controls to a further ten busses. Busses can be sent to other busses up to six layers deep, facilitating complex stem building, processing, and allowing discrete deliverables. For mor information see Chapter 167, “Setting Up Tracks, Busses, and Patching.”
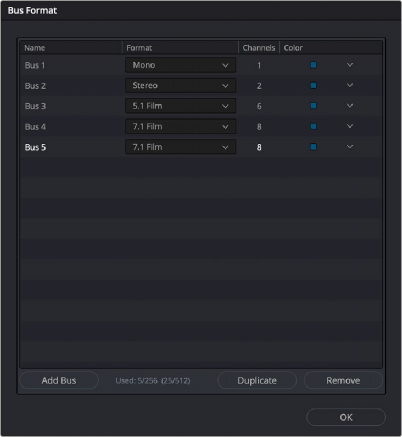
What is a Bus?
A bus is simply a common signal connection point in an audio mixer. Busses can be mono, stereo, or any larger format, like 5.1 or Dolby Atmos 9.1.6 (where 16 audio signals are used). Bussed connections are mix points for the audio, allowing each audio track feeding their signals to the bus to be summed together to create a master output for that bus.
Bus-to-Bus Routing
A mix may use a single bus (for example, the default stereo Main 1 bus may be all that you need if you’re doing basic stereo mixing). Or you can create “submixes” where multiple busses feed into other busses to create a master mix. For example, you might have a dialogue bus, an effects bus, and a music bus so you have control over those elements separately via the bus “masters” for each, then feed the 3 masters into a main output bus for final mix rendering.
You may want to route the output of a bus to an audio track to record the resulting signal, or route to monitor speakers to listen to the real time output. Finally, the Deliver page can render the output of your designated master bus to create a final bounced file.
The FlexBus structure allows for many different bus track types to be created or changed.
User-definable busses allow for bus-to-bus, bus-to-track, or track-to-bus routing, with each bus having the ability to sum together signals from mono to fully immersive formats (such as Dolby Atmos) at your discretion. As with any and all of the audio track types in Fairlight, you can change bus types at any time if needed.
The power of the FlexBus system is that it allows you to direct signals to many different places at one time to achieve complex mixing scenarios. Perhaps you need to generate two mixes that are identical in content but need to be of different output levels. You can designate two mix busses, one with a target output level of -14 LUFS and one with a target output level of -24 LUFS. The final mix signal is sent to one bus that is then broken into two more busses, one with a limiter set to accommodate the -14 LUFS mix and one set to the correct level for the -24 LUFS mix, allowing you to create these two different mixes at one time.
FlexBus supports expanded Dolby Atmos capabilities; for more information see Chapter 180, “Immersive Audio Workflows.”
FlexBus bus routing buttons
Legacy Fixed Bussing
Prior to DaVinci Resolve 17, the Mixer had a fixed topology with specific, fixed numbers of sends, submix busses, and main outputs. DaVinci Resolve still supports this older “legacy” bussing topology to maintain compatibility with earlier projects.
With the current FlexBus bussing, the Mixer looks slightly different. The Aux panel on the legacy Mixer has been renamed Bus Send, and the Main/Submix panel has been changed to Bus Outputs.
In the legacy Fixed Bus view:
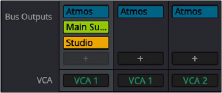
— Each audio track’s channel strip has a set of Main and Submix bus buttons that let you assign the audio output by that channel strip to a Sub (typically used to combine different subsets of tracks into submixes) or to a Main (typically used to output or render overall mixes).
— Each Sub and Aux’s channel strip has a set of Main buttons so that different combinations of Subs can be assigned to each Main. Main channel strips have no buttons because, from a bussing perspective, they’re the final output.
— Main and Submix buttons let you assign tracks to busses, and busses to other busses.
![]()
Main and Submix bus buttons

Using Legacy Fixed Busing
If you want to work using the previous method of Fixed Bus mapping, you can do so for new projects by accessing the Project Settings > Fairlight panel, and turning on the “Use fixed bus mapping” checkbox. If you’re starting work in FlexBus, this checkbox can only be enabled in new projects in which no timelines have yet been created. Older projects that were created with Fixed Bus mapping have this setting enabled by default to preserve the previous mix.
Converting Older Fixed Bus Projects to FlexBus
Older Fixed Bus projects can be converted to FlexBus by doing the following:
— Open Project Settings > Fairlight.
— Under the Bussing heading, uncheck “Use fixed bus mapping.”
— A dialog will appear, allowing you to convert the project to FlexBus.