< Previous | Contents | Next >
The second set of dynamics parameters let you apply compression, which detects the envelope of an audio signal in order to automatically change its level. A compressor is used to compress a signal’s dynamic range by reducing differences in level between the loudest and quietest parts of the input signal.
Compression can be used to raise the signal’s overall level to be boosted without clipping, increasing perceived loudness. Compression is often used to allow voices to have more presence within a mix, and to smooth out changes in the levels of tracks with too much dynamic range for the task at hand.
However, “overcompressing” can remove natural dynamics of a sound, or remove too many of the natural transients (energy bursts or “attacks”) that give the original sound its character. But more extreme compression can also be used creatively to change a sound’s character to give it more perceived attack, change its release characteristic, or change the balance and blend of the
environment a sound is recorded in (for example, compressing a source signal with a higher ratio and fast release to raise up the presence of a room sound that the source is recorded in).
— Compressor: Enables the Compressor.
— Threshold: Sets the signal level above which compression is applied. The default is –15 dB. The range is –50 to 0 dB.
— Ratio: Adjusts the compression ratio. This sets the gain reduction ratio (input to output) applied to signals which rise above the threshold level. The default is 2.0:1. The range is 1.0:1 to 10:1. Commonly used ratios for dialogue processing are 2.5:1 to 3:1. With a 3:1 ratio, for every 3 dB of increase in signal above the threshold, 1 dB is output.
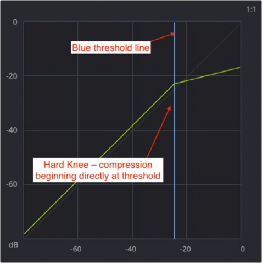
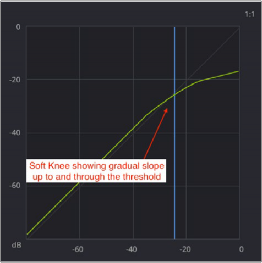
— Knee: Affects behavior with signals that are very near the threshold. The knee can smooth out the transition between where you don’t hear any compression and when the “hard compression” (the set ratio) starts.
— The Knee: Control allows a smoothing of the slope of the threshold point. You can see Knee’s effect on the graph when using a ratio like 4:1 and adjusting Knee; the graph will show the line where compression “kicks in” being rounded off by higher values of the Knee control.
— Normally, compression begins directly above the threshold. This is known as a “hard knee.” For a smoother and less audible handling of compression, you can set a softer knee, so the compression turns on gradually as signals approach the threshold and rise above.
![]()
Hard and Soft Knee graphs
— Mix: Adjusts the mix between the compressed (0) and non-compressed input signal (100), allowing you to balance the compressed signal against the original, unaffected sound. For example, if you’re creating a large explosion impact sound effect, it might sometimes be useful to mix in just a bit of the original, uncompressed signal with a more compressed version to preserve more of the original character along with compressed version. The default is 0 (all compression, no original signal).
— Attack: Adjusts how quickly the compression will occur when a signal exceeds the threshold. The default is 1.4 ms. The range is 0 to 100 ms.
— Hold: After the attack phase has been completed, the Hold parameter controls how long this initial attenuation is maintained, before entering the release phase. Defaults to 0 ms. The range is from 0 to 4000 ms.
— Release: Adjusts how quickly or gradually the sidechain detector stops applying compression when a signal falls back below the threshold. The default is 93 ms. The range is 50 to 4000 ms (4 seconds).
— Send: Enable Send when you want to use the audio levels of the currently selected track to attenuate those of another track using sidechain compression. For example, you can turn on the compressor and enable Send for all tracks with dialogue, in order to use those levels to attenuate the levels of another track containing music.
— Listen: Enable Listen when you want to use the audio levels of tracks that you set to Send to attenuate the levels of your currently selected track. If there are no tracks with Send enabled, then the current track is compressed as usual, using itself as the sidechain.
Sidechaining and “Ducking” with Dynamics
The built-in Dynamics module allows you to set up “sidechaining” compression. A “sidechain” refers to a control signal path that allows a source signal to be used to control the response of another

NOTE: DaVinci Resolve presently supports sidechaining exclusively on the built-in dynamics processor.
NOTE: DaVinci Resolve presently supports sidechaining exclusively on the built-in dynamics processor.
NOTE: DaVinci Resolve presently supports sidechaining exclusively on the built-in dynamics processor.
processor, in most cases, dynamics processing. This is done by feeding the control signal into a special “side chain input” on the processor you want to affect.
To use sidechain compression to automatically “duck” music in the presence of dialogue on other tracks:
![]()
1 Edit dialogue into one track of the Timeline, and edit overlapping music into another track of the Timeline.
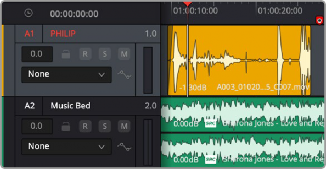
Choosing the track header in the Fairlight timeline to add dynamics
2 Click the track header or channel strip of a track with dialogue to select that track, and then double-click the Dynamics Indicator on the channel strip in the Mixer to open the Dynamics window.
3 Turn on the Send button to automatically send all levels from that track to the sidechain of a Compressor on another track (it’s not necessary to turn on the Compressor for this). If you hover the pointer over the Send button, a tooltip will show you which tracks of the current timeline are set to Send. This enables your sidechain “feed.”
4 If you have multiple tracks with dialogue, you can repeat steps 2-3 for each so that the output levels of all dialogue are sent to the sidechain.
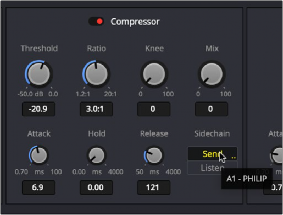
Enabling sidechain Send in the Compressor of a track with dialogue
5 Next, click the track header or channel strip of a track with music to select that track. If you haven’t closed the Dynamics window, the header will show you that the Dynamics controls are now those of the newly selected track.
6 Turn on Compressor, and then turn on the Listen button to connect the “Send” signals from any of the tracks you were feeding to the sidechain of the Compressor on this track. If you hover the pointer over the Listen button, a tooltip will show you which tracks of the current timeline are being received by Listen.
![]()
7 At this point, you need to lower the Threshold and raise the Ratio controls to the appropriate levels so that as dialogue is heard, the music is compressed in the way you’d like to hear it. You may also want to raise Hold a bit so this gain reduction doesn’t fluctuate too wildly, and raise Release slightly so the volume adjustment doesn’t end too abruptly.
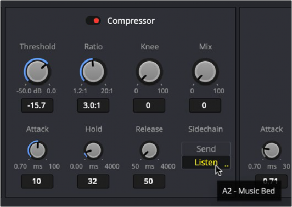
Enabling side chain Listen on the Compressor assigned to a music track