< Previous | Contents | Next >
Bus Sends let you route a channel strip’s source signals to a bus destination, with control over level, pan, mute, and pre/post fader routing. You can create bus sends on channels that go to any bus destination you’ve created.
Some common mixing tasks that sends can be useful for:
— Submixing: For example, to render separate mixed outputs that are different formats, such as stereo, 5.1 surround, or Atmos, all at the same time.
— Feeding signals to a shared effect: For example, route to a reverb plugin, where post fader sends on various mixer channels feed a reverb placed on a bus channel strip by varying amounts.
— Headphone cue mixes: Create separate pre-fader mixes for the talent so you don’t disturb what you’re listening to on your main monitor speakers.
Creating Sends
To create a Bus Send and access its controls:
— Click on the assign button with the plus sign (+) in the Bus Sends area of the Mixer.
— A drop-down menu appears with a list of busses; select one to assign.
— Your send is now created.
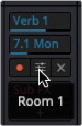
You can hover over the rectangular name button and access a disable/bypass button, an access icon to show the Bus Send window for the channel, and an “x” to delete the send. A tooltip appears showing the send bus name.
Hovering over the rectangular name button will show send controls.
Accessing the Bus Sends Window
You can access the Bus Sends window to control a channel’s sends by clicking in the center of the name button.
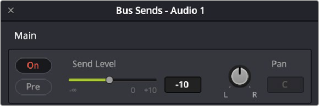
Bus Send window controls