< Previous | Contents | Next >
be accurately played back with extreme accuracy. Recording automation has real advantages over drawing as you’re able to perform the changes you want to hear against picture as actions occur, which can make the process intuitive and fast.
In this way, you can create a dynamic mix where different audio level, pan, and EQ, dynamics, and other audio processing settings change over time to fade music up or down against effects or dialogue, pan the sound effect of a car driving by from one speaker position to another, or gradually increase the strength of that reverb effect as your character walks into that long, dark cavern.
While the recording of keyframe automation is most commonly associated with either the onscreen mixer or the Fairlight console, you can also record automation using controls found in the Inspector, or using the controls of the Pan, EQ, and Dynamics plugin effects, thereby enabling you to record automation for the various audio effects that you’ve applied to a track.
What Can Be Automated
Automation can be recorded for nearly every control in the Mixer for channel strips corresponding to individual tracks, track groups, or busses, including fader, sends, mute, and panning. Additionally, you can record automation for controls found in audio plugins that you use in your mix.
Why Use Track Automation?
If you’re a video editor, you may be more familiar with using clip-based automation to make changes to your audio mix, but this approach has limitations. Sometimes there are global changes you may want to make to a track over the Timeline, or want to adjust groups of tracks at once (see Chapter 175, “Track Groups.” ).
And when working with time-based effects like reverb or a repeating delay, you may want to adjust the level of “trails” on these effects dynamically as the track evolves. For example, you may have a situation where a scene changes perspective from a larger space to a smaller one, and the room ambience or tonal quality of the dialogue needs to change immediately or over time characters move through the scene.
This is where track automation techniques (whether drawing or recording the movement of controls) can be powerful and creatively inspiring.
Drawing Mix Automation
Automaton can be drawn in the Timeline for any parameter by globally enabling automation recording and playback, viewing a parameter to be automated, then drawing the automation in the Timeline.
![]()
Enabling and Viewing Automation
The Toggle Automation button, to the right of the transport controls, turns automation recording and playback on and off. It must be enabled to draw or record track-based automation and to see busses on the Timeline.

The Automation Enable button

TIP: You can quickly enable/disable automation safe on or off for a selected group of channel strips, or to all channel strips, by holding down the Option key (Mac) or the Alt key (Windows) for all selected tracks or Command-Option (Mac) or Control-Alt (Windows) for all mixer channel strips prior to performing the operation. These shortcuts can save a lot of time in your workflow.
TIP: You can quickly enable/disable automation safe on or off for a selected group of channel strips, or to all channel strips, by holding down the Option key (Mac) or the Alt key (Windows) for all selected tracks or Command-Option (Mac) or Control-Alt (Windows) for all mixer channel strips prior to performing the operation. These shortcuts can save a lot of time in your workflow.
TIP: You can quickly enable/disable automation safe on or off for a selected group of channel strips, or to all channel strips, by holding down the Option key (Mac) or the Alt key (Windows) for all selected tracks or Command-Option (Mac) or Control-Alt (Windows) for all mixer channel strips prior to performing the operation. These shortcuts can save a lot of time in your workflow.
Automation View
Audio tracks normally display an arrangement of clips on the Timeline (“Clips View”). In Clips View, clips can be placed or edited, and clip gain for individual clips can be adjusted (See Chapter 172, “Audio Clip Specific Inspector Adjustments.” ). Effects can also be added to clips, which can be managed in the Inspector.
Tracks can also show an Automation View, which appears when the automation button is enabled. When active, a drop-down menu appears under the track controls in the track header. By default, the menu will display “None,” indicating you are working with clips only; no automation data will appear.
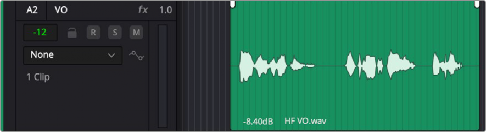
Fairlight Automation View showing “None”
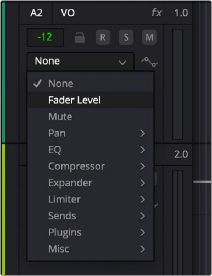
Clicking on the drop-down menu allows you to choose an automation parameter to view or edit. Choices are included for all parameters that can be controlled on a track, including fader, sends, pan, mute, and built-in dynamics and EQ as well as AU or VST plugin effects.
![]()
Fairlight Automation View menu choices

NOTE: When in Automation View you can still move and trim clips, but cut/copy/paste and delete operate on automation keyframe data only. When in Automation View, timeline- based clip gain keyframe adjustment is not available, but overall clip gain can still be adjusted using Volume slider in the Audio tab of the Inspector.
NOTE: When in Automation View you can still move and trim clips, but cut/copy/paste and delete operate on automation keyframe data only. When in Automation View, timeline- based clip gain keyframe adjustment is not available, but overall clip gain can still be adjusted using Volume slider in the Audio tab of the Inspector.
NOTE: When in Automation View you can still move and trim clips, but cut/copy/paste and delete operate on automation keyframe data only. When in Automation View, timeline- based clip gain keyframe adjustment is not available, but overall clip gain can still be adjusted using Volume slider in the Audio tab of the Inspector.
Once a parameter is chosen, the automation view changes so that the focus is on editing track automation data rather than manipulating clips. The clips darken and the automation data line is shown in light gray. When automation is drawn or recorded for the parameter, the line will change to bright green.
Vector-based Automation
Audio keyframe automation is vector-based, so levels will smoothly ramp between any 2 points on the Timeline based on the direction of the change in control value and the time between the points.
For example, if you have a single keyframe setting fader level to 0 dB that occurs at 01:00:20:00 on the timeline, and then add a point at at 01:00:28:00 at -10.5 dB, the level will change smoothly between
0 dB and -10 dB over the 8 seconds between the 2 points.
Creating Curves
Keep in mind that audio automation keyframes are not Bezier keyframes, so they only let you create a single level adjustment at that point in time. If you make a large adjustment with only a single new keyframe, you can end up with an abrupt level change, or level changes that don’t have a curve you may want (exponential changes can be particularly useful on fade ins or outs to get a natural result). You can create convex or concave shapes when drawing by adding just a few keyframes to create your curve, or you can perform the change exactly as you want by recording the automation (see “Recording Mix Automation” later in this chapter).
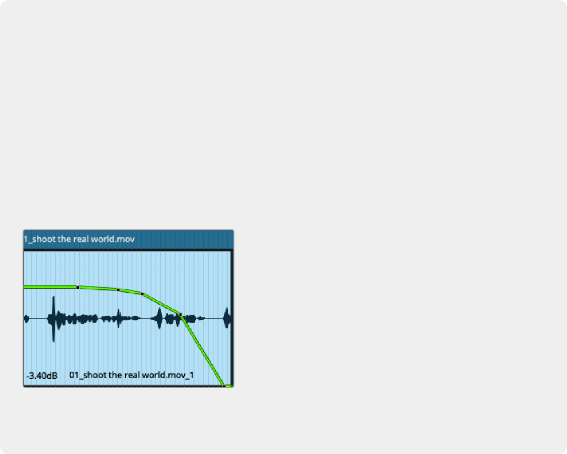
A fade out transition with 5 keyframes for an exponential shape
A fade out transition with 5 keyframes for an exponential shape
A fade out transition with 5 keyframes for an exponential shape
![]()
This allows you to draw individual keyframes to quickly construct different transition shapes, such as fade ins or outs, with just a few points, or adjust them up or down by specific amounts quickly and easily.
Track Automation Line
Audio automation on a track is represented by a line that extends over length of the Timeline, called the automation line, or “curve.” The level of the line can be changed by dragging, entering keyframes one at a time, or using the Pencil tool to draw a series of keyframes.


Sample Accuracy: Audio keyframes allow creation of precisely placed parameter changes on timeline tracks. On the Fairlight page, audio keyframes are sample accurate, meaning they can be placed at any sample location with sub-millisecond precision, allowing more precision than keyframe handling on the Cut and Edit pages. However, sample-accurate audio automation data created on the Fairlight page can be accurately played back on the other pages.
Sample accuracy is important when working to picture as the location of audio events often does not fall on exact frame or sub-frame boundaries.
Automation line for fader level showing multiple keyframes
Working with Audio Keyframes on the Timeline
To draw automated changes to any audio control:
— Enable the Automation button to see Automation View on all audio tracks.
— On the track(s) where you want to create automation, choose the parameter you wish to automate in the Automation type drop-down menu in the track header.
— Using Focus Mode’s Multi tool allows you to draw automation using the up/down arrow cursor (to adjust an overall curve), enter or delete keyframes one a time using modifier keys, create different curves depending on individual keyframe position, select and delete a range of keyframes, and more.
Managing keyframes on the automation line is nearly identical to working with clip gain. For more information see Chapter 172, “Audio Clip Specific Inspector Adjustments.”
To add a keyframe:
— Hold down the option key and a plus sign appears. Click to place a keyframe on the automation line.
![]()
To remove a keyframe:

TIP: You can quickly flip between Clips View and Automation View using the keyboard shortcut F4. This can be changed by using the DaVinci Resolve > Customization dialog.
TIP: You can quickly flip between Clips View and Automation View using the keyboard shortcut F4. This can be changed by using the DaVinci Resolve > Customization dialog.
TIP: You can quickly flip between Clips View and Automation View using the keyboard shortcut F4. This can be changed by using the DaVinci Resolve > Customization dialog.
— Hold down Command-option and a minus sign appears. Click on keyframe to delete it.