< Previous | Contents | Next >
Editing Mix Automation Curves
Using Edit Operations
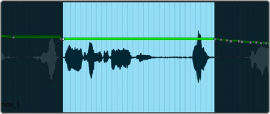
Normal editing operations such as cut, copy, paste, delete, and nudge can all be used on automation keyframe data. When automation data is cut or deleted, the value at either end of the selection
is preserved.
Nudging can be very useful when fine-tuning the location of automation events.
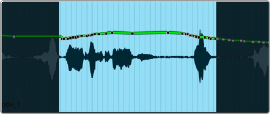
Before and after cut or deletion
Adjusting the Automation Line
Once one or more keyframes are on the automation line, the resulting curve for the entire track can be adjusted. Individual keyframes can be edited up or down using the same techniques as with adjusting clip gain; the whole line can be adjusted, or a selection can be affected.
If you adjust the last keyframe on a line with multiple keyframe points, the line will change from that point onwards to the newly set level.
Adjusting an individual keyframe changes the line from that point onwards.
Adjusting the Entire Line
To adjust the entire line:
— With automation view enabled, click anywhere within the track, and select all automation data on the curve by choosing Command-A.
— Position the cursor close to the line and and the dual arrow cursor appears, allowing the level of the entire line to be adjusted.

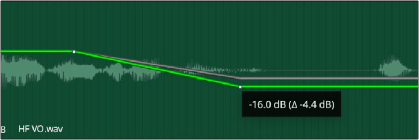
Select all automation to adjust the entire line
Adjusting a Selected Range
You can perform adjustments to only a specific range of the automation curve. This can be useful when you want to make “snapshot” changes for a specific scene.
— Use the Focus Mode Select tool (I-beam cursor) to select the range you want to affect.
— Position the mouse close to any area of the line, and the up/down arrow cursor appears.
— Trim the line up or down. A tooltip will appear showing the current value and a delta to the original value, so any difference in a control’s value can be seen.
— At the bounds of the selection, “bounding keyframes” are automatically created, so the level at the edge of the selection is preserved.
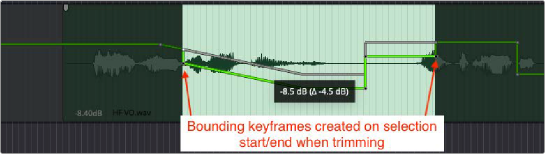
Trimming a selected range of the automation curve

TIP: Hold the Shift key when adjusting levels to maintain precision. When adjusting fader levels this allows .1 dB accuracy, even when working with small track heights.
TIP: Hold the Shift key when adjusting levels to maintain precision. When adjusting fader levels this allows .1 dB accuracy, even when working with small track heights.
TIP: Hold the Shift key when adjusting levels to maintain precision. When adjusting fader levels this allows .1 dB accuracy, even when working with small track heights.
Drawing Automation with the Pencil Tool
The Pencil tool allows automation keyframes to be drawn freely:
— Choose the Pencil tool in the Automation toolbar, or when in Focus mode, hold down Option-Shift to temporarily switch to the Pencil tool.
— Click the mouse and drag to draw keyframes in either direction.