< Previous | Contents | Next >
The Flanger has the following controls:
— Bypass: Toggles this plugin on and off.
— Input mode: (Only visible when the Flanger is inserted on a multi-channel track.) Lets you choose how multiple channels are input to the Flanger. Stereo sets separate Left and Right channels. Mono sums Left and Right to both channels. Left inputs the Left channel only, and Right inputs the Right channel only.
— Modulation: A low frequency oscillator (LFO) used to drive the Flanger effect.
— Waveform (Hz): Specifies the shape of the LFO that modulates the rate of the Flanger. The three choices are Sine (a smooth change in rate), Triangle (a jerky change in rate), and Sawtooth (an abrupt change in rage). Affects the timing of the warble that is added to the sound.
— Rate: Speed of the LFO, affects the speed of the warble that is added to the sound. Low rate values create a slow warble, while high rate values create more of a buzz.
— Depth: Affects the “length” of the warble that is added to the sound. Low values add only the very beginning of a warble, high values add more fully developed warble.
— Width: Consists of a single parameter, Expansion, which sets Left/Right channel length differences, along with the phase offset of modulators.
— Feedback: These controls determine, in large part, how extreme the Flanging effect will be.
— Amount (%): The percentage of signal fed back to the Delay Line. Values can be positive or negative, the default is 0 (no effect). Increasing this parameter adds more of the Flange effect to the signal, lowering this parameter adds more of the inverted Flange effect to the signal. At values closer to 0, only a faint phase shift can be heard in the audio, but at values farther away from 0 (maxing at +/- 99), a gradually increasing warble becomes audible. The type of warble depends on the Modulation controls.
— High Ratio: Determines the attenuation of the echo over time.
— Output: Controls for adjusting the final output from this plugin.
— Dry/Wet (%): A percentage control of the output mix of “dry” or original signal to “wet” or processed signal. 0 is completely dry, 100% is completely wet.
— Output Level (dB): Adjusts the overall output level of the affected sound.
Foley Sampler
The Foley Sampler is a built-in sampler that makes it easy to add sound effects that you want to play using a keyboard, pad, or other MIDI performance device connected to your computer, to add timed sound effects to sync with onscreen visuals. This plugin has been designed to simplify the process of recording performed audio cues on the current track to which the sampler has been added.
![]()
Setting Up the Foley Sampler
Using the Foley Sampler to record samples played with a MIDI controller is easy.
1 Create an audio track for your sound effects or instrument recording.
2 Drag the Foley Sampler onto the track header to assign it to that track. The Foley Sampler window automatically appears. The Fairlight page knows this is an instrument with no inputs to the plugin, so this effect is automatically patched to that track’s input, ready for recording.
3 If you have a MIDI controller of some kind connected to your computer and properly configured, it will appear in the MIDI drop-down menu at the upper-right corner of the Foley Sampler window (next to the Keyboard button). Choose your device from this menu, and the Keyboard button will highlight to show it’s enabled.
At this point, the Foley Sampler is ready to be used, but by default it has no samples loaded to play. The next step is to add sound effects.
Adding Sound Effects
You can add prerecorded sound effects or instruments to the Foley Sampler in the following ways:
— Drag and drop an audio file in a supported format from the file system onto the Foley Sampler window
— Drag and drop a sound effect from the Sound Library onto the Foley Sampler window
— Click the Foley Sampler window’s Option menu and input sounds from your attached drives.
Once you’ve loaded a sound effect of some kind, it’s automatically mapped to the top four keys of your instrument, starting at C2. Pressing a key or pad of your controller will play that sound.
To see the sound’s waveform, click the Sample button at the top of the Sound panel. In this example, there are a series of continuous footsteps recorded in a row that we can use.
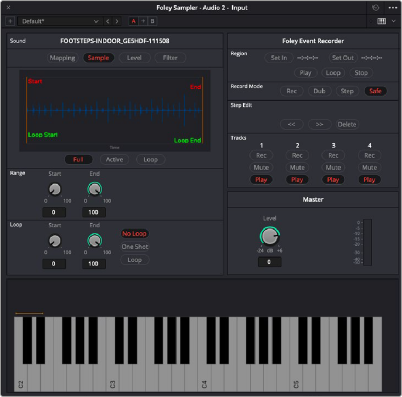
A footsteps recording loaded into the Foley Sampler
Splitting Sound Effects
It’s common to use pre-recorded library sound effects that consist of a series of recorded footsteps, cloth rustles, punches, or other “foleyed” sound recordings, in order to play variations of a specific kind of repetitive sound effect in sync to action that’s happening on screen. The Foley Sampler lets you do this easily.
1 After you’ve loaded a sound effect, click the Foley Sampler window’s Option menu and choose Split Sample to automatically split the current sample into slices based on an analysis of its noise floor, and assign each slice to a set of keys or pads on your selected MIDI device. Continuing with the previous example, each footstep has been split and assigned to a different key.
2 To adjust the timing of each slice of the sound effect that’s been split apart, you can click on the assignment text above the keyboard at the bottom of the window to see that slice in the Sample view.
3 You can adjust the Range Start and Range End parameters to encompass as much or as little of that slice as you want to play back.
4 If you want a sample to loop if a note is held down, you can enable the Loop button, and then adjust the Loop Start and Loop End parameters to choose how much of each slice will loop.
5 To delete slices that aren’t useful, you can select a slice you don’t like and press Shift-Delete to clear that slice from the virtual keyboard.
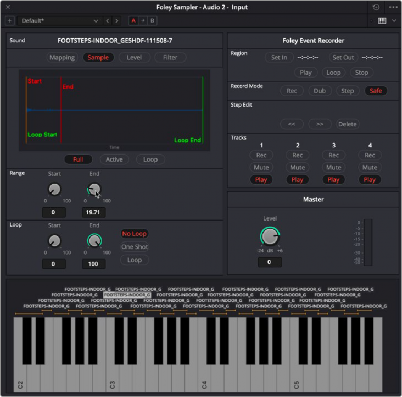
A single slice of the footsteps recording after being split in the Foley Sampler, with the range of the effect adjusted
Assigning Sound Effects Manually
When you first load sound effects into the Foley Sampler, they’re automatically assigned to a series of notes. Each additional sound effect that you load is automatically assigned to the next series of notes to the right. Once all notes are occupied, additional sound effects will shuffle all previous assignments to the left.
You also have the option of manually assigning sound effects that you load. This is useful when you want to manually load a variety of different sound effects all at once (such as a combination of punch sounds, human grunts, and cloth rustles to use in a fight scene), and assign them to particular notes of your choosing.
1 Load a sound effect you want to map.
2 Click the Mapping button to remap the range of notes it corresponds to.
3 Use the Low and High parameters to select a range of notes for the selected sound.
4 You also have the option of tuning the pitch of specific sound effects, if necessary.
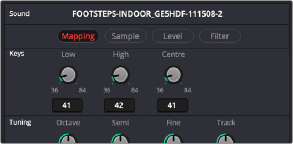
The Mapping controls used to assign a sound to a particular set of notes
Adjusting Sound Effects

TIP: If a sample or slice is set to loop, you can press the Control key and click a key on the virtual keyboard to initiate looping, so you can hear these adjustments as you’re making them.
TIP: If a sample or slice is set to loop, you can press the Control key and click a key on the virtual keyboard to initiate looping, so you can hear these adjustments as you’re making them.
TIP: If a sample or slice is set to loop, you can press the Control key and click a key on the virtual keyboard to initiate looping, so you can hear these adjustments as you’re making them.
If you want to customize a sample or slice further, you can select it above the virtual keyboard and use the controls on the Level panel to control the dynamics of audio playback, or you can use the controls on the Filter panel to EQ the sound.
Playing and Recording Sound Effects
Once you’ve set up the Foley Sampler with sound effects you can play from a MIDI controller, recording those sound effects is simple.
1 Make sure that the “Save clips to” field in the Capture and Playback panel of the Project Settings is correctly set up to record to the desired storage volume, using the Browse button, if necessary.
2 Click the R button in the track header of the audio track to which you applied the Foley Sampler, to put that track into Record Enable mode.